
此示例显示如何使用Azure Provider Terraform Provider的Terraform模块部署Azure Kubernetes服务(AKS)群集和Azure OpenAI服务,以及如何部署Python聊天机器人,该聊天机器人使用Azure AD工作负载标识针对Azure OpenAI进行身份验证,并调用ChatGPT模型的聊天完成API。
你可以在这个GitHub存储库中找到聊天机器人和Terraform模块的代码来部署环境。有关文章的Bicep版本和配套示例,请参阅如何通过Bicep在AKS上部署和运行Azure OpenAI ChatGPT应用程序。
聊天机器人是一种通过聊天模拟与用户进行类似人类对话的应用程序。它的关键任务是用即时消息回答用户的问题。Azure Kubernetes服务(AKS)集群通过Azure专用端点与Azure OpenAI服务通信。聊天机器人应用程序模拟了最初的魔术8球塑料球,看起来像一个用于算命或寻求建议的超大8球。
人工智能应用程序可用于执行总结文章、撰写故事以及与聊天机器人进行长时间对话等任务。这是由OpenAI ChatGPT等大型语言模型(LLM)实现的,这些模型是能够识别、总结、翻译、预测和生成文本和其他内容的深度学习算法。LLM利用从广泛的数据集中获得的知识,使他们能够执行人工智能人类语言教学之外的任务。这些模型在不同的领域取得了成功,包括理解蛋白质、编写软件代码等等。除了在翻译、聊天机器人和人工智能助手等自然语言处理中的应用外,大型语言模型还广泛应用于医疗保健、软件开发和其他各个领域。
有关Azure OpenAI服务和大型语言模型(LLM)的更多信息,请参阅以下文章:
- 什么是Azure OpenAI服务?
- Azure OpenAI服务模型
- 大型语言模型
- 用于示例聊天机器人的Azure OpenAI Terraform部署
- 用于部署Azure OpenAI服务的Terraform模块。
先决条件
- 活动的Azure订阅。如果您没有,请在开始之前创建一个免费的Azure帐户。
- Visual Studio代码与HashiCorp Terraform一起安装在一个受支持的平台上。
- 已安装Azure CLI 2.49.0或更高版本。要安装或升级,请参阅安装Azure CLI。
- 已安装0.5.140或更高版本的aks预览Azure CLI扩展
您可以运行az-version来验证以上版本。
要安装aks预览扩展插件,请运行以下命令:
az extension add --name aks-preview运行以下命令以更新到已发布的扩展的最新版本:
az extension update --name aks-preview架构
此示例提供了一组Terraform模块,用于部署Azure Kubernetes服务(AKS)群集和Azure OpenAI服务,以及如何部署Python聊天机器人,该聊天机器人使用Azure AD工作负载标识针对Azure OpenAI进行身份验证,并调用ChatGPT模型的聊天完成API。Azure Kubernetes服务(AKS)集群通过Azure专用端点与Azure OpenAI服务通信。下图显示了示例部署的体系结构和网络拓扑:

Terraform模块是参数化的,因此您可以选择任何网络插件:
- Azure CNI with static IP allocation
- Azure CNI with dynamic IP allocation
- Azure CNI Powered by Cilium
- Azure CNI Overlay
- BYO CNI
- Kubenet
在生产环境中,我们强烈建议部署具有正常运行时间SLA的专用AKS集群。有关更多信息,请参阅具有公共DNS地址的专用AKS群集。或者,您可以部署公共AKS集群,并使用授权的IP地址范围安全访问API服务器。
Terraform模块部署以下Azure资源:
- Azure OpenAI服务:聊天机器人应用程序使用的具有GPT-3.5模型的Azure OpenAI Service。Azure OpenAI服务为客户提供具有OpenAI GPT-4、GPT-3、Codex和DALL-E模型的高级语言AI,并具有Azure的安全性和企业承诺。Azure OpenAI与OpenAI共同开发API,确保兼容性和从一个到另一个的平稳过渡。
- 用户定义的托管标识:AKS集群用于创建额外资源(如Azure中的负载平衡器和托管磁盘)的用户定义托管标识。
- 用户定义的托管标识:聊天机器人应用程序使用的用户定义托管标识,通过Azure AD工作负载标识获取安全令牌,以调用Azure OpenAI服务提供的ChatGPT模型的聊天完成API。
- Azure虚拟机:Terraform模块可以选择创建一个跳转框虚拟机来管理私有AKS集群。
- Azure堡垒主机:在AKS集群虚拟网络中部署了一个单独的Azure堡垒,为代理节点和虚拟机提供SSH连接。
- Azure NAT网关:一个自带(BYO)的Azure NAT网关,用于管理由AKS托管的工作负载发起的出站连接。NAT网关与SystemSubnet、UserSubnet和PodSubnet子网相关联。群集的outboundType属性设置为userAssignedNatGateway,以指定BYO NAT网关用于出站连接。注意:您可以在创建集群后更新outboundType,这将根据需要部署或删除资源,以将集群放入新的出口配置中。有关详细信息,请参阅创建集群后更新outboundType。
- Azure存储帐户:此存储帐户用于存储服务提供商和服务消费者虚拟机的启动诊断日志。引导诊断是一种调试功能,允许您查看控制台输出和屏幕截图以诊断虚拟机状态。
- Azure容器注册表:一个Azure容器注册表(ACR),用于在所有容器部署的专用注册表中构建、存储和管理容器映像和工件。
- Azure密钥库:一个Azure密钥库,用于存储机密、证书和密钥,这些密钥可以由pod使用用于机密存储CSI驱动程序的Azure密钥库提供程序装载为文件。有关详细信息,请参阅在AKS群集中使用用于机密存储CSI驱动程序的Azure密钥存储提供程序和提供访问用于机密存储的Azure密钥库提供程序CSI驱动程序的身份。
- Azure专用端点:为以下每个资源创建一个Azure专用端点
- Azure OpenAI服务
- Azure容器注册表
- Azure密钥保管库
- Azure存储帐户
- 部署专用AKS集群时使用API服务器。
- Azure专用DNDS区域:为以下每个资源创建一个Azure专用DNS区域:
- Azure OpenAI服务
- Azure容器注册表
- Azure密钥保管库
- Azure存储帐户
- 部署专用AKS集群时使用API服务器。
- Azure网络安全组:托管虚拟机和Azure堡垒主机的子网受用于筛选入站和出站流量的Azure网络安全小组保护。
- Azure日志分析工作区:集中的Azure日志分析的工作区用于收集来自所有Azure资源的诊断日志和指标:
- Azure OpenAI服务
- Azure Kubernetes服务集群
- Azure密钥保管库
- Azure网络安全组
- Azure容器注册表
- Azure存储帐户
- Azure跳转框虚拟机
- Azure部署脚本:部署脚本用于运行install-nginx-via-helm-andcreate-sa.sh Bash脚本,该脚本为示例应用程序创建命名空间和服务帐户,并通过helm将以下包安装到AKS集群。有关部署脚本的详细信息,请参阅使用部署脚本
- NGINX入口控制器
- 证书管理员
- Prometheus
注释
您可以在visio文件夹下找到用于关系图的architecture.vsdx文件。
Azure提供程序
Azure提供程序可用于使用Azure资源管理器API配置Microsoft Azure中的基础结构。有关Azure提供程序支持的数据源和资源的更多信息,请参阅文档。要使用此提供程序学习Terraform的基本知识,请遵循动手入门教程。如果您对Azure提供程序的最新功能感兴趣,请参阅更改日志以获取版本信息和发布说明。
什么是Azure OpenAI服务?
Azure OpenAI服务是微软Azure提供的一个平台,提供由OpenAI模型提供的认知服务。通过该服务可用的模型之一是ChatGPT模型,它是为交互式会话任务设计的。它允许开发人员将自然语言理解和生成功能集成到他们的应用程序中。
Azure OpenAI服务提供了对OpenAI强大语言模型的REST API访问,包括GPT-3、Codex和Embeddings模型系列。此外,新的GPT-4和ChatGPT型号系列现已全面上市。这些模型可以很容易地适应您的特定任务,包括但不限于内容生成、摘要、语义搜索和自然语言到代码的翻译。用户可以通过REST API、Python SDK或我们在Azure OpenAI Studio中的基于web的界面访问该服务。
Chat Completion API是Azure OpenAI服务的一部分,它为与ChatGPT和GPT-4模型交互提供了专用接口。此API目前正在预览中,是访问这些模型的首选方法。GPT-4模型只能通过此API访问。
OpenAI的GPT-3、GPT-3.5和GPT-4模型是基于提示的。对于基于提示的模型,用户通过输入文本提示与模型交互,模型会以文本完成作为响应。这个完成是模型对输入文本的延续。虽然这些模型非常强大,但它们的行为对提示也非常敏感。这使得快速构建成为一项需要发展的关键技能。有关详细信息,请参见提示工程简介。
快速构建可能很复杂。在实践中,提示的作用是配置模型权重以完成所需任务,但它更多的是一门艺术而非科学,通常需要经验和直觉才能制作出成功的提示。这篇文章的目的是帮助你开始这个学习过程。它试图捕获适用于所有GPT模型的一般概念和模式。然而,重要的是要理解每个模型的行为都不同,因此学习可能不平等地适用于所有模型。
提示工程是指为大型语言模型(LLM)创建名为提示的指令,例如OpenAI的ChatGPT。LLM具有解决广泛任务的巨大潜力,利用即时工程可以使我们节省大量时间,并促进令人印象深刻的应用程序的开发。它是释放这些巨大模型的全部功能、改变我们互动方式并从中受益的关键。有关详细信息,请参见提示工程技术。
部署Terraform模块
在Terraform文件夹中部署Terraform模块之前,请在Terraform.tfvars变量定义文件中为以下变量指定一个值。
name_prefix            = "magic8ball"
domain                 = "contoso.com"
subdomain              = "magic"
namespace              = "magic8ball"
service_account_name   = "magic8ball-sa"
ssh_public_key         = "XXXXXXX"
vm_enabled             = true
location               = "westeurope"
admin_group_object_ids = ["XXXXXXXX-XXXX-XXXX-XXXX-XXXXXXXXXXXX"]
描述
- prefix:指定所有Azure资源的前缀。
- domain:指定用于通过NGINX入口控制器公开聊天机器人的入口对象的主机名的域部分(例如,subdomain.domain)。
- subdomain:指定用于通过NGINX入口控制器公开聊天机器人的入口对象的主机名的子域部分。
- namespace:指定访问Azure OpenAI服务的工作负载应用程序的命名空间。
- service_account_name:指定访问Azure OpenAI服务的工作负载应用程序的服务帐户的名称。
- ssh_public_key:指定用于AKS节点和jumpbox虚拟机的ssh公钥。
- vm_enabled:一个boleean值,用于指定是否在AKS集群的同一虚拟网络中部署jumpbox虚拟机。
- location:指定部署Azure资源的地区(例如西欧)。
- admin_group_object_ids:当部署具有Azure AD和Azure RBAC集成的AKS群集时,此数组参数包含将具有群集管理员角色的Azure AD组对象ID的列表。
我们建议从预先存在的Azure密钥库资源中读取敏感配置数据,如密码或SSH密钥。有关更多信息,请参阅在Terraform中引用Azure密钥库机密。
OpenAI Terraform 模块
下表包含用于部署Azure openai服务的openai.tf Terraform模块中的代码。
resource "azurerm_cognitive_account" "openai" {
  name                          = var.name
  location                      = var.location
  resource_group_name           = var.resource_group_name
  kind                          = "OpenAI"
  custom_subdomain_name         = var.custom_subdomain_name
  sku_name                      = var.sku_name
  public_network_access_enabled = var.public_network_access_enabled
  tags                          = var.tags

  identity {
    type = "SystemAssigned"
  }

  lifecycle {
    ignore_changes = [
      tags
    ]
  }
}

resource "azurerm_cognitive_deployment" "deployment" {
  for_each             = {for deployment in var.deployments: deployment.name => deployment}

  name                 = each.key
  cognitive_account_id = azurerm_cognitive_account.openai.id

  model {
    format  = "OpenAI"
    name    = each.value.model.name
    version = each.value.model.version
  }

  scale {
    type = "Standard"
  }
}

resource "azurerm_monitor_diagnostic_setting" "settings" {
  name                       = "DiagnosticsSettings"
  target_resource_id         = azurerm_cognitive_account.openai.id
  log_analytics_workspace_id = var.log_analytics_workspace_id

  enabled_log {
    category = "Audit"

    retention_policy {
      enabled = true
      days    = var.log_analytics_retention_days
    }
  }

  enabled_log {
    category = "RequestResponse"

    retention_policy {
      enabled = true
      days    = var.log_analytics_retention_days
    }
  }

  enabled_log {
    category = "Trace"

    retention_policy {
      enabled = true
      days    = var.log_analytics_retention_days
    }
  }

  metric {
    category = "AllMetrics"

    retention_policy {
      enabled = true
      days    = var.log_analytics_retention_days
    }
  }
}
Azure认知服务为通过Azure门户、Azure云外壳、Azure CLI、Bicep、Azure资源管理器(ARM)或Terraform创建的每个资源使用自定义子域名称。与特定Azure区域中所有客户通用的区域端点不同,自定义子域名称对资源是唯一的。需要自定义子域名称才能启用Azure Active Directory(Azure AD)等功能进行身份验证。在我们的案例中,我们需要为我们的Azure OpenAI服务指定一个自定义子域,因为我们的聊天机器人应用程序将使用Azure AD安全令牌来访问它。默认情况下,main.tf模块将custom_subdomain_name参数的值设置为Azure OpenAI资源的小写名称。有关自定义子域的更多信息,请参阅认知服务的自定义子域名称。
此地形模块允许您在deployment参数中传递一个数组,该数组包含一个或多个模型展开的定义。有关模型部署的更多信息,请参阅使用Azure OpenAI创建资源并部署模型。
或者,您可以使用Terraform模块来部署Azure OpenAI服务。以部署Azure OpenAI服务资源。
专用端点
main.tf模块为以下每个资源创建Azure专用终结点和Azure专用DNDS区域:
- Azure OpenAI服务
- Azure容器注册表
- Azure密钥保管库
- Azure存储帐户
特别是,它为Azure OpenAI服务创建了一个Azure专用端点和Azure专用DNDS区域,如以下代码片段所示:
module "openai_private_dns_zone" {
  source                       = "./modules/private_dns_zone"
  name                         = "privatelink.openai.azure.com"
  resource_group_name          = azurerm_resource_group.rg.name
  tags                         = var.tags
  virtual_networks_to_link     = {
    (module.virtual_network.name) = {
      subscription_id = data.azurerm_client_config.current.subscription_id
      resource_group_name = azurerm_resource_group.rg.name
    }
  }
}

module "openai_private_endpoint" {
  source                         = "./modules/private_endpoint"
  name                           = "${module.openai.name}PrivateEndpoint"
  location                       = var.location
  resource_group_name            = azurerm_resource_group.rg.name
  subnet_id                      = module.virtual_network.subnet_ids[var.vm_subnet_name]
  tags                           = var.tags
  private_connection_resource_id = module.openai.id
  is_manual_connection           = false
  subresource_name               = "account"
  private_dns_zone_group_name    = "AcrPrivateDnsZoneGroup"
  private_dns_zone_group_ids     = [module.acr_private_dns_zone.id]
}
下面您可以阅读分别用于创建Azure私有端点和Azure私有DNDS区域的private_dns_zone和private_endpoint模块的代码。
私有_dns_zone
resource "azurerm_private_dns_zone" "private_dns_zone" {
  name                = var.name
  resource_group_name = var.resource_group_name
  tags                = var.tags

  lifecycle {
    ignore_changes = [
      tags
    ]
  }
}

resource "azurerm_private_dns_zone_virtual_network_link" "link" {
  for_each = var.virtual_networks_to_link

  name                  = "link_to_${lower(basename(each.key))}"
  resource_group_name   = var.resource_group_name
  private_dns_zone_name = azurerm_private_dns_zone.private_dns_zone.name
  virtual_network_id    = "/subscriptions/${each.value.subscription_id}/resourceGroups/${each.value.resource_group_name}/providers/Microsoft.Network/virtualNetworks/${each.key}"

  lifecycle {
    ignore_changes = [
      tags
    ]
  }
}
private_endpoint
resource "azurerm_private_endpoint" "private_endpoint" {
  name                = var.name
  location            = var.location
  resource_group_name = var.resource_group_name
  subnet_id           = var.subnet_id
  tags                = var.tags

  private_service_connection {
    name                           = "${var.name}Connection"
    private_connection_resource_id = var.private_connection_resource_id
    is_manual_connection           = var.is_manual_connection
    subresource_names              = try([var.subresource_name], null)
    request_message                = try(var.request_message, null)
  }

  private_dns_zone_group {
    name                 = var.private_dns_zone_group_name
    private_dns_zone_ids = var.private_dns_zone_group_ids
  }

  lifecycle {
    ignore_changes = [
      tags
    ]
  }
}
AKS工作负载用户定义的托管标识
以下来自main.tf Terraform模块的代码片段创建聊天机器人使用的用户定义托管身份,以通过Azure AD工作负载标识从Azure Active Directory获取安全令牌。
resource "azurerm_user_assigned_identity" "aks_workload_identity" {
  name                = var.name_prefix == null ? "${random_string.prefix.result}${var.workload_managed_identity_name}" : "${var.name_prefix}${var.workload_managed_identity_name}"
  resource_group_name = azurerm_resource_group.rg.name
  location            = var.location
  tags                = var.tags

  lifecycle {
    ignore_changes = [
      tags
    ]
  }
}

resource "azurerm_role_assignment" "cognitive_services_user_assignment" {
  scope                = module.openai.id
  role_definition_name = "Cognitive Services User"
  principal_id         = azurerm_user_assigned_identity.aks_workload_identity.principal_id
  skip_service_principal_aad_check = true
}

resource "azurerm_federated_identity_credential" "federated_identity_credential" {
  name                = "${title(var.namespace)}FederatedIdentity"
  resource_group_name = azurerm_resource_group.rg.name
  audience            = ["api://AzureADTokenExchange"]
  issuer              = module.aks_cluster.oidc_issuer_url
  parent_id           = azurerm_user_assigned_identity.aks_workload_identity.id
  subject             = "system:serviceaccount:${var.namespace}:${var.service_account_name}"
}
上述代码段执行以下步骤:
- 创建新的用户定义的托管标识。
- 将新的托管标识分配给认知服务用户角色,并将资源组作为作用域。
- 将托管身份与聊天机器人使用的服务帐户联合。以下信息是创建联合身份凭据所必需的:
- Kubernetes服务帐户名称。
- 将托管聊天机器人应用程序的Kubernetes命名空间。
- Azure AD工作负载标识的OpenID Connect(OIDC)令牌颁发者终结点的URL
有关详细信息,请参阅以下资源:
- 如何使用托管身份配置Azure OpenAI服务
- 将Azure AD工作负载标识与Azure Kubernetes服务(AKS)一起使用
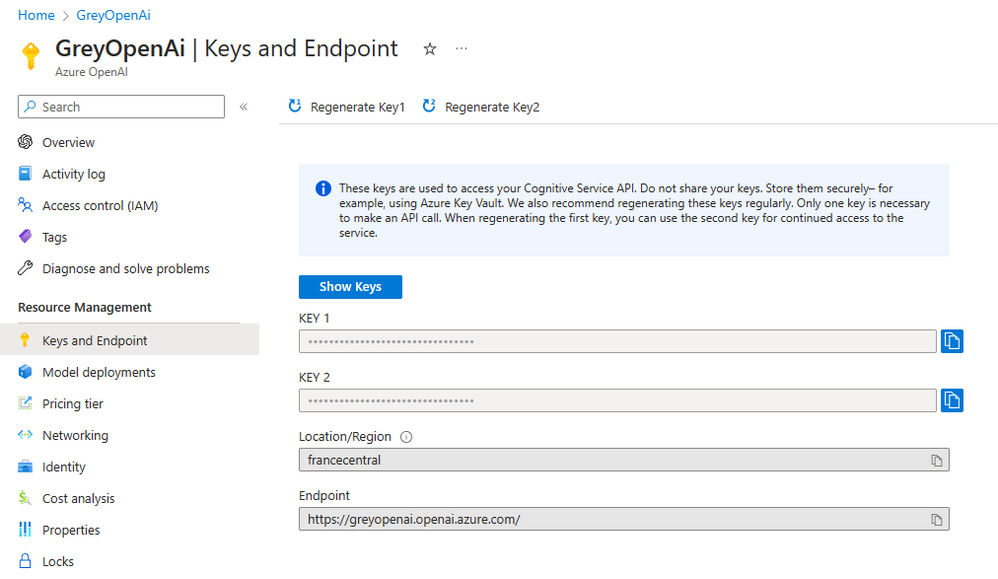
验证部署
打开Azure门户,然后导航到资源组。打开Azure开放人工智能服务资源,导航到密钥和端点,并检查端点是否包含自定义子域,而不是区域认知服务端点。
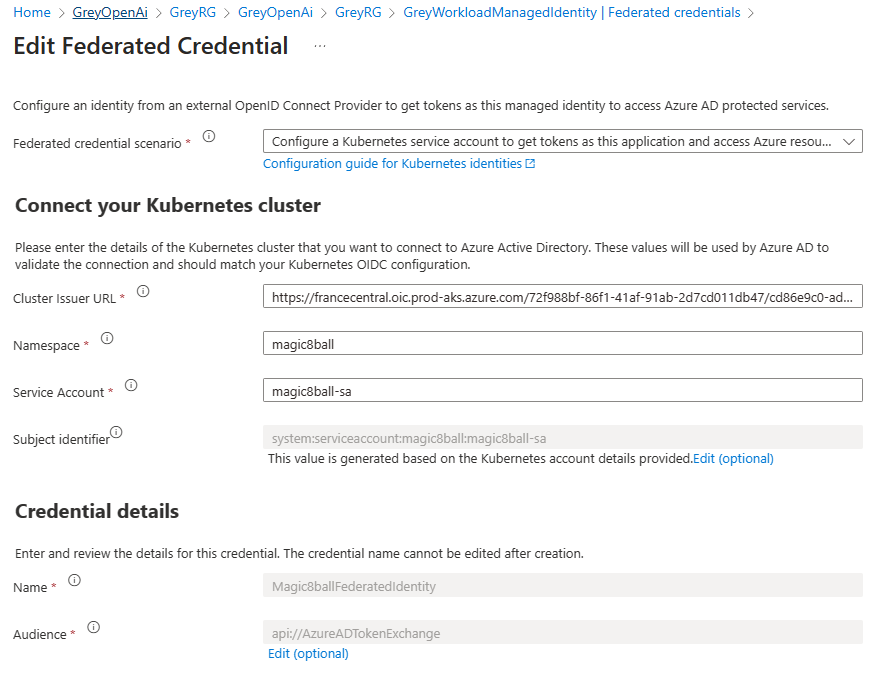
打开<Prefix>WorkloadManagedIdentity管理的标识,导航到联合凭据,并验证magic8ball sa服务帐户的联合身份凭据是否已正确创建,如下图所示。
将Azure AD工作负载标识与Azure Kubernetes服务(AKS)一起使用
部署在Azure Kubernetes Services(AKS)群集上的工作负载需要Azure Active Directory(Azure AD)应用程序凭据或托管身份才能访问受Azure AD保护的资源,如Azure密钥库和Microsoft Graph。Azure AD工作负载标识与Kubernetes本机的功能集成,以与外部标识提供商联合。
Azure AD工作负载标识使用服务帐户令牌卷投影使pod能够使用Kubernetes服务帐户。启用后,AKS OIDC颁发者向工作负载颁发服务帐户安全令牌,OIDC联盟使应用程序能够基于注释的服务帐户使用Azure AD安全地访问Azure资源。
如果使用注册的应用程序而不是托管标识,则Azure AD工作负载标识与Azure identity客户端库和Microsoft身份验证库(MSAL)集合配合良好。您的工作负载可以使用这些库中的任何一个来无缝地验证和访问Azure云资源。有关详细信息,请参阅以下资源:
- Azure Workload Identity open-source project
- Use an Azure AD workload identity on Azure Kubernetes Service (AKS
- Deploy and configure workload identity on an Azure Kubernetes Service (AKS) cluster
- Modernize application authentication with workload identity sidecar
- Tutorial: Use a workload identity with an application on Azure Kubernetes Service (AKS)
- Workload identity federation
- Use Azure AD Workload Identity for Kubernetes with a User-Assigned Managed Identity
- Use Azure AD workload identity for Kubernetes with an Azure AD registered application
- Azure Managed Identities with Workload Identity Federation
- Azure AD workload identity federation with Kubernetes
- Azure Active Directory Workload Identity Federation with external OIDC Identy Providers
- Minimal Azure AD Workload identity federation
Azure身份客户端库
在Azure Identity客户端库中,您可以选择以下方法之一:
- 使用DefaultAzureCredential,它将尝试使用WorkloadIdentityCredential。
- 创建一个包含WorkloadIdentityCredential的ChainedTokenCredential实例。
- 直接使用WorkloadIdentityCredential。
下表提供了每种语言的客户端库所需的最低软件包版本。
| Language | Library | Minimum Version | Example |
|---|---|---|---|
| .NET | Azure.Identity | 1.9.0 | Link |
| Go | azidentity | 1.3.0 | Link |
| Java | azure-identity | 1.9.0 | Link |
| JavaScript | @azure/identity | 3.2.0 | Link |
| Python | azure-identity | 1.13.0 | Link |
Microsoft Authentication Library (MSAL)
The following client libraries are the minimum version required
| Language | Library | Image | Example | Has Windows |
|---|---|---|---|---|
| .NET | microsoft-authentication-library-for-dotnet | ghcr.io/azure/azure-workload-identity/msal-net | Link | Yes |
| Go | microsoft-authentication-library-for-go | ghcr.io/azure/azure-workload-identity/msal-go | Link | Yes |
| Java | microsoft-authentication-library-for-java | ghcr.io/azure/azure-workload-identity/msal-java | Link | No |
| JavaScript | microsoft-authentication-library-for-js | ghcr.io/azure/azure-workload-identity/msal-node | Link | No |
| Python | microsoft-authentication-library-for-python | ghcr.io/azure/azure-workload-identity/msal-python | Link | No |
部署脚本
该示例使用部署脚本来运行install-nginx-via-helm-andcreate-sa.sh Bash脚本,该脚本为示例应用程序创建名称空间和服务帐户,并通过helm将以下包安装到AKS集群。
此示例使用NGINX入口控制器将聊天机器人程序公开到公共互联网。
# Install kubectl
az aks install-cli --only-show-errors

# Get AKS credentials
az aks get-credentials \
  --admin \
  --name $clusterName \
  --resource-group $resourceGroupName \
  --subscription $subscriptionId \
  --only-show-errors

# Check if the cluster is private or not
private=$(az aks show --name $clusterName \
  --resource-group $resourceGroupName \
  --subscription $subscriptionId \
  --query apiServerAccessProfile.enablePrivateCluster \
  --output tsv)

# Install Helm
curl https://raw.githubusercontent.com/helm/helm/main/scripts/get-helm-3 -o get_helm.sh -s
chmod 700 get_helm.sh
./get_helm.sh &>/dev/null

# Add Helm repos
helm repo add prometheus-community https://prometheus-community.github.io/helm-charts
helm repo add ingress-nginx https://kubernetes.github.io/ingress-nginx
helm repo add jetstack https://charts.jetstack.io

# Update Helm repos
helm repo update

if [[ $private == 'true' ]]; then
  # Log whether the cluster is public or private
  echo "$clusterName AKS cluster is public"

  # Install Prometheus
  command="helm install prometheus prometheus-community/kube-prometheus-stack \
  --create-namespace \
  --namespace prometheus \
  --set prometheus.prometheusSpec.podMonitorSelectorNilUsesHelmValues=false \
  --set prometheus.prometheusSpec.serviceMonitorSelectorNilUsesHelmValues=false"

  az aks command invoke \
    --name $clusterName \
    --resource-group $resourceGroupName \
    --subscription $subscriptionId \
    --command "$command"

  # Install NGINX ingress controller using the internal load balancer
  command="helm install nginx-ingress ingress-nginx/ingress-nginx \
    --create-namespace \
    --namespace ingress-basic \
    --set controller.replicaCount=3 \
    --set controller.nodeSelector.\"kubernetes\.io/os\"=linux \
    --set defaultBackend.nodeSelector.\"kubernetes\.io/os\"=linux \
    --set controller.metrics.enabled=true \
    --set controller.metrics.serviceMonitor.enabled=true \
    --set controller.metrics.serviceMonitor.additionalLabels.release=\"prometheus\" \
    --set controller.service.annotations.\"service\.beta\.kubernetes\.io/azure-load-balancer-health-probe-request-path\"=/healthz"

  az aks command invoke \
    --name $clusterName \
    --resource-group $resourceGroupName \
    --subscription $subscriptionId \
    --command "$command"

  # Install certificate manager
  command="helm install cert-manager jetstack/cert-manager \
    --create-namespace \
    --namespace cert-manager \
    --set installCRDs=true \
    --set nodeSelector.\"kubernetes\.io/os\"=linux"

  az aks command invoke \
    --name $clusterName \
    --resource-group $resourceGroupName \
    --subscription $subscriptionId \
    --command "$command"

  # Create cluster issuer
  command="cat <<EOF | kubectl apply -f -
apiVersion: cert-manager.io/v1
kind: ClusterIssuer
metadata:
  name: letsencrypt-nginx
spec:
  acme:
    server: https://acme-v02.api.letsencrypt.org/directory
    email: $email
    privateKeySecretRef:
      name: letsencrypt
    solvers:
    - http01:
        ingress:
          class: nginx
          podTemplate:
            spec:
              nodeSelector:
                "kubernetes.io/os": linux
EOF"

  az aks command invoke \
    --name $clusterName \
    --resource-group $resourceGroupName \
    --subscription $subscriptionId \
    --command "$command"

  # Create workload namespace
  command="kubectl create namespace $namespace"

  az aks command invoke \
    --name $clusterName \
    --resource-group $resourceGroupName \
    --subscription $subscriptionId \
    --command "$command"

  # Create service account
  command="cat <<EOF | kubectl apply -f -
apiVersion: v1
kind: ServiceAccount
metadata:
  annotations:
    azure.workload.identity/client-id: $workloadManagedIdentityClientId
    azure.workload.identity/tenant-id: $tenantId
  labels:
    azure.workload.identity/use: "true"
  name: $serviceAccountName
  namespace: $namespace
EOF"

  az aks command invoke \
    --name $clusterName \
    --resource-group $resourceGroupName \
    --subscription $subscriptionId \
    --command "$command"

else
  # Log whether the cluster is public or private
  echo "$clusterName AKS cluster is private"

  # Install Prometheus
  helm install prometheus prometheus-community/kube-prometheus-stack \
    --create-namespace \
    --namespace prometheus \
    --set prometheus.prometheusSpec.podMonitorSelectorNilUsesHelmValues=false \
    --set prometheus.prometheusSpec.serviceMonitorSelectorNilUsesHelmValues=false

  # Install NGINX ingress controller using the internal load balancer
  helm install nginx-ingress ingress-nginx/ingress-nginx \
    --create-namespace \
    --namespace ingress-basic \
    --set controller.replicaCount=3 \
    --set controller.nodeSelector."kubernetes\.io/os"=linux \
    --set defaultBackend.nodeSelector."kubernetes\.io/os"=linux \
    --set controller.metrics.enabled=true \
    --set controller.metrics.serviceMonitor.enabled=true \
    --set controller.metrics.serviceMonitor.additionalLabels.release="prometheus" \
    --set controller.service.annotations."service\.beta\.kubernetes\.io/azure-load-balancer-health-probe-request-path"=/healthz

  helm install $nginxReleaseName $nginxRepoName/$nginxChartName \
    --create-namespace \
    --namespace $nginxNamespace

  # Install certificate manager
  helm install cert-manager jetstack/cert-manager \
    --create-namespace \
    --namespace cert-manager \
    --set installCRDs=true \
    --set nodeSelector."kubernetes\.io/os"=linux

  # Create cluster issuer
  cat <<EOF | kubectl apply -f -
apiVersion: cert-manager.io/v1
kind: ClusterIssuer
metadata:
  name: letsencrypt-nginx
spec:
  acme:
    server: https://acme-v02.api.letsencrypt.org/directory
    email: $email
    privateKeySecretRef:
      name: letsencrypt
    solvers:
    - http01:
        ingress:
          class: nginx
          podTemplate:
            spec:
              nodeSelector:
                "kubernetes.io/os": linux
EOF

  # Create workload namespace
  kubectl create namespace $namespace

  # Create service account
  cat <<EOF | kubectl apply -f -
apiVersion: v1
kind: ServiceAccount
metadata:
  annotations:
    azure.workload.identity/client-id: $workloadManagedIdentityClientId
    azure.workload.identity/tenant-id: $tenantId
  labels:
    azure.workload.identity/use: "true"
  name: $serviceAccountName
  namespace: $namespace
EOF

fi

# Create output as JSON file
echo '{}' |
  jq --arg x $namespace '.namespace=$x' |
  jq --arg x $serviceAccountName '.serviceAccountName=$x' |
  jq --arg x 'prometheus' '.prometheus=$x' |
  jq --arg x 'cert-manager' '.certManager=$x' |
  jq --arg x 'ingress-basic' '.nginxIngressController=$x' >$AZ_SCRIPTS_OUTPUT_PATH
install-nginx-via-helm-andcreate-sa.sh Bash脚本可以使用az-AKS命令invoke在公共AKS集群或专用AKS集群上运行。有关更多信息,请参阅使用命令invoke访问专用Azure Kubernetes服务(AKS)集群。
install-nginx-via-helm-andcreate-sa.sh Bash脚本向部署脚本返回以下输出:
- 承载聊天机器人示例的命名空间。您可以通过为terraform.tfvars文件中的名称空间变量指定不同的值来更改默认的magic8ball名称空间。
- 服务帐户名称
- 普罗米修斯命名空间
- 证书管理器命名空间
- NGINX入口控制器命名空间
聊天机器人应用程序
聊天机器人是一个Python应用程序,其灵感来自“是时候为自己创建私人聊天GPT了”arctiel中的示例代码。该应用程序包含在一个名为app.py的文件中。该应用程序使用以下库:
- OpenAPI:OpenAI Python库提供了从用Pythons语言编写的应用程序方便地访问OpenAI API的功能。它包括一组预定义的API资源类,这些类可以根据API响应动态初始化自己,从而与多种版本的OpenAI API兼容。您可以在我们的API参考资料和OpenAI Cookbook中找到OpenAI Python库的使用示例。
- Azure身份:Azure身份库通过Azure SDK提供Azure Active Directory(Azure AD)令牌身份验证支持。它提供了一组TokenCredential实现,可用于构建支持Azure AD令牌身份验证的Azure SDK客户端。
- Streamlit:Streamlit是一个开源Python库,可以轻松创建和共享用于机器学习和数据科学的漂亮的自定义web应用程序。只需几分钟,您就可以构建和部署功能强大的数据应用程序。有关更多信息,请参阅Streamlight文档
- Streamlit聊天:一个为聊天机器人应用程序提供可配置用户界面的Streamlit组件。
- Dotenv:Python Dotenv从.env文件中读取键值对,并可以将它们设置为环境变量。它有助于开发遵循12因素原则的应用程序。
scripts文件夹下的requirements.txt文件包含app.py应用程序使用的包列表,您可以使用以下命令还原这些包:
pip install -r requirements.txt --upgrade下表包含app.py聊天机器人的代码:
# Import packages
import os
import sys
import time
import openai
import logging
import streamlit as st
from streamlit_chat import message
from azure.identity import DefaultAzureCredential
from dotenv import load_dotenv
from dotenv import dotenv_values

# Load environment variables from .env file
if os.path.exists(".env"):
  load_dotenv(override=True)
  config = dotenv_values(".env")

# Read environment variables
assistan_profile = """
You are the infamous Magic 8 Ball. You need to randomly reply to any question with one of the following answers:

- It is certain.
- It is decidedly so.
- Without a doubt.
- Yes definitely.
- You may rely on it.
- As I see it, yes.
- Most likely.
- Outlook good.
- Yes.
- Signs point to yes.
- Reply hazy, try again.
- Ask again later.
- Better not tell you now.
- Cannot predict now.
- Concentrate and ask again.
- Don't count on it.
- My reply is no.
- My sources say no.
- Outlook not so good.
- Very doubtful.

Add a short comment in a pirate style at the end! Follow your heart and be creative!
For mor information, see https://en.wikipedia.org/wiki/Magic_8_Ball
"""
title = os.environ.get("TITLE", "Magic 8 Ball")
text_input_label = os.environ.get("TEXT_INPUT_LABEL", "Pose your question and cross your fingers!")
image_file_name = os.environ.get("IMAGE_FILE_NAME", "magic8ball.png")
image_width = int(os.environ.get("IMAGE_WIDTH", 80))
temperature = float(os.environ.get("TEMPERATURE", 0.9))
system = os.environ.get("SYSTEM", assistan_profile)
api_base = os.getenv("AZURE_OPENAI_BASE")
api_key = os.getenv("AZURE_OPENAI_KEY")
api_type = os.environ.get("AZURE_OPENAI_TYPE", "azure")
api_version = os.environ.get("AZURE_OPENAI_VERSION", "2023-05-15")
engine = os.getenv("AZURE_OPENAI_DEPLOYMENT")
model = os.getenv("AZURE_OPENAI_MODEL")

# Configure OpenAI
openai.api_type = api_type
openai.api_version = api_version
openai.api_base = api_base

# Set default Azure credential
default_credential = DefaultAzureCredential() if openai.api_type == "azure_ad" else None

# Configure a logger
logging.basicConfig(stream = sys.stdout,
                    format = '[%(asctime)s] {%(filename)s:%(lineno)d} %(levelname)s - %(message)s',
                    level = logging.INFO)
logger = logging.getLogger(__name__)

# Log variables
logger.info(f"title: {title}")
logger.info(f"text_input_label: {text_input_label}")
logger.info(f"image_file_name: {image_file_name}")
logger.info(f"image_width: {image_width}")
logger.info(f"temperature: {temperature}")
logger.info(f"system: {system}")
logger.info(f"api_base: {api_base}")
logger.info(f"api_key: {api_key}")
logger.info(f"api_type: {api_type}")
logger.info(f"api_version: {api_version}")
logger.info(f"engine: {engine}")
logger.info(f"model: {model}")

# Authenticate to Azure OpenAI
if openai.api_type == "azure":
  openai.api_key = api_key
elif openai.api_type == "azure_ad":
  openai_token = default_credential.get_token("https://cognitiveservices.azure.com/.default")
  openai.api_key = openai_token.token
  if 'openai_token' not in st.session_state:
    st.session_state['openai_token'] = openai_token
else:
  logger.error("Invalid API type. Please set the AZURE_OPENAI_TYPE environment variable to azure or azure_ad.")
  raise ValueError("Invalid API type. Please set the AZURE_OPENAI_TYPE environment variable to azure or azure_ad.")

# Customize Streamlit UI using CSS
st.markdown("""
<style>

div.stButton > button:first-child {
    background-color: #eb5424;
    color: white;
    font-size: 20px;
    font-weight: bold;
    border-radius: 0.5rem;
    padding: 0.5rem 1rem;
    border: none;
    box-shadow: 0 0.5rem 1rem rgba(0,0,0,0.15);
    width: 300 px;
    height: 42px;
    transition: all 0.2s ease-in-out;
}

div.stButton > button:first-child:hover {
    transform: translateY(-3px);
    box-shadow: 0 1rem 2rem rgba(0,0,0,0.15);
}

div.stButton > button:first-child:active {
    transform: translateY(-1px);
    box-shadow: 0 0.5rem 1rem rgba(0,0,0,0.15);
}

div.stButton > button:focus:not(:focus-visible) {
    color: #FFFFFF;
}

@media only screen and (min-width: 768px) {
  /* For desktop: */
  div {
      font-family: 'Roboto', sans-serif;
  }

  div.stButton > button:first-child {
      background-color: #eb5424;
      color: white;
      font-size: 20px;
      font-weight: bold;
      border-radius: 0.5rem;
      padding: 0.5rem 1rem;
      border: none;
      box-shadow: 0 0.5rem 1rem rgba(0,0,0,0.15);
      width: 300 px;
      height: 42px;
      transition: all 0.2s ease-in-out;
      position: relative;
      bottom: -32px;
      right: 0px;
  }

  div.stButton > button:first-child:hover {
      transform: translateY(-3px);
      box-shadow: 0 1rem 2rem rgba(0,0,0,0.15);
  }

  div.stButton > button:first-child:active {
      transform: translateY(-1px);
      box-shadow: 0 0.5rem 1rem rgba(0,0,0,0.15);
  }

  div.stButton > button:focus:not(:focus-visible) {
      color: #FFFFFF;
  }

  input {
      border-radius: 0.5rem;
      padding: 0.5rem 1rem;
      border: none;
      box-shadow: 0 0.5rem 1rem rgba(0,0,0,0.15);
      transition: all 0.2s ease-in-out;
      height: 40px;
  }
}
</style>
""", unsafe_allow_html=True)

# Initialize Streamlit session state
if 'prompts' not in st.session_state:
  st.session_state['prompts'] = [{"role": "system", "content": system}]

if 'generated' not in st.session_state:
  st.session_state['generated'] = []

if 'past' not in st.session_state:
  st.session_state['past'] = []

# Refresh the OpenAI security token every 45 minutes
def refresh_openai_token():
  if st.session_state['openai_token'].expires_on < int(time.time()) - 45 * 60:
      st.session_state['openai_token'] = default_credential.get_token("https://cognitiveservices.azure.com/.default")
      openai.api_key = st.session_state['openai_token'].token

# Send user prompt to Azure OpenAI
def generate_response(prompt):
  try:
    st.session_state['prompts'].append({"role": "user", "content": prompt})

    if openai.api_type == "azure_ad":
      refresh_openai_token()

    completion = openai.ChatCompletion.create(
      engine = engine,
      model = model,
      messages = st.session_state['prompts'],
      temperature = temperature,
    )

    message = completion.choices[0].message.content
    return message
  except Exception as e:
    logging.exception(f"Exception in generate_response: {e}")

# Reset Streamlit session state to start a new chat from scratch
def new_click():
  st.session_state['prompts'] = [{"role": "system", "content": system}]
  st.session_state['past'] = []
  st.session_state['generated'] = []
  st.session_state['user'] = ""

# Handle on_change event for user input
def user_change():
  # Avoid handling the event twice when clicking the Send button
  chat_input = st.session_state['user']
  st.session_state['user'] = ""
  if (chat_input == '' or
      (len(st.session_state['past']) > 0 and chat_input == st.session_state['past'][-1])):
    return

  # Generate response invoking Azure OpenAI LLM
  if chat_input !=  '':
    output = generate_response(chat_input)

    # store the output
    st.session_state['past'].append(chat_input)
    st.session_state['generated'].append(output)
    st.session_state['prompts'].append({"role": "assistant", "content": output})

# Create a 2-column layout. Note: Streamlit columns do not properly render on mobile devices.
# For more information, see https://github.com/streamlit/streamlit/issues/5003
col1, col2 = st.columns([1, 7])

# Display the robot image
with col1:
  st.image(image = os.path.join("images", image_file_name), width = image_width)

# Display the title
with col2:
  st.title(title)

# Create a 3-column layout. Note: Streamlit columns do not properly render on mobile devices.
# For more information, see https://github.com/streamlit/streamlit/issues/5003
col3, col4, col5 = st.columns([7, 1, 1])

# Create text input in column 1
with col3:
  user_input = st.text_input(text_input_label, key = "user", on_change = user_change)

# Create send button in column 2
with col4:
  st.button(label = "Send")

# Create new button in column 3
with col5:
  st.button(label = "New", on_click = new_click)

# Display the chat history in two separate tabs
# - normal: display the chat history as a list of messages using the streamlit_chat message() function
# - rich: display the chat history as a list of messages using the Streamlit markdown() function
if st.session_state['generated']:
  tab1, tab2 = st.tabs(["normal", "rich"])
  with tab1:
    for i in range(len(st.session_state['generated']) - 1, -1, -1):
      message(st.session_state['past'][i], is_user = True, key = str(i) + '_user', avatar_style = "fun-emoji", seed = "Nala")
      message(st.session_state['generated'][i], key = str(i), avatar_style = "bottts", seed = "Fluffy")
  with tab2:
    for i in range(len(st.session_state['generated']) - 1, -1, -1):
      st.markdown(st.session_state['past'][i])
      st.markdown(st.session_state['generated'][i])
该应用程序利用st.markdown元素中的内部级联样式表(CSS)为移动和桌面设备的Streamlit聊天机器人添加独特的样式。有关如何调整Streamlight应用程序的用户界面的更多信息,请参阅自定义Streamlight应用的3个提示。
streamlit run app.py使用ChatGPT和GPT-4模型
generate_rensponse函数创建并向ChatGPT模型的聊天完成API发送提示。
def generate_response(prompt):
  try:
    st.session_state['prompts'].append({"role": "user", "content": prompt})

    if openai.api_type == "azure_ad":
      refresh_openai_token()

    completion = openai.ChatCompletion.create(
      engine = engine,
      model = model,
      messages = st.session_state['prompts'],
      temperature = temperature,
    )

    message = completion.choices[0].message.content
    return message
  except Exception as e:
    logging.exception(f"Exception in generate_response: {e}")
OpenAI训练ChatGPT和GPT-4模型接受格式化为对话的输入。messages参数采用一组字典,其中包含按角色或消息组织的对话:系统、用户和助手。基本聊天完成的格式如下:
{"role": "system", "content": "Provide some context and/or instructions to the model"},
{"role": "user", "content": "The users messages goes here"},
{"role": "assistant", "content": "The response message goes here."}
系统角色(也称为系统消息)包含在数组的开头。此消息为模型提供了初始说明。您可以在系统角色中提供各种信息,包括:
- 助理简介
- 助理的个性特征
- 您希望助理遵守的指示或规则
- 模型所需的数据或信息,例如常见问题解答中的相关问题
- 您可以为您的用例自定义系统角色,也可以只包含基本说明。
系统角色或消息是可选的,但建议至少包含一个基本角色或消息,以获得最佳结果。用户角色或消息表示来自用户的输入或查询,而助手消息对应于GPT API生成的响应。这种对话交换旨在模拟类似人类的对话,其中用户消息启动交互,辅助消息提供相关且信息丰富的答案。此上下文有助于聊天模型稍后生成更合适的响应。最后一条用户消息指的是当前请求的提示。有关更多信息,请参阅了解如何使用ChatGPT和GPT-4模型。
应用程序配置
在本地测试app.py Python应用程序时,请确保为以下环境变量提供一个值,例如在Visual Studio代码中。您最终可以在与app.py文件位于同一文件夹的.env文件中定义环境变量。
- AZURE_OPENAI_TYPE:如果希望应用程序使用API密钥根据OPENAI进行身份验证,请指定AZURE。在这种情况下,请确保在AZURE_OPENAI_Key环境变量中提供Key。如果要使用Azure AD安全令牌进行身份验证,则需要指定Azure_AD作为值。在这种情况下,不需要在AZURE_OPENAI_KEY环境变量中提供任何值。
- AZURE_OPENAI_BASE:您的AZURE OPENAI资源的URL。如果使用API密钥针对OpenAI进行身份验证,则可以指定Azure OpenAI服务的区域端点(例如。,https://eastus.api.cognitive.microsoft.com/)。如果您计划使用Azure AD安全令牌进行身份验证,则需要使用子域部署Azure OpenAI服务,并指定特定于资源的端点url(例如。,https://myopenai.openai.azure.com/)。
- AZURE_OPENAI_KEY:AZURE OPENAI资源的密钥。
- AZURE_OPENAI_DEPOLYMENT:AZURE OPENAI资源使用的ChatGPT部署的名称,例如gpt-35-turbo。
- AZURE_OPENAI_MODEL:AZURE OPENAI资源使用的ChatGPT模型的名称,例如gpt-35-turbo。
- TITLE:Streamlight应用程序的标题。
- TEMPERATURE:OpenAI API用于生成响应的温度。
- SYSTEM:向模型提供有关它应该如何表现以及在生成响应时应该引用的任何上下文的说明。用于描述助理的个性。
当将应用程序部署到Azure Kubernetes服务(AKS)时,这些值在KubernetesConfigMap中提供。有关更多信息,请参阅下一节。
OpenAI库
为了将openai库与Microsoft Azure端点一起使用,除了设置api_key之外,还需要设置api_type、api_base和api_version。api_type必须设置为“azure”,其他类型与终结点的属性相对应。此外,部署名称必须作为引擎参数传递。为了使用OpenAI密钥向Azure端点进行身份验证,您需要将api_type设置为Azure,并将OpenAI密钥传递给api_Key。
import openai
openai.api_type = "azure"
openai.api_key = "..."
openai.api_base = "https://example-endpoint.openai.azure.com"
openai.api_version = "2023-05-15"

# create a chat completion
chat_completion = openai.ChatCompletion.create(deployment_id="gpt-3.5-turbo", model="gpt-3.5-turbo", messages=[{"role": "user", "content": "Hello world"}])

# print the completion
print(completion.choices[0].message.content)
有关如何使用Azure端点使用微调和其他操作的详细示例,请查看以下Jupyter笔记本:
若要使用Microsoft Active Directory对Azure端点进行身份验证,您需要将api_type设置为Azure_ad,并将获取的凭据令牌传递给api_key。其余参数需要按照上一节中的规定进行设置。
from azure.identity import DefaultAzureCredential
import openai

# Request credential
default_credential = DefaultAzureCredential()
token = default_credential.get_token("https://cognitiveservices.azure.com/.default")

# Setup parameters
openai.api_type = "azure_ad"
openai.api_key = token.token
openai.api_base = "https://example-endpoint.openai.azure.com/"
openai.api_version = "2023-05-15"

# ...
您可以在magic8ball聊天机器人应用程序中使用两种不同的身份验证方法:
- API key:将AZURE_OPENAI_TYPE环境变量设置为AZURE,将AZULE_OPENAI_key环境变量设置为由AZURE OPENAI资源生成的键。您可以使用区域端点,例如https://eastus.api.cognitive.microsoft.com/,在AZURE_OPENAI_BASE环境变量中,连接到AZURE OPENAI资源。
- Azure Active Directory:将Azure_OPENAI_TYPE环境变量设置为Azure_ad,并使用服务主体或具有DefaultAzureCredential对象的托管标识从Azure Active Directory获取安全令牌。有关Python中DefaultAzureCredential的更多信息,请参阅使用Azure SDK For Python将Python应用程序验证为Azure服务。请确保将认知服务用户角色分配给用于向Azure OpenAI服务进行身份验证的服务主体或托管身份。有关更多信息,请参阅如何使用托管身份配置Azure OpenAI服务。如果你想使用Azure AD集成安全,你需要为你的Azure OpenAI资源创建一个自定义子域,并使用包含自定义域的特定终结点,例如https://myopenai.openai.azure.com/其中myoenai是自定义子域。如果指定区域终结点,则会出现以下错误:子域未映射到资源。因此,在AZURE_OPENAI_BASE环境变量中传递自定义域端点。在这种情况下,您还需要定期刷新安全令牌。
构建容器映像
您可以使用脚本文件夹中的Dockerfile和01-build-docker-image.sh构建容器映像。
Dockefile
# app/Dockerfile

# # Stage 1 - Install build dependencies

# A Dockerfile must start with a FROM instruction which sets the base image for the container.
# The Python images come in many flavors, each designed for a specific use case.
# The python:3.11-slim image is a good base image for most applications.
# It is a minimal image built on top of Debian Linux and includes only the necessary packages to run Python.
# The slim image is a good choice because it is small and contains only the packages needed to run Python.
# For more information, see:
# * https://hub.docker.com/_/python
# * https://docs.streamlit.io/knowledge-base/tutorials/deploy/docker
FROM python:3.11-slim AS builder

# The WORKDIR instruction sets the working directory for any RUN, CMD, ENTRYPOINT, COPY and ADD instructions that follow it in the Dockerfile.
# If the WORKDIR doesn’t exist, it will be created even if it’s not used in any subsequent Dockerfile instruction.
# For more information, see: https://docs.docker.com/engine/reference/builder/#workdir
WORKDIR /app

# Set environment variables.
# The ENV instruction sets the environment variable <key> to the value <value>.
# This value will be in the environment of all “descendant” Dockerfile commands and can be replaced inline in many as well.
# For more information, see: https://docs.docker.com/engine/reference/builder/#env
ENV PYTHONDONTWRITEBYTECODE 1
ENV PYTHONUNBUFFERED 1

# Install git so that we can clone the app code from a remote repo using the RUN instruction.
# The RUN comand has 2 forms:
# * RUN <command> (shell form, the command is run in a shell, which by default is /bin/sh -c on Linux or cmd /S /C on Windows)
# * RUN ["executable", "param1", "param2"] (exec form)
# The RUN instruction will execute any commands in a new layer on top of the current image and commit the results.
# The resulting committed image will be used for the next step in the Dockerfile.
# For more information, see: https://docs.docker.com/engine/reference/builder/#run
RUN apt-get update && apt-get install -y \
    build-essential \
    curl \
    software-properties-common \
    git \
    && rm -rf /var/lib/apt/lists/*

# Create a virtualenv to keep dependencies together
RUN python -m venv /opt/venv
ENV PATH="/opt/venv/bin:$PATH"

# Clone the requirements.txt which contains dependencies to WORKDIR
# COPY has two forms:
# * COPY <src> <dest> (this copies the files from the local machine to the container's own filesystem)
# * COPY ["<src>",... "<dest>"] (this form is required for paths containing whitespace)
# For more information, see: https://docs.docker.com/engine/reference/builder/#copy
COPY requirements.txt .

# Install the Python dependencies
RUN pip install --no-cache-dir --no-deps -r requirements.txt

# Stage 2 - Copy only necessary files to the runner stage

# The FROM instruction initializes a new build stage for the application
FROM python:3.11-slim

# Sets the working directory to /app
WORKDIR /app

# Copy the virtual environment from the builder stage
COPY --from=builder /opt/venv /opt/venv

# Set environment variables
ENV PATH="/opt/venv/bin:$PATH"

# Clone the app.py containing the application code
COPY app.py .

# Copy the images folder to WORKDIR
# The ADD instruction copies new files, directories or remote file URLs from <src> and adds them to the filesystem of the image at the path <dest>.
# For more information, see: https://docs.docker.com/engine/reference/builder/#add
ADD images ./images

# The EXPOSE instruction informs Docker that the container listens on the specified network ports at runtime.
# For more information, see: https://docs.docker.com/engine/reference/builder/#expose
EXPOSE 8501

# The HEALTHCHECK instruction has two forms:
# * HEALTHCHECK [OPTIONS] CMD command (check container health by running a command inside the container)
# * HEALTHCHECK NONE (disable any healthcheck inherited from the base image)
# The HEALTHCHECK instruction tells Docker how to test a container to check that it is still working.
# This can detect cases such as a web server that is stuck in an infinite loop and unable to handle new connections,
# even though the server process is still running. For more information, see: https://docs.docker.com/engine/reference/builder/#healthcheck
HEALTHCHECK CMD curl --fail http://localhost:8501/_stcore/health

# The ENTRYPOINT instruction has two forms:
# * ENTRYPOINT ["executable", "param1", "param2"] (exec form, preferred)
# * ENTRYPOINT command param1 param2 (shell form)
# The ENTRYPOINT instruction allows you to configure a container that will run as an executable.
# For more information, see: https://docs.docker.com/engine/reference/builder/#entrypoint
ENTRYPOINT ["streamlit", "run", "app.py", "--server.port=8501", "--server.address=0.0.0.0"]
01-build-docker-image.sh
#!/bin/bash

# Variables
source ./00-variables.sh

# Build the docker image
docker build -t $imageName:$tag -f Dockerfile .
在运行任何脚本之前,请确保自定义00-variables.sh文件中的变量值。该文件嵌入在所有脚本中,并包含以下变量:
# Variables
acrName="CoralAcr"
acrResourceGrougName="CoralRG"
location="FranceCentral"
attachAcr=false
imageName="magic8ball"
tag="v2"
containerName="magic8ball"
image="$acrName.azurecr.io/$imageName:$tag"
imagePullPolicy="IfNotPresent" # Always, Never, IfNotPresent
managedIdentityName="OpenAiManagedIdentity"
federatedIdentityName="Magic8BallFederatedIdentity"

# Azure Subscription and Tenant
subscriptionId=$(az account show --query id --output tsv)
subscriptionName=$(az account show --query name --output tsv)
tenantId=$(az account show --query tenantId --output tsv)

# Parameters
title="Magic 8 Ball"
label="Pose your question and cross your fingers!"
temperature="0.9"
imageWidth="80"

# OpenAI
openAiName="CoralOpenAi "
openAiResourceGroupName="CoralRG"
openAiType="azure_ad"
openAiBase="https://coralopenai.openai.azure.com/"
openAiModel="gpt-35-turbo"
openAiDeployment="gpt-35-turbo"

# Nginx Ingress Controller
nginxNamespace="ingress-basic"
nginxRepoName="ingress-nginx"
nginxRepoUrl="https://kubernetes.github.io/ingress-nginx"
nginxChartName="ingress-nginx"
nginxReleaseName="nginx-ingress"
nginxReplicaCount=3

# Certificate Manager
cmNamespace="cert-manager"
cmRepoName="jetstack"
cmRepoUrl="https://charts.jetstack.io"
cmChartName="cert-manager"
cmReleaseName="cert-manager"

# Cluster Issuer
email="paolos@microsoft.com"
clusterIssuerName="letsencrypt-nginx"
clusterIssuerTemplate="cluster-issuer.yml"

# AKS Cluster
aksClusterName="CoralAks"
aksResourceGroupName="CoralRG"

# Sample Application
namespace="magic8ball"
serviceAccountName="magic8ball-sa"
deploymentTemplate="deployment.yml"
serviceTemplate="service.yml"
configMapTemplate="configMap.yml"
secretTemplate="secret.yml"

# Ingress and DNS
ingressTemplate="ingress.yml"
ingressName="magic8ball-ingress"
dnsZoneName="contoso.com"
dnsZoneResourceGroupName="DnsResourceGroup"
subdomain="magic8ball"
host="$subdomain.$dnsZoneName"
将Docker容器映像上载到Azure容器注册表(ACR)
您可以使用脚本文件夹中的03-push-Docker-image.sh脚本将Docker容器映像推送到Azure容器注册表(ACR)。
03-push-docker-image.sh
#!/bin/bash

# Variables
source ./00-variables.sh

# Login to ACR
az acr login --name $acrName

# Retrieve ACR login server. Each container image needs to be tagged with the loginServer name of the registry.
loginServer=$(az acr show --name $acrName --query loginServer --output tsv)

# Tag the local image with the loginServer of ACR
docker tag ${imageName,,}:$tag $loginServer/${imageName,,}:$tag

# Push latest container image to ACR
docker push $loginServer/${imageName,,}:$tag
部署脚本
如果您使用此示例中提供的Terraform模块部署Azure基础设施,则只需要使用脚本文件夹中的以下脚本和YAML模板部署应用程序。
Scripts
09-deploy-app.sh10-create-ingress.sh11-configure-dns.sh
YAML manifests
configMap.ymldeployment.ymlingress.ymlservice.yml
If you instead want to deploy the application in your AKS cluster, you can use the following scripts to configure your environment.
04-create-nginx-ingress-controller.sh
This script installs the NGINX Ingress Controller using Helm.
#!/bin/bash

# Variables
source ./00-variables.sh

# Use Helm to deploy an NGINX ingress controller
result=$(helm list -n $nginxNamespace | grep $nginxReleaseName | awk '{print $1}')

if [[ -n $result ]]; then
  echo "[$nginxReleaseName] ingress controller already exists in the [$nginxNamespace] namespace"
else
  # Check if the ingress-nginx repository is not already added
  result=$(helm repo list | grep $nginxRepoName | awk '{print $1}')

  if [[ -n $result ]]; then
    echo "[$nginxRepoName] Helm repo already exists"
  else
    # Add the ingress-nginx repository
    echo "Adding [$nginxRepoName] Helm repo..."
    helm repo add $nginxRepoName $nginxRepoUrl
  fi

  # Update your local Helm chart repository cache
  echo 'Updating Helm repos...'
  helm repo update

  # Deploy NGINX ingress controller
  echo "Deploying [$nginxReleaseName] NGINX ingress controller to the [$nginxNamespace] namespace..."
  helm install $nginxReleaseName $nginxRepoName/$nginxChartName \
    --create-namespace \
    --namespace $nginxNamespace \
    --set controller.config.enable-modsecurity=true \
    --set controller.config.enable-owasp-modsecurity-crs=true \
    --set controller.config.modsecurity-snippet=\
'SecRuleEngine On
SecRequestBodyAccess On
SecAuditLog /dev/stdout
SecAuditLogFormat JSON
SecAuditEngine RelevantOnly
SecRule REMOTE_ADDR "@ipMatch 127.0.0.1" "id:87,phase:1,pass,nolog,ctl:ruleEngine=Off"' \
    --set controller.metrics.enabled=true \
    --set controller.metrics.serviceMonitor.enabled=true \
    --set controller.metrics.serviceMonitor.additionalLabels.release="prometheus" \
    --set controller.nodeSelector."kubernetes\.io/os"=linux \
    --set controller.replicaCount=$replicaCount \
    --set defaultBackend.nodeSelector."kubernetes\.io/os"=linux \
    --set controller.service.annotations."service\.beta\.kubernetes\.io/azure-load-balancer-health-probe-request-path"=/healthz
fi
05-install-cert-manager.sh
This script installs the cert-manager using Helm.
#/bin/bash

# Variables
source ./00-variables.sh

# Check if the ingress-nginx repository is not already added
result=$(helm repo list | grep $cmRepoName | awk '{print $1}')

if [[ -n $result ]]; then
  echo "[$cmRepoName] Helm repo already exists"
else
  # Add the Jetstack Helm repository
  echo "Adding [$cmRepoName] Helm repo..."
  helm repo add $cmRepoName $cmRepoUrl
fi

# Update your local Helm chart repository cache
echo 'Updating Helm repos...'
helm repo update

# Install cert-manager Helm chart
result=$(helm list -n $cmNamespace | grep $cmReleaseName | awk '{print $1}')

if [[ -n $result ]]; then
  echo "[$cmReleaseName] cert-manager already exists in the $cmNamespace namespace"
else
  # Install the cert-manager Helm chart
  echo "Deploying [$cmReleaseName] cert-manager to the $cmNamespace namespace..."
  helm install $cmReleaseName $cmRepoName/$cmChartName \
    --create-namespace \
    --namespace $cmNamespace \
    --set installCRDs=true \
    --set nodeSelector."kubernetes\.io/os"=linux
fi
06-create-cluster-issuer.sh
This script creates a cluster issuer for the NGINX Ingress Controller based on the Let's Encrypt ACME certificate issuer.
#/bin/bash

# Variables
source ./00-variables.sh

# Check if the cluster issuer already exists
result=$(kubectl get ClusterIssuer -o json | jq -r '.items[].metadata.name | select(. == "'$clusterIssuerName'")')

if [[ -n $result ]]; then
  echo "[$clusterIssuerName] cluster issuer already exists"
  exit
else
  # Create the cluster issuer
  echo "[$clusterIssuerName] cluster issuer does not exist"
  echo "Creating [$clusterIssuerName] cluster issuer..."
  cat $clusterIssuerTemplate |
    yq "(.spec.acme.email)|="\""$email"\" |
    kubectl apply -f -
fi
07-create-workload-managed-identity.sh
This script creates the managed identity used by the magic8ballchatbot and assigns it the Cognitive Services User role on the Azure OpenAI Service.
#!/bin/bash

# Variables
source ./00-variables.sh

# Check if the user-assigned managed identity already exists
echo "Checking if [$managedIdentityName] user-assigned managed identity actually exists in the [$aksResourceGroupName] resource group..."

az identity show \
  --name $managedIdentityName \
  --resource-group $aksResourceGroupName &>/dev/null

if [[ $? != 0 ]]; then
  echo "No [$managedIdentityName] user-assigned managed identity actually exists in the [$aksResourceGroupName] resource group"
  echo "Creating [$managedIdentityName] user-assigned managed identity in the [$aksResourceGroupName] resource group..."

  # Create the user-assigned managed identity
  az identity create \
    --name $managedIdentityName \
    --resource-group $aksResourceGroupName \
    --location $location \
    --subscription $subscriptionId 1>/dev/null

  if [[ $? == 0 ]]; then
    echo "[$managedIdentityName] user-assigned managed identity successfully created in the [$aksResourceGroupName] resource group"
  else
    echo "Failed to create [$managedIdentityName] user-assigned managed identity in the [$aksResourceGroupName] resource group"
    exit
  fi
else
  echo "[$managedIdentityName] user-assigned managed identity already exists in the [$aksResourceGroupName] resource group"
fi

# Retrieve the clientId of the user-assigned managed identity
echo "Retrieving clientId for [$managedIdentityName] managed identity..."
clientId=$(az identity show \
  --name $managedIdentityName \
  --resource-group $aksResourceGroupName \
  --query clientId \
  --output tsv)

if [[ -n $clientId ]]; then
  echo "[$clientId] clientId  for the [$managedIdentityName] managed identity successfully retrieved"
else
  echo "Failed to retrieve clientId for the [$managedIdentityName] managed identity"
  exit
fi

# Retrieve the principalId of the user-assigned managed identity
echo "Retrieving principalId for [$managedIdentityName] managed identity..."
principalId=$(az identity show \
  --name $managedIdentityName \
  --resource-group $aksResourceGroupName \
  --query principalId \
  --output tsv)

if [[ -n $principalId ]]; then
  echo "[$principalId] principalId  for the [$managedIdentityName] managed identity successfully retrieved"
else
  echo "Failed to retrieve principalId for the [$managedIdentityName] managed identity"
  exit
fi

# Get the resource id of the Azure OpenAI resource
openAiId=$(az cognitiveservices account show \
  --name $openAiName \
  --resource-group $openAiResourceGroupName \
  --query id \
  --output tsv)

if [[ -n $openAiId ]]; then
  echo "Resource id for the [$openAiName] Azure OpenAI resource successfully retrieved"
else
  echo "Failed to the resource id for the [$openAiName] Azure OpenAI resource"
  exit -1
fi

# Assign the Cognitive Services User role on the Azure OpenAI resource to the managed identity
role="Cognitive Services User"
echo "Checking if the [$managedIdentityName] managed identity has been assigned to [$role] role with [$openAiName] Azure OpenAI resource as a scope..."
current=$(az role assignment list \
  --assignee $principalId \
  --scope $openAiId \
  --query "[?roleDefinitionName=='$role'].roleDefinitionName" \
  --output tsv 2>/dev/null)

if [[ $current == $role ]]; then
  echo "[$managedIdentityName] managed identity is already assigned to the ["$current"] role with [$openAiName] Azure OpenAI resource as a scope"
else
  echo "[$managedIdentityName] managed identity is not assigned to the [$role] role with [$openAiName] Azure OpenAI resource as a scope"
  echo "Assigning the [$role] role to the [$managedIdentityName] managed identity with [$openAiName] Azure OpenAI resource as a scope..."

  az role assignment create \
    --assignee $principalId \
    --role "$role" \
    --scope $openAiId 1>/dev/null

  if [[ $? == 0 ]]; then
    echo "[$managedIdentityName] managed identity successfully assigned to the [$role] role with [$openAiName] Azure OpenAI resource as a scope"
  else
    echo "Failed to assign the [$managedIdentityName] managed identity to the [$role] role with [$openAiName] Azure OpenAI resource as a scope"
    exit
  fi
fi
08-create-service-account.sh`
This script creates the namespace and service account for the magic8ball chatbot and federate the service account with the user-defined managed identity created in the previous step.
#!/bin/bash

# Variables for the user-assigned managed identity
source ./00-variables.sh

# Check if the namespace already exists
result=$(kubectl get namespace -o 'jsonpath={.items[?(@.metadata.name=="'$namespace'")].metadata.name'})

if [[ -n $result ]]; then
  echo "[$namespace] namespace already exists"
else
  # Create the namespace for your ingress resources
  echo "[$namespace] namespace does not exist"
  echo "Creating [$namespace] namespace..."
  kubectl create namespace $namespace
fi

# Check if the service account already exists
result=$(kubectl get sa -n $namespace -o 'jsonpath={.items[?(@.metadata.name=="'$serviceAccountName'")].metadata.name'})

if [[ -n $result ]]; then
  echo "[$serviceAccountName] service account already exists"
else
  # Retrieve the resource id of the user-assigned managed identity
  echo "Retrieving clientId for [$managedIdentityName] managed identity..."
  managedIdentityClientId=$(az identity show \
    --name $managedIdentityName \
    --resource-group $aksResourceGroupName \
    --query clientId \
    --output tsv)

  if [[ -n $managedIdentityClientId ]]; then
    echo "[$managedIdentityClientId] clientId  for the [$managedIdentityName] managed identity successfully retrieved"
  else
    echo "Failed to retrieve clientId for the [$managedIdentityName] managed identity"
    exit
  fi

  # Create the service account
  echo "[$serviceAccountName] service account does not exist"
  echo "Creating [$serviceAccountName] service account..."
  cat <<EOF | kubectl apply -f -
apiVersion: v1
kind: ServiceAccount
metadata:
  annotations:
    azure.workload.identity/client-id: $managedIdentityClientId
    azure.workload.identity/tenant-id: $tenantId
  labels:
    azure.workload.identity/use: "true"
  name: $serviceAccountName
  namespace: $namespace
EOF
fi

# Show service account YAML manifest
echo "Service Account YAML manifest"
echo "-----------------------------"
kubectl get sa $serviceAccountName -n $namespace -o yaml

# Check if the federated identity credential already exists
echo "Checking if [$federatedIdentityName] federated identity credential actually exists in the [$aksResourceGroupName] resource group..."

az identity federated-credential show \
  --name $federatedIdentityName \
  --resource-group $aksResourceGroupName \
  --identity-name $managedIdentityName &>/dev/null

if [[ $? != 0 ]]; then
  echo "No [$federatedIdentityName] federated identity credential actually exists in the [$aksResourceGroupName] resource group"

  # Get the OIDC Issuer URL
  aksOidcIssuerUrl="$(az aks show \
    --only-show-errors \
    --name $aksClusterName \
    --resource-group $aksResourceGroupName \
    --query oidcIssuerProfile.issuerUrl \
    --output tsv)"

  # Show OIDC Issuer URL
  if [[ -n $aksOidcIssuerUrl ]]; then
    echo "The OIDC Issuer URL of the $aksClusterName cluster is $aksOidcIssuerUrl"
  fi

  echo "Creating [$federatedIdentityName] federated identity credential in the [$aksResourceGroupName] resource group..."

  # Establish the federated identity credential between the managed identity, the service account issuer, and the subject.
  az identity federated-credential create \
    --name $federatedIdentityName \
    --identity-name $managedIdentityName \
    --resource-group $aksResourceGroupName \
    --issuer $aksOidcIssuerUrl \
    --subject system:serviceaccount:$namespace:$serviceAccountName

  if [[ $? == 0 ]]; then
    echo "[$federatedIdentityName] federated identity credential successfully created in the [$aksResourceGroupName] resource group"
  else
    echo "Failed to create [$federatedIdentityName] federated identity credential in the [$aksResourceGroupName] resource group"
    exit
  fi
else
  echo "[$federatedIdentityName] federated identity credential already exists in the [$aksResourceGroupName] resource group"
fi
09-deploy-app.sh`
This script creates the Kubernetes config map, deployment, and service used by the magic8ball chatbot.
#!/bin/bash

# Variables
source ./00-variables.sh

# Attach ACR to AKS cluster
if [[ $attachAcr == true ]]; then
  echo "Attaching ACR $acrName to AKS cluster $aksClusterName..."
  az aks update \
    --name $aksClusterName \
    --resource-group $aksResourceGroupName \
    --attach-acr $acrName
fi

# Check if namespace exists in the cluster
result=$(kubectl get namespace -o jsonpath="{.items[?(@.metadata.name=='$namespace')].metadata.name}")

if [[ -n $result ]]; then
  echo "$namespace namespace already exists in the cluster"
else
  echo "$namespace namespace does not exist in the cluster"
  echo "creating $namespace namespace in the cluster..."
  kubectl create namespace $namespace
fi

# Create config map
cat $configMapTemplate |
    yq "(.data.TITLE)|="\""$title"\" |
    yq "(.data.LABEL)|="\""$label"\" |
    yq "(.data.TEMPERATURE)|="\""$temperature"\" |
    yq "(.data.IMAGE_WIDTH)|="\""$imageWidth"\" |
    yq "(.data.AZURE_OPENAI_TYPE)|="\""$openAiType"\" |
    yq "(.data.AZURE_OPENAI_BASE)|="\""$openAiBase"\" |
    yq "(.data.AZURE_OPENAI_MODEL)|="\""$openAiModel"\" |
    yq "(.data.AZURE_OPENAI_DEPLOYMENT)|="\""$openAiDeployment"\" |
    kubectl apply -n $namespace -f -

# Create deployment
cat $deploymentTemplate |
    yq "(.spec.template.spec.containers[0].image)|="\""$image"\" |
    yq "(.spec.template.spec.containers[0].imagePullPolicy)|="\""$imagePullPolicy"\" |
    yq "(.spec.template.spec.serviceAccountName)|="\""$serviceAccountName"\" |
    kubectl apply -n $namespace -f -

# Create deployment
kubectl apply -f $serviceTemplate -n $namespace
10-create-ingress.sh
This script creates the ingress object to expose the service via the NGINX Ingress Controller.
#/bin/bash

# Variables
source ./00-variables.sh

# Create the ingress
echo "[$ingressName] ingress does not exist"
echo "Creating [$ingressName] ingress..."
cat $ingressTemplate |
  yq "(.spec.tls[0].hosts[0])|="\""$host"\" |
  yq "(.spec.rules[0].host)|="\""$host"\" |
  kubectl apply -n $namespace -f -
11-configure-dns.sh
This script creates an A record in the Azure DNS Zone to expose the application via a given subdomain (e.g., https://magic8ball.example.com).
# Variables
source ./00-variables.sh

# Retrieve the public IP address from the ingress
echo "Retrieving the external IP address from the [$ingressName] ingress..."
publicIpAddress=$(kubectl get ingress $ingressName -n $namespace -o jsonpath='{.status.loadBalancer.ingress[0].ip}')

if [ -n $publicIpAddress ]; then
  echo "[$publicIpAddress] external IP address of the application gateway ingress controller successfully retrieved from the [$ingressName] ingress"
else
  echo "Failed to retrieve the external IP address of the application gateway ingress controller from the [$ingressName] ingress"
  exit
fi

# Check if an A record for todolist subdomain exists in the DNS Zone
echo "Retrieving the A record for the [$subdomain] subdomain from the [$dnsZoneName] DNS zone..."
ipv4Address=$(az network dns record-set a list \
  --zone-name $dnsZoneName \
  --resource-group $dnsZoneResourceGroupName \
  --query "[?name=='$subdomain'].arecords[].ipv4Address" \
  --output tsv)

if [[ -n $ipv4Address ]]; then
  echo "An A record already exists in [$dnsZoneName] DNS zone for the [$subdomain] subdomain with [$ipv4Address] IP address"

  if [[ $ipv4Address == $publicIpAddress ]]; then
    echo "The [$ipv4Address] ip address of the existing A record is equal to the ip address of the [$ingressName] ingress"
    echo "No additional step is required"
    exit
  else
    echo "The [$ipv4Address] ip address of the existing A record is different than the ip address of the [$ingressName] ingress"
  fi

  # Retrieving name of the record set relative to the zone
  echo "Retrieving the name of the record set relative to the [$dnsZoneName] zone..."

  recordSetName=$(az network dns record-set a list \
    --zone-name $dnsZoneName \
    --resource-group $dnsZoneResourceGroupName \
    --query "[?name=='$subdomain'].name" \
    --output name 2>/dev/null)

  if [[ -n $recordSetName ]]; then
    "[$recordSetName] record set name successfully retrieved"
  else
    "Failed to retrieve the name of the record set relative to the [$dnsZoneName] zone"
    exit
  fi

  # Remove the a record
  echo "Removing the A record from the record set relative to the [$dnsZoneName] zone..."

  az network dns record-set a remove-record \
    --ipv4-address $ipv4Address \
    --record-set-name $recordSetName \
    --zone-name $dnsZoneName \
    --resource-group $dnsZoneResourceGroupName

  if [[ $? == 0 ]]; then
    echo "[$ipv4Address] ip address successfully removed from the [$recordSetName] record set"
  else
    echo "Failed to remove the [$ipv4Address] ip address from the [$recordSetName] record set"
    exit
  fi
fi

# Create the a record
echo "Creating an A record in [$dnsZoneName] DNS zone for the [$subdomain] subdomain with [$publicIpAddress] IP address..."
az network dns record-set a add-record \
  --zone-name $dnsZoneName \
  --resource-group $dnsZoneResourceGroupName \
  --record-set-name $subdomain \
  --ipv4-address $publicIpAddress 1>/dev/null

if [[ $? == 0 ]]; then
  echo "A record for the [$subdomain] subdomain with [$publicIpAddress] IP address successfully created in [$dnsZoneName] DNS zone"
else
  echo "Failed to create an A record for the $subdomain subdomain with [$publicIpAddress] IP address in [$dnsZoneName] DNS zone"
fi
用于部署YAML模板的脚本使用yq工具使用00-variables.sh文件中定义的变量值自定义清单。该工具是一个轻量级和可移植的命令行YAML、JSON和XML处理器,使用类似jq的语法,但可与YAML文件以及JSON、XML、properties、csv和tsv一起使用。它还不支持jq所做的一切,但它确实支持最常见的操作和功能,而且还在不断添加更多。
YAML清单
下面您可以阅读用于将magic8ball聊天机器人部署到AKS的YAML清单。
configmap.yml configmap.yml为传递到应用程序容器的环境变量定义一个值。configmap没有为OpenAI键定义任何环境变量作为容器。
apiVersion: v1
kind: ConfigMap
metadata:
  name: magic8ball-configmap
data:
  TITLE: "Magic 8 Ball"
  LABEL: "Pose your question and cross your fingers!"
  TEMPERATURE: "0.9"
  IMAGE_WIDTH: "80"
  AZURE_OPENAI_TYPE: azure_ad
  AZURE_OPENAI_BASE: https://myopenai.openai.azure.com/
  AZURE_OPENAI_KEY: ""
  AZURE_OPENAI_MODEL: gpt-35-turbo
  AZURE_OPENAI_DEPLOYMENT: magic8ballGPT
这些是由配置映射定义的参数:
- AZURE_OPENAI_TYPE:如果希望应用程序使用API密钥根据OPENAI进行身份验证,请指定AZURE。在这种情况下,请确保在AZURE_OPENAI_Key环境变量中提供Key。如果要使用Azure AD安全令牌进行身份验证,则需要指定Azure_AD作为值。在这种情况下,不需要在AZURE_OPENAI_KEY环境变量中提供任何值。
- AZURE_OPENAI_BASE:您的AZURE OPENAI资源的URL。如果使用API密钥针对OpenAI进行身份验证,则可以指定Azure OpenAI服务的区域端点(例如https://eastus.api.cognitive.microsoft.com/)。如果您计划使用Azure AD安全令牌进行身份验证,则需要使用子域部署Azure OpenAI服务,并指定特定于资源的端点url(例如https://myopenai.openai.azure.com/)。
- AZURE_OPENAI_KEY:AZURE OPENAI资源的密钥。如果将AZURE_OPENAI_TYPE设置为AZURE_ad,则可以将此参数保留为空。
- AZURE_OPENAI_DEPOLYMENT:AZURE OPENAI资源使用的ChatGPT部署的名称,例如gpt-35-turbo。
- AZURE_OPENAI_MODEL:AZURE OPENAI资源使用的ChatGPT模型的名称,例如gpt-35-turbo。
- TITLE:Streamlight应用程序的标题。
- TEMPERATURE:OpenAI API用于生成响应的温度。
- SYSTEM:向模型提供有关它应该如何表现以及在生成响应时应该引用的任何上下文的说明。用于描述助理的个性。
deployment.yml
deployment.yml清单用于创建一个Kubernetes部署,该部署定义了要创建的应用程序pod。pod模板规范中需要azure.workload.identity/use标签。只有具有此标签的pod才会被azure工作负载标识变异准入webhook变异,以注入azure特定的环境变量和计划的服务帐户令牌量。
apiVersion: apps/v1
kind: Deployment
metadata:
  name: magic8ball
  labels:
    app: magic8ball
spec:
  replicas: 3
  selector:
    matchLabels:
      app: magic8ball
      azure.workload.identity/use: "true"
  strategy:
    rollingUpdate:
      maxSurge: 1
      maxUnavailable: 1
  minReadySeconds: 5
  template:
    metadata:
      labels:
        app: magic8ball
        azure.workload.identity/use: "true"
        prometheus.io/scrape: "true"
    spec:
      serviceAccountName: magic8ball-sa
      topologySpreadConstraints:
      - maxSkew: 1
        topologyKey: topology.kubernetes.io/zone
        whenUnsatisfiable: DoNotSchedule
        labelSelector:
          matchLabels:
            app: magic8ball
      - maxSkew: 1
        topologyKey: kubernetes.io/hostname
        whenUnsatisfiable: DoNotSchedule
        labelSelector:
          matchLabels:
            app: magic8ball
      nodeSelector:
        "kubernetes.io/os": linux
      containers:
      - name: magic8ball
        image: paolosalvatori.azurecr.io/magic8ball:v1
        imagePullPolicy: Always
        resources:
          requests:
            memory: "128Mi"
            cpu: "250m"
          limits:
            memory: "256Mi"
            cpu: "500m"
        ports:
        - containerPort: 8501
        livenessProbe:
          httpGet:
            path: /
            port: 8501
          failureThreshold: 1
          initialDelaySeconds: 60
          periodSeconds: 30
          timeoutSeconds: 5
        readinessProbe:
          httpGet:
            path: /
            port: 8501
          failureThreshold: 1
          initialDelaySeconds: 60
          periodSeconds: 30
          timeoutSeconds: 5
        startupProbe:
          httpGet:
            path: /
            port: 8501
          failureThreshold: 1
          initialDelaySeconds: 60
          periodSeconds: 30
          timeoutSeconds: 5
        env:
        - name: TITLE
          valueFrom:
            configMapKeyRef:
                name: magic8ball-configmap
                key: TITLE
        - name: IMAGE_WIDTH
          valueFrom:
            configMapKeyRef:
                name: magic8ball-configmap
                key: IMAGE_WIDTH
        - name: LABEL
          valueFrom:
            configMapKeyRef:
                name: magic8ball-configmap
                key: LABEL
        - name: TEMPERATURE
          valueFrom:
            configMapKeyRef:
                name: magic8ball-configmap
                key: TEMPERATURE
        - name: AZURE_OPENAI_TYPE
          valueFrom:
            configMapKeyRef:
                name: magic8ball-configmap
                key: AZURE_OPENAI_TYPE
        - name: AZURE_OPENAI_BASE
          valueFrom:
            configMapKeyRef:
                name: magic8ball-configmap
                key: AZURE_OPENAI_BASE
        - name: AZURE_OPENAI_KEY
          valueFrom:
            configMapKeyRef:
                name: magic8ball-configmap
                key: AZURE_OPENAI_KEY
        - name: AZURE_OPENAI_MODEL
          valueFrom:
            configMapKeyRef:
                name: magic8ball-configmap
                key: AZURE_OPENAI_MODEL
        - name: AZURE_OPENAI_DEPLOYMENT
          valueFrom:
            configMapKeyRef:
                name: magic8ball-configmap
                key: AZURE_OPENAI_DEPLOYMENT
service.yml
The application is exposed using a ClusterIP Kubernetes service.
apiVersion: v1
kind: Service
metadata:
  name: magic8ball
  labels:
    app: magic8ball
spec:
  type: ClusterIP
  ports:
  - protocol: TCP
    port: 8501
  selector:
    app: magic8ball
ingress.yml
The ingress.yml manifest defines a Kubernetes ingress object used to expose the service via the NGINX Ingress Controller.
apiVersion: networking.k8s.io/v1
kind: Ingress
metadata:
  name: magic8ball-ingress
  annotations:
    cert-manager.io/cluster-issuer: letsencrypt-nginx
    cert-manager.io/acme-challenge-type: http01
    nginx.ingress.kubernetes.io/proxy-connect-timeout: "360"
    nginx.ingress.kubernetes.io/proxy-send-timeout: "360"
    nginx.ingress.kubernetes.io/proxy-read-timeout: "360"
    nginx.ingress.kubernetes.io/proxy-next-upstream-timeout: "360"
    nginx.ingress.kubernetes.io/configuration-snippet: |
      more_set_headers "X-Frame-Options: SAMEORIGIN";
spec:
  ingressClassName: nginx
  tls:
  - hosts:
    - magic8ball.contoso.com
    secretName: tls-secret
  rules:
  - host: magic8ball.contoso.com
    http:
      paths:
      - path: /
        pathType: Prefix
        backend:
          service:
            name: magic8ball
            port:
              number: 8501
ingress对象定义了以下注释:
cert-manager.io/cluster-requestor:指定cert-manageer.io ClusterIssuer的名称,以获取此Ingress所需的证书。Ingress驻留在哪个命名空间并不重要,因为ClusterIssuers是非命名空间资源。在这个示例中,证书管理器被指示使用letsencrypt-nginx-ClusterIssuer,您可以使用06-create-cluster-issuer.sh脚本创建它。
cert-manager.io/acme-challenge-type:指定challend类型。
nginx.ingress.kubernetes.io/proxy-connect-timeout:指定以秒为单位的连接超时。
nginx.ingress.kubernetes.io/proxy-sensid-timeout:指定以秒为单位的发送超时。
nginx.ingress.kubernetes.io/proxy-read-timeout:以秒为单位指定读取超时。
nginx.ingress.kubernetes.io/proxy-next-upstream-timeout:以秒为单位指定下一个上行超时。
nginx.ingress.kubernetes.io/configuration-sippet:允许对nginx位置进行额外配置。
审查已部署的资源
使用Azure门户、Azure CLI或Azure PowerShell列出资源组中已部署的资源。
Azure CLI
az resource list --resource-group <resource-group-name>PowerShell
Get-AzResource -ResourceGroupName <resource-group-name>清理资源
当您不再需要您创建的资源时,请删除该资源组。这将删除所有Azure资源。
Azure CLI
az group delete --name <resource-group-name>PowerShell
Remove-AzResourceGroup -Name <resource-group-name>最新内容
- 4 hours ago
- 1 week 6 days ago
- 3 weeks ago
- 3 weeks 4 days ago
- 2 months 1 week ago
- 6 months 1 week ago
- 6 months 1 week ago
- 6 months 1 week ago
- 6 months 1 week ago
- 6 months 1 week ago