
category
逐步微调DeepSeek模型。..即使你是LLMs的新手!
微调通过在新示例上训练预训练的语言模型,使其适应特定的任务或数据集。此过程通常使用Hugging Face的Transformers库完成,该库需要高计算能力和内存。然而,Unloth提供了一种更优化的方法,即使在较慢的GPU上也可以进行微调。它减少了内存使用,加快了下载速度,并使用LoRA等技术以最少的资源高效地微调大型模型。虽然它目前缺乏多GPU支持(模型并行性)等高级功能,但它仍然是资源高效微调的绝佳选择,特别是如果你没有高端GPU的话。
在本指南中,我将使用Unloth逐步指导您微调DeepSeek模型。到最后,您将能够使用您选择的数据集对几乎任何大型语言模型进行微调。
步骤1:安装必要的库
在开始之前,我们需要从GitHub安装Unloth库及其最新更新。
%%capture
!pip install unsloth
!pip install --force-reinstall --no-cache-dir --no-deps git+https://github.com/unslothai/unsloth.git
现在安装了Unloth,我们可以继续加载模型和标记器。
步骤2:加载模型和标记器
现在,我们将使用Unloth的优化方法加载DeepSeek模型。我使用的是DeepSeek-R1-Distill-Lama-8B型号。
from unsloth import FastLanguageModel
import torch

# Define configurations for loading the model
max_seq_length = 2048
dtype = None  # Automatically choose the best data type (float16, bfloat16, etc.)
load_in_4bit = True  # Enable 4-bit quantization to reduce memory usage

model, tokenizer = FastLanguageModel.from_pretrained(
    model_name="unsloth/DeepSeek-R1-Distill-Llama-8B",
    max_seq_length=max_seq_length,
    dtype=dtype,
    load_in_4bit=load_in_4bit
)
如果要微调另一个模型,只需更改model_name字段即可。
步骤3:应用LoRA适配器进行高效微调
低秩自适应(LoRA)允许我们只微调模型参数的一小部分,使训练更快,内存更高效。
model = FastLanguageModel.get_peft_model(
    model,
    r=16,  # LoRA rank (controls low-rank approximation quality)
    target_modules=["q_proj", "k_proj", "v_proj", "o_proj", "gate_proj", "up_proj", "down_proj"],  # Layers to apply LoRA
    lora_alpha=16, # Scaling factor for LoRA weights
    lora_dropout=0,
    bias="none",
    use_gradient_checkpointing="unsloth",
    random_state=3407,
    use_rslora=False,
    loftq_config=None
)
步骤4:准备训练数据集
在开始训练之前,我们需要加载和预处理我们的数据集。我使用的是sharegpt风格的Sulav/mental_health_counseling_conversations_sharegpt数据集。
您可以使用您选择的任何数据集,但如果它的格式不正确,您将需要手动对其进行编码以匹配所需的格式。《拥抱脸数据集处理指南》是学习如何操纵和转换数据集以进行微调的绝佳资源。正确的格式有助于避免标记化错误或输入不匹配。
from datasets import load_dataset  # Load datasets from Hugging Face Hub

# Load a dataset
dataset = load_dataset("Sulav/mental_health_counseling_conversations_sharegpt", split="train")
现在,我们需要将数据集从ShareGPT风格(“from”、“value”)转换为Hugging face通用格式(“role”、“content”)。
from unsloth.chat_templates import standardize_sharegpt

# Convert dataset format from ShareGPT format to Hugging Face's standardized ("role", "content") structure
dataset = standardize_sharegpt(dataset)
例如,ShareGPT格式的数据集条目:
{"from": "system", "value": "You are an assistant"}
{"from": "human", "value": "What's the capital of France?"}
{"from": "gpt", "value": "The capital of France is Paris."}
转换为基于角色的拥抱脸格式:
{"role": "system", "content": "You are an assistant"}
{"role": "user", "content": "What's the capital of France?"}
{"role": "assistant", "content": "The capital of France is Paris."}
第五步:设置提示格式
一旦数据集准备就绪,我们需要确保数据结构正确,以便模型使用。为此,我们使用get_chat_template函数应用适当的聊天模板(我使用了Llama-3.1格式。)。此函数基本上为标记器准备Llama-3.1聊天格式,以进行对话风格微调。
from unsloth.chat_templates import get_chat_template

# Apply the Llama-3.1 chat template to the tokenizer
tokenizer = get_chat_template(
    tokenizer,  # Tokenizer being used
    chat_template="llama-3.1",  # The chat template format
)

# Function to format the conversation data into tokenized text
def formatting_prompts_func(examples):
    convos = examples["conversations"]
    texts = [tokenizer.apply_chat_template(convo, tokenize=False, add_generation_prompt=False) for convo in convos]
    return {"text": texts}

dataset = dataset.map(formatting_prompts_func, batched=True)
要了解如何以Llama-3.1格式呈现对话,您可以以原始对话格式和格式化文本格式打印项目:
# Print an item in its original conversation format
print(dataset[0]["conversations"])

# Print the same item in its formatted text format
print(dataset[0]["text"])
此步骤确保数据根据模型的训练输入要求进行格式化。
步骤6:设置和配置培训器
现在,我们将使用Hugging Face的SFTTrainer配置微调过程。它自动化了标记化、批处理和优化等关键任务,使微调更容易。SFTTrainer与Unloth高效配合,减少VRAM使用,加快训练速度。
为了加快速度,我将微调限制在60步以内,但您可以将num_train_epochs=1设置为完整运行,max_steps设置为None。
from trl import SFTTrainer
from transformers import TrainingArguments, DataCollatorForSeq2Seq
from unsloth import is_bfloat16_supported


# Define training configurations
trainer = SFTTrainer(
    model=model,
    tokenizer=tokenizer,
    train_dataset=dataset,
    dataset_text_field="text",
    max_seq_length=max_seq_length,
    data_collator=DataCollatorForSeq2Seq(tokenizer=tokenizer),
    dataset_num_proc=2,
    packing=False,

    args=TrainingArguments(
        per_device_train_batch_size=2,  # Number of examples per GPU batch
        gradient_accumulation_steps=4,  # Accumulate gradients over 4 batches before updating model
        warmup_steps=5,  # Number of warmup steps for learning rate schedule
        max_steps=60,  # Limit training steps to 60 (for quick testing)
        # num_train_epochs=1
        learning_rate=2e-4,
        fp16=not is_bfloat16_supported(),
        bf16=is_bfloat16_supported(),
        logging_steps=1,  # Log training metrics after every step
        optim="adamw_8bit",
        weight_decay=0.01,
        lr_scheduler_type="linear",  # Linear decay of learning rate
        seed=3407,
        output_dir="outputs",  # Directory to save model checkpoints
        report_to="none",  # Use this for WandB etc

    ),
)
第7步:只训练助理的反应
为了提高培训效率,我们将只关注助理的反应,而不是用户的输入。
from unsloth.chat_templates import train_on_responses_only
trainer = train_on_responses_only(
    trainer,
    instruction_part="<|start_header_id|>user<|end_header_id|>\n\n",  # Mark user input
    response_part="<|start_header_id|>assistant<|end_header_id|>\n\n",  # Mark assistant response
)
# Start training the model
trainer_stats = trainer.train()
该模型仅对辅助输出进行训练,忽略了用户输入的损失。训练损失逐渐减少,具体如下:
对辅助输出进行训练
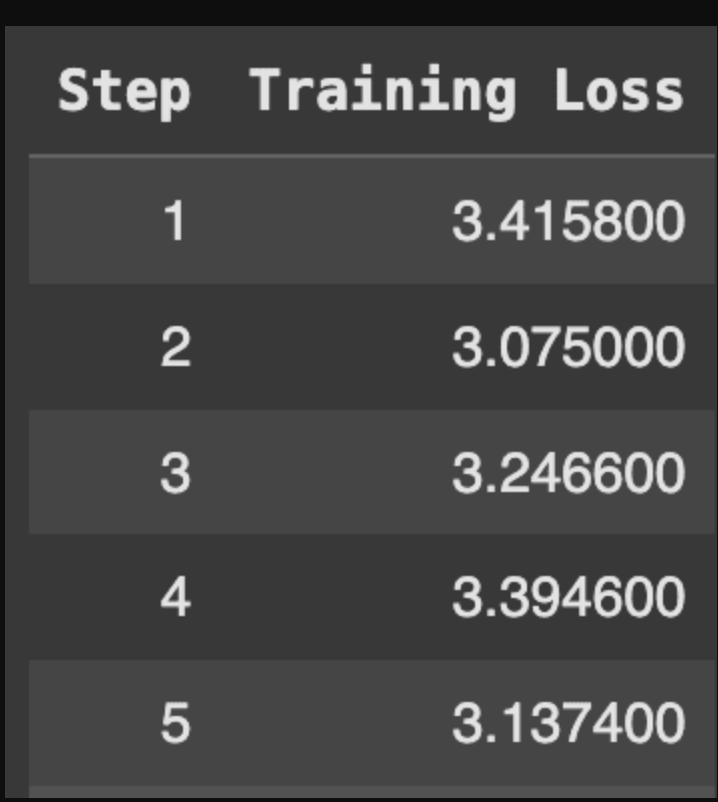
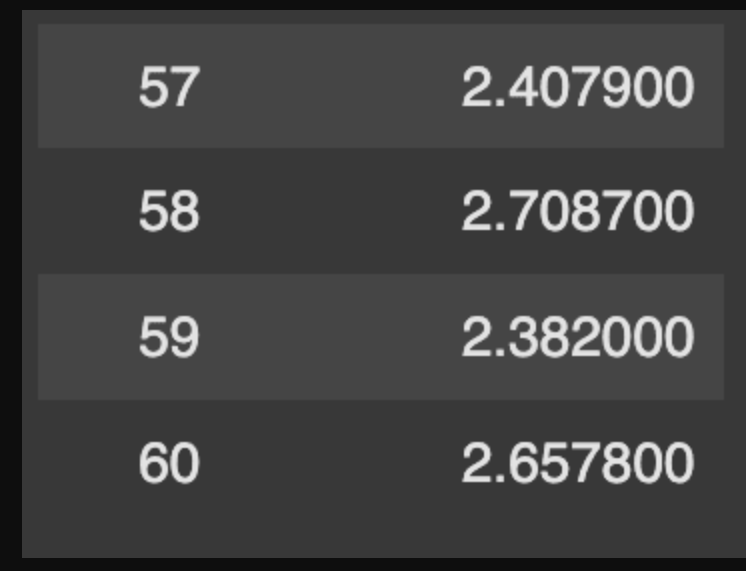
这里训练损失的减少有点少,因为我们只对模型进行了60步的微调。为了获得更好的结果,建议在大型数据集上训练数据集2-3个epoch,在小型数据集中训练数据集3-5个epoch。目标是至少500多步,但如果资源允许,1000多步的训练可以进一步提高模型性能。
第8步:推断
经过微调后,我们可以使用训练好的模型进行推理以生成响应。
tokenizer = get_chat_template(
   tokenizer,
   chat_template = "llama-3.1",
)
# Set the PAD token to be the same as the EOS token to avoid tokenization issues
tokenizer.pad_token = tokenizer.eos_token
FastLanguageModel.for_inference(model) # Enable native 2x faster inference

messages = [
   {"role": "user", "content": "I am sad because I failed my Maths test today"}]
# Tokenize the user input with the chat template
inputs = tokenizer.apply_chat_template(
   messages,
   tokenize=True,
   add_generation_prompt=True,
   return_tensors="pt",
   padding=True,  # Add padding to match sequence lengths
).to("cuda")

attention_mask = inputs != tokenizer.pad_token_id

outputs = model.generate(
   input_ids=inputs,
   attention_mask=attention_mask,
   max_new_tokens=64,
   use_cache=True,  # Use cache for faster token generation
   temperature=0.6,  # Controls randomness in responses
   min_p=0.1,  # Set minimum probability threshold for token selection
)

# Decode the generated tokens into human-readable text
text = tokenizer.decode(outputs[0], skip_special_tokens=True)
print(text)
输出
System
Cutting Knowledge Date: December 2023
Today Date: 26 July 2024

User: I am sad because I failed my Maths test today

Assistant: It is important to recognize that failing a test is not a reflection of your worth.
该输出,特别是辅助响应表明模型已成功微调。
步骤9:保存模型和标记器
您可以通过savepretrained在本地保存模型和标记器:
my_model="MindSeek-8B"
model.save_pretrained(my_model)  # Local saving
tokenizer.save_pretrained(my_model)
您还可以通过将模型推送到拥抱脸来在线保存模型。
model.push_to_hub("your_name/your_model_name") # Online saving
tokenizer.push_to_hub("your_name/your_model_name")
这两者都只保存LoRA适配器,而不是完整型号。GGUF专为高效推理而设计,特别是在CPU上。要以GGUF格式保存完整模型,请使用以下命令:
%%capture
model.push_to_hub_gguf(my_model, tokenizer, quantization_method = "q4_k_m")
它保存了完整的模型(基础模型+微调的LoRA权重)。量化方法q4_k_m压缩模型以减小大小并提高推理速度。
使用DeepSeek-R1模型的推荐做法
为了确保您在使用DeepSeek-R1模型时获得最佳结果,请考虑以下做法:
- 将温度设置在0.5到0.7之间,0.6是最佳值。这个范围有助于平衡创造力和连贯性,减少重复或不合逻辑的输出的可能性。
- 不包括系统提示。所有必要的说明应直接包含在用户提示中,以确保模型按预期运行。
- 对于数学任务,通过添加以下指令来指导模型:
“请逐步解决,并将最终答案放在\boxed{}中。” - 在评估模型的性能时,最好运行多个测试并计算结果的平均值,以获得更可靠的见解。
通过遵循这些步骤,您可以有效地微调DeepSeek或任何其他大型语言模型,只需为您的特定用例进行最少的设置。此外,您还可以查看Unloth文档并访问这个github存储库,其中包含微调各种大型语言模型的演示。如果你在任何时候遇到问题,请在评论区留言!
- 登录 发表评论
- 132 次浏览
Tags
最新内容
- 1 month 2 weeks ago
- 5 months 1 week ago
- 5 months 1 week ago
- 5 months 1 week ago
- 5 months 1 week ago
- 5 months 1 week ago
- 5 months 1 week ago
- 5 months 1 week ago
- 5 months 1 week ago
- 5 months 1 week ago