
category
构建用户友好的AI聊天界面:使用Python顶级框架实现无缝交互、演示和测试
AI聊天界面概述
AI应用的聊天界面提供了与AI助手、本地和云端大语言模型(LLMs)以及智能工作流交互的前端界面。与流行的AI应用如iOS版Grok、Le Chat以及网页和移动端的ChatGPT类似,这些界面支持发送和生成文本、图像、音频或视频(多模态输入输出)。
如何用Python构建AI应用
开发者可以使用多种模型提供商API构建AI应用。流行的AI模型解决方案包括OpenAI、Anthropic、Mistral、Grok和DeepSeek。通常开发者使用LlamaIndex、LangChain、PydanticAI、Embedchain、LangGraph、CrewAI等平台构建这些AI解决方案和智能体。虽然命令行非常适合测试和调试这些应用,但需要直观的界面来与底层AI功能交互,进行真实用户测试或全球分享。
为什么使用Python库构建AI聊天界面?
- 输出流式传输:LLM的响应流式传输实现复杂,但多数UI构建平台提供便捷启用方式
- 聊天机器人动画:通过某些库可免费获得打字指示等动画效果
- 实时反馈:快速获取项目改进建议
- 性能监控:Chainlit使用Literal AI观测服务监控LLM性能
- 易测试性:提供便捷的测试和演示方式
AI聊天界面构建工具及用例
- 多模态AI:音频-文本转换、视觉问答、文档问答等
- 计算机视觉:视频会议中的文本/图像分类
- 自然语言处理:摘要生成、翻译、问答机器人
- 音频处理:语音合成、语音识别、音频分类
1. Gradio:构建测试和部署AI应用的UI
Gradio是由Hugging Face开发的开源Python库,允许开发者快速为大型语言模型(LLM)、智能体以及实时AI语音/视频应用构建用户界面。它通过网页界面提供快速测试和分享AI应用的解决方案,并以低代码方式支持无限AI用例的界面开发。
- 快速上手:仅需几行Python代码即可创建功能完整的AI应用界面
- 展示与分享:轻松将界面嵌入Jupyter Notebook、Google Colab,或通过公开链接分享到Hugging Face平台
- 生产部署:支持将Gradio项目永久托管在Hugging Face Spaces
核心功能与优势
作为机器学习应用前端开发的热门工具,Gradio凭借丰富的组件和预制模块广受欢迎:
- 自定义组件:创建专属UI组件库并集成到AI应用中,支持打包为Python库进行社区分发
- Agent界面:通过Hugging Face transformers.agents快速构建文生图等交互界面
- 主流框架兼容:无缝集成LangChain、LlamaIndex、Embedchain等AI开发平台
- 思维链支持:内置中间思维(CoT)功能,便于构建推理型LLM的演示界面
- 多场景适配:
- 标准输入输出界面(如图像分类、语音转文字)
- 纯输出界面(如图像生成)
- 纯输入界面(如数据库存储类LLM应用)
- 统一覆盖界面(如自动补全场景)
- 模块化设计:通过Blocks快速实现定制化UI
- 聊天机器人:使用gr.ChatInterface高阶抽象快速搭建对话界面
安装与快速启动
以下示例演示如何创建聊天机器人界面:
-
创建Python虚拟环境并安装Gradio:
python -m venv venv
source venv/bin/activate
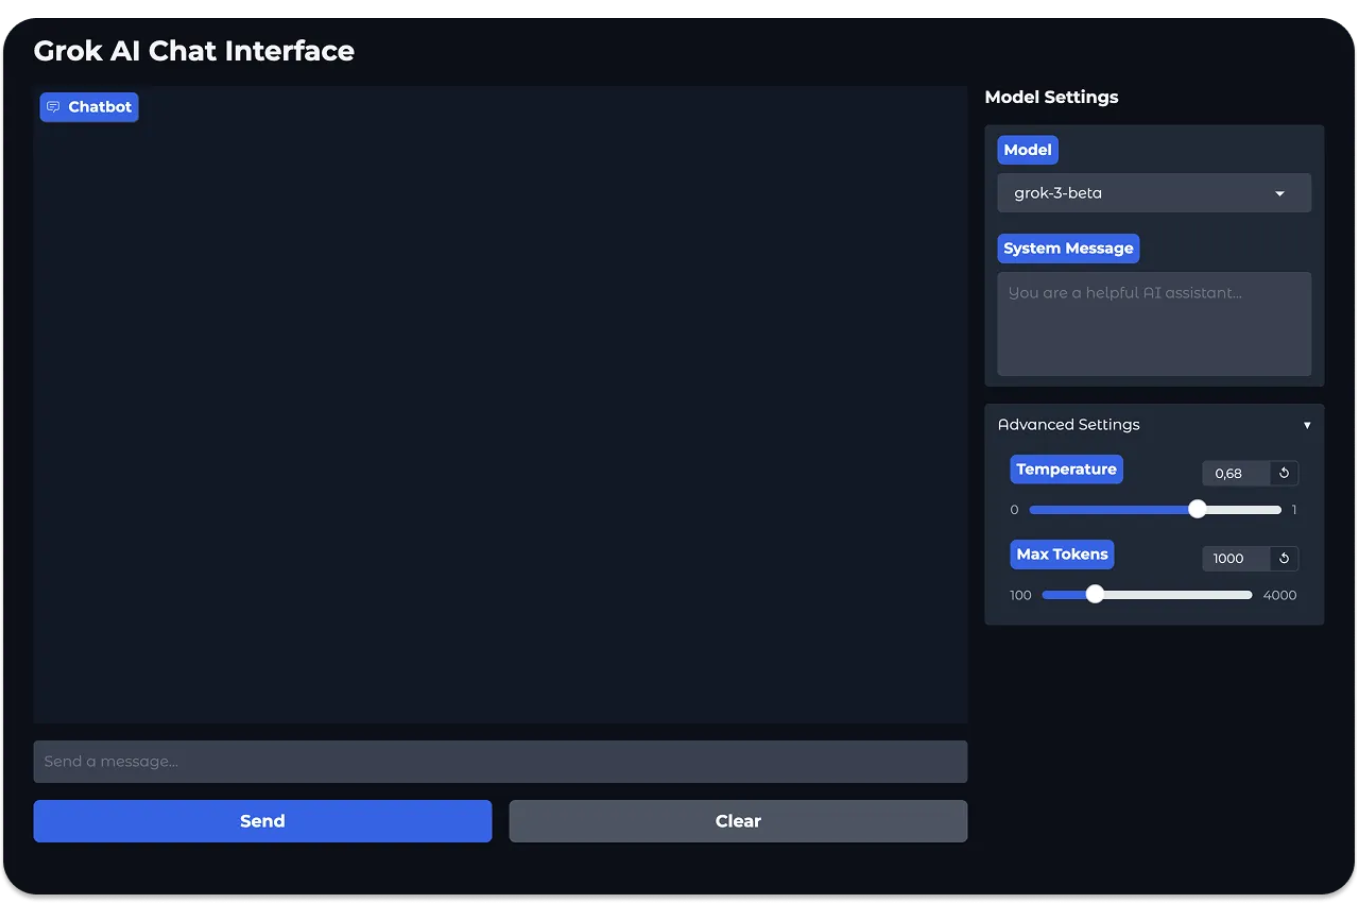
pip install gradio2.示例代码(grok_ui.py)
import gradio as gr
import os
from dotenv import load_dotenv

# Load environment variables from .env file
load_dotenv()

# Function to handle chat interactions
def chat_with_grok(message, history, system_message, model_name, temperature, max_tokens):
    # In a real implementation, this would call the Grok API
    # For now, we'll just echo the inputs to demonstrate the UI is working
    bot_message = f"You selected model: {model_name}\nSystem message: {system_message}\n
    Temperature: {temperature}\nMax tokens: {max_tokens}\n\nYour message: {message}"
    return bot_message

# Create the Gradio interface
with gr.Blocks(theme=gr.themes.Soft(primary_hue="blue")) as demo:
    gr.Markdown("# Grok AI Chat Interface")

    with gr.Row():
        with gr.Column(scale=3):
            # Main chat interface
            chatbot = gr.Chatbot(
                height=600,
                show_copy_button=True,
                avatar_images=("👤", "🤖"),
                bubble_full_width=False,
            )

            # Message input
            msg = gr.Textbox(
                placeholder="Send a message...",
                container=False,
                scale=7,
                show_label=False,
            )

            with gr.Row():
                submit_btn = gr.Button("Send", variant="primary", scale=1)
                clear_btn = gr.Button("Clear", variant="secondary", scale=1)

        with gr.Column(scale=1):
            # Model settings sidebar
            gr.Markdown("### Model Settings")

            model_dropdown = gr.Dropdown(
                choices=["grok-1", "grok-2", "grok-3-beta"],
                value="grok-3-beta",
                label="Model"
            )

            system_message = gr.Textbox(
                placeholder="You are a helpful AI assistant...",
                label="System Message",
                lines=4
            )

            with gr.Accordion("Advanced Settings", open=False):
                temperature = gr.Slider(
                    minimum=0.0,
                    maximum=1.0,
                    value=0.7,
                    step=0.01,
                    label="Temperature"
                )

                max_tokens = gr.Slider(
                    minimum=100,
                    maximum=4000,
                    value=1000,
                    step=100,
                    label="Max Tokens"
                )

    # Set up event handlers
    submit_btn.click(
        chat_with_grok,
        inputs=[msg, chatbot, system_message, model_dropdown, temperature, max_tokens],
        outputs=[chatbot],
    ).then(
        lambda: "",
        None,
        msg,
        queue=False
    )

    msg.submit(
        chat_with_grok,
        inputs=[msg, chatbot, system_message, model_dropdown, temperature, max_tokens],
        outputs=[chatbot],
    ).then(
        lambda: "",
        None,
        msg,
        queue=False
    )

    clear_btn.click(lambda: None, None, chatbot, queue=False)

# Launch the app
if __name__ == "__main__":
    demo.launch()
在这个示例中,我们使用Gradio的gr.Blocks()组件为AI创建了一个包含文本输入输出功能的聊天机器人界面。通过内置的区块组件,我们可以将界面划分为消息输入输出区、模型设置区和高级设置区。
运行Python文件grok_ui.py后,将通过本地URL http://127.0.0.1
:7860 显示上述聊天界面。
太棒了!👏 您已使用Gradio创建了首个AI聊天界面。正如之前讨论的,Gradio不仅能构建文本和图像生成界面,还可以轻松与其他AI开发平台集成,创建各种应用场景的界面。接下来我们将使用Gradio构建实时语音界面,让您能与AI进行实时语音对话。
Gradio:构建实时语音界面
Gradio是构建对话式AI界面的绝佳选择。我们将使用其内置组件配合Hugging Face的FastRTC创建实时语音应用。FastRTC可视为OpenAI实时API的替代方案,这个Python库能帮助开发者构建AI实时通信应用。本节将创建简单的语音界面,实现语音输入并通过FastRTC输出回声。
与之前示例类似,我们首先创建虚拟环境并安装所需依赖:
python -m venv venv
source venv/bin/activate
pip install gradio
pip install fastrtc
安装vad、stt和tts扩展:
pip install "fastrtc[vad, stt, tts]"接着创建新Python文件gradio_fastrtc_voice_ui.py,并填入以下内容:
from fastrtc import Stream, ReplyOnPause
import numpy as np
def echo(audio: tuple[int, np.ndarray]):
# 该函数将持续接收音频直到用户暂停
# 可实现任何生成音频的迭代器
# 完整示例请参考"LLM语音聊天"
yield audio
stream = Stream(
handler=ReplyOnPause(echo),
modality="audio",
mode="send-receive",
)
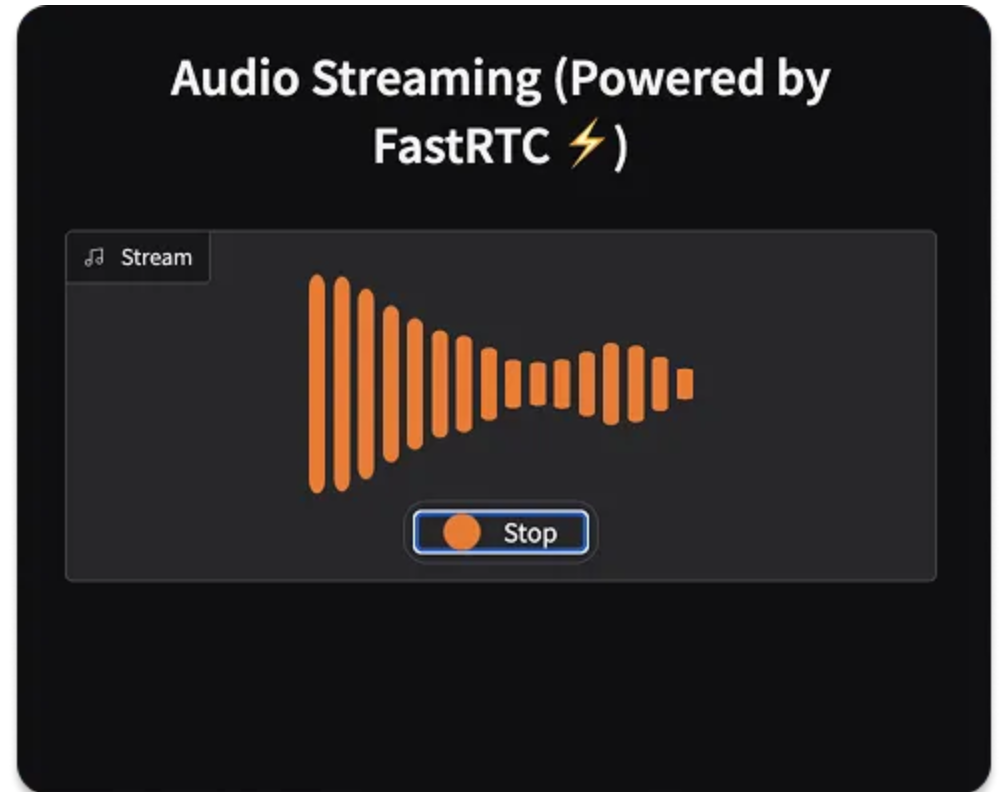
stream.ui.launch()在上述示例代码中,stream.ui.launch()方法会启动内置的Gradio界面用于快速测试和分享实时流。运行Python文件后,终端将显示运行地址:Running on local URL: http://127.0.0.1
:7860。在浏览器中打开该地址,即可看到如图所示的Gradio语音界面。开始实时通信前请授权网络摄像头访问。恭喜!😊 您已创建首个Gradio实时语音界面。
Gradio:与主流API及LLM库集成
当使用OpenAI、Anthropic、xAI等主流大语言模型API,或Embedchain、LlamaIndex等开发库时,可以轻松使用Gradio构建项目前端。以下参考指南可帮助您快速上手:
-
Gradio与Llama Index整合
Gradio与Enbedchain整合
Gradio与LangChain整合
Gradio与OpenAI整合
Gradio与SambaNova整合
Gradio与Hyperbolic整合
Gradio与Anthropic的Claude整合
2. Streamlit:构建云端AI应用
除了Gradio,Streamlit是另一个优秀的开源应用框架,专注于为AI项目构建用户界面。它以"极简易用"著称。若需创建本地运行LLM的界面,可将Streamlit与Ollama结合,直接访问QwQ-32等开源推理模型。
Streamlit的核心优势
- 仅需5行Python代码即可创建完整应用
- 通过预置组件扩展功能
- 支持一键部署到网页
- 内置文本流式动画和加载状态动画
- 兼容LangChain、LlamaIndex等主流AI开发工具
- 提供实时交互的生成式AI聊天界面
本地运行模型的Streamlit实践
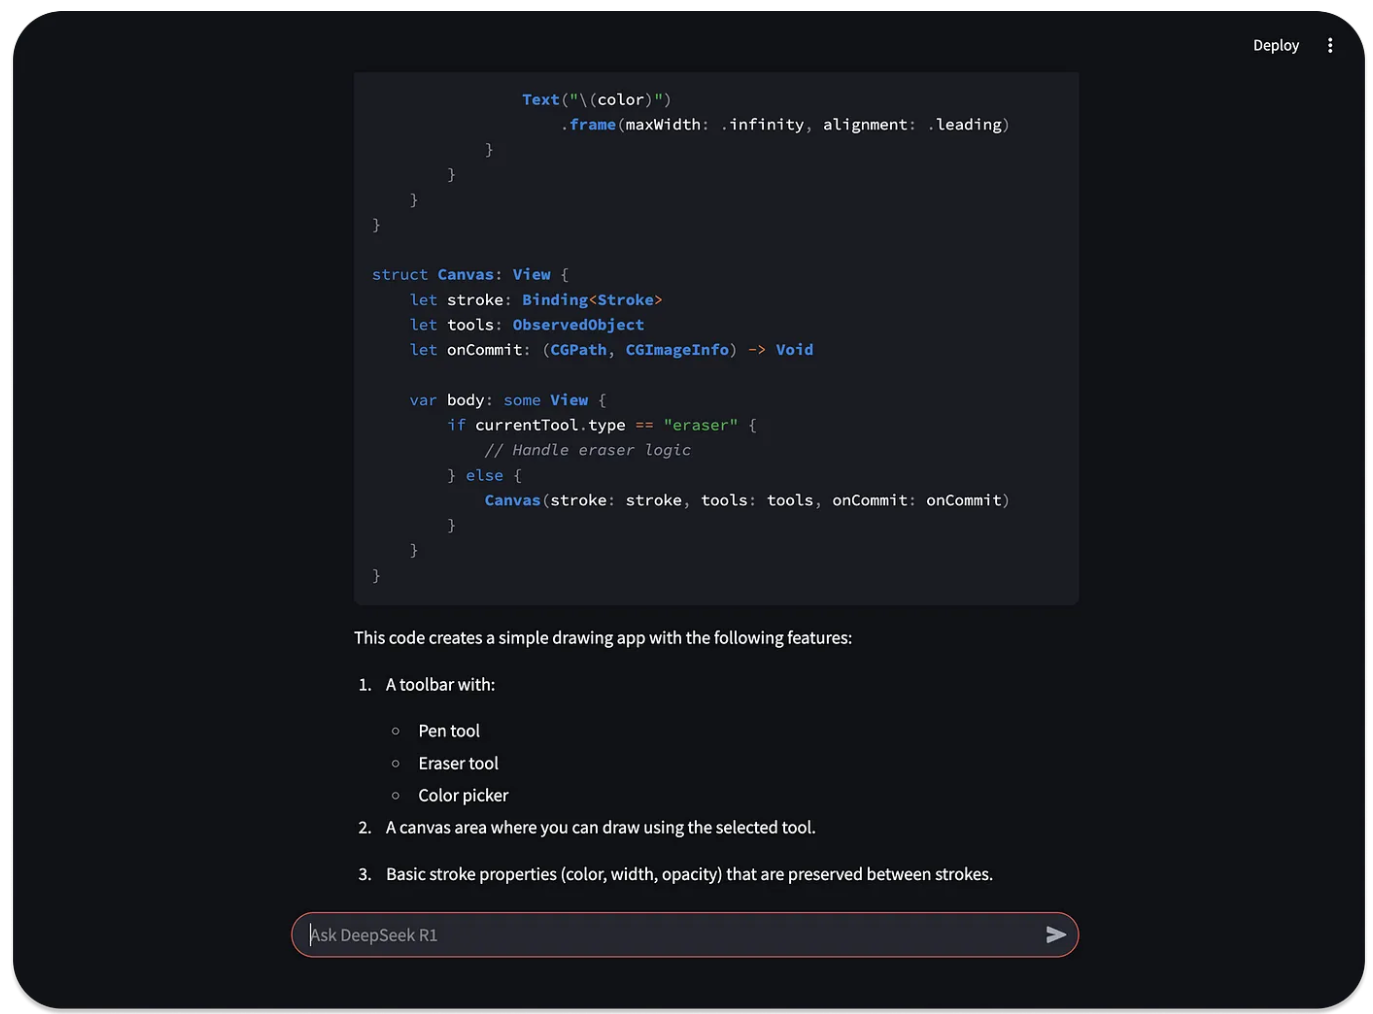
本教程演示如何通过Streamlit复刻DeepSeek聊天界面,并本地运行DeepSeek R1模型,实现以下目标:
- 构建本地测试界面,避免数据外泄风险
- 利用流式输出模拟打字机效果
- 自动显示加载动画和计时器
- 提升用户等待回答时的体验
环境配置步骤
执行以下命令准备环境:
python -m venv venv
source venv/bin/activate
pip install streamlit ollama
ollama run deepseek-r1:8b
代码实现(文件:local_deepseek_r1_streamlit.py)
将以下代码保存为Python文件:
import streamlit as st
import ollama
import time

def stream_data(text, delay: float=0.02):
    for word in text.split():
        yield word + " "
        time.sleep(delay)

# Input for the prompt
prompt = st.chat_input("Ask DeepSeek R1")

# Initialize chat history in session state if it doesn't exist
if "messages" not in st.session_state:
    st.session_state.messages = []

# Display chat history
for message in st.session_state.messages:
    with st.chat_message(message["role"]):
        st.markdown(message["content"])

if prompt:
    # Add user message to chat history
    st.session_state.messages.append({"role": "user", "content": prompt})

    # Display input prompt from user
    with st.chat_message("user"):
        st.markdown(prompt)

    # Processing
    with st.chat_message("assistant"):
        message_placeholder = st.empty()
        full_response = ""

        # Stream the response with a spinner while waiting for the initial response
        with st.spinner("Thinking...", show_time=True):
            response = ollama.chat(
                model="deepseek-r1:8b",
                messages=[{"role": m["role"], "content": m["content"]} for m in st.session_state.messages],
                stream=True  # Enable streaming if supported by your ollama version
            )

            # If streaming is supported
            if hasattr(response, '__iter__'):
                for chunk in response:
                    if chunk and "message" in chunk and "content" in chunk["message"]:
                        content = chunk["message"]["content"]
                        full_response += content
                        message_placeholder.markdown(full_response + "▌")
                message_placeholder.markdown(full_response)
            else:
                # Fallback for non-streaming response
                full_response = response["message"]["content"]
                # Simulate streaming for better UX
                for word in stream_data(full_response):
                    message_placeholder.markdown(full_response[:len(word)] + "▌")
                message_placeholder.markdown(full_response)

        # Add assistant response to chat history
        st.session_state.messages.append({"role": "assistant", "content": full_response})
运行指令
在终端执行命令启动应用:
streamlit run local_deepseek_r1_streamlit.py
:8501/ 即可体验本地AI聊天应用,包含流式输出、加载动画和动态计时功能。Streamlit提供丰富的集成案例库,支持快速构建各类AI应用。
3. Chainlit:构建对话式AI界面

与Streamlit类似,您可以使用Chainlit创建美观实用的用户界面来与AI系统和大型语言模型(LLM)交互。Streamlit可用于在纯Python中构建通用型Web应用程序以处理数据和AI任务,而Chainlit专注于创建AI和LLM应用。如果您想构建通用Python Web应用而非专注于AI,Chainlit可能并不适合。
加粗关键特性和优势
- 广泛集成第三方应用和部署选项,适合创建AI聊天界面
- 通过内置监控、可观测性和认证机制,与团队协作构建安全且可扩展的AI应用
加粗核心功能
- 内置监控与分析:通过Literal AI的仪表盘和提示调试界面,监控Anthropic、OpenAI等模型提供商的API调用
- 界面定制:支持基础修改(如更换徽标和图标)和高级主题定制(使用自定义CSS调整组件样式)
- 认证机制:支持OAuth等标准协议,可通过Google、GitHub等第三方服务认证,也支持密码/登录认证
- 功能支持:消息交互、流式传输、音频处理、聊天历史记录、用户配置、反馈功能(类似ChatGPT的点赞/点踩机制)
- 集成扩展:与Mistral AI、Autogen、Haystack等流行Python库和API集成
- 部署场景:可作为独立AI Web应用部署,或嵌入Slack、Discord、Microsoft Teams等应用作为内置功能
构建Chainlit界面访问100+大型语言模型
本节演示如何通过LiteLLM平台创建本地Chainlit界面。LiteLLM作为网关,以兼容OpenAI的格式提供数百种LLM的访问和费用跟踪功能。本例通过Ollama本地调用DeepSeek R1的蒸馏模型。
操作步骤:
-
按前文方法安装Ollama
-
安装依赖库:
pip install chainlit
pip install litellm在编辑器中创建Python文件,填入以下代码:
import chainlit as cl
import litellm

@cl.on_message
async def on_message(message: cl.Message):
  msg = cl.Message(content="")
  await msg.send()

  system_message = {
    "role": "system",
    "content": """You are an advanced AI assistant powered by the deepseek-r1:8b model.

Your strengths:
- Providing clear, accurate, and thoughtful responses
- Breaking down complex topics into understandable explanations
- Offering balanced perspectives on questions
- Being helpful while acknowledging your limitations

Guidelines:
- If you're uncertain about something, acknowledge it rather than making up information
- When appropriate, suggest related questions the user might want to ask
- Maintain a friendly, respectful tone
- Format your responses with markdown when it improves readability
"""
  }

  response = await litellm.acompletion(
    model="ollama/deepseek-r1:8b",
    messages = [
      system_message,
      {"role": "user", "content": message.content}
    ],
    api_base="http://localhost:11434",
    stream=True
  )

  async for chunk in response:
    if chunk:
      content = chunk.choices[0].delta.content
      if content:
        await msg.stream_token(content)

  await msg.update()
其他Python框架
- Messop:Google团队使用的快速AI应用构建工具
- FastHTML:纯Python现代Web应用框架
- Reflex:全栈Python框架,支持AI图像生成
总结
选择AI聊天界面框架需综合考虑功能、扩展性、集成能力和部署选项。Gradio适合快速原型开发,Streamlit擅长数据可视化应用,Chainlit专注企业级AI解决方案。开发者可根据项目需求选择最适合的工具,或结合Stream等平台的预置组件快速集成AI助手功能。
- 登录 发表评论
- 181 次浏览
最新内容
- 8 hours ago
- 1 week 6 days ago
- 3 weeks ago
- 3 weeks 4 days ago
- 2 months 1 week ago
- 6 months 1 week ago
- 6 months 1 week ago
- 6 months 1 week ago
- 6 months 1 week ago
- 6 months 1 week ago