category
重要事项
在对生成式人工智能进行了大量投资并增强了Microsoft Copilot之间的集成后,Power Virtual Agents的功能和特性现在是Microsoft Copiloth Studio的一部分。
在我们更新文档和培训内容时,一些文章和屏幕截图可能会参考Power Virtual Agents。
注:
本文包括仅适用于Microsoft Copilot Studio经典聊天机器人的信息。此功能在新的Microsoft Copilot Studio体验中不可用。
当您使用Microsoft Copilot Studio副驾驶作为Bot Framework机器人的技能时,Bot Framework机器人会确定用户所说的任何内容是否与Microsoft Copilot-Studio副驾驶的触发短语相匹配。如果匹配,Bot Framework机器人会将对话传递给Microsoft Copilot Studio机器人。Microsoft Copilot-Studio副驾驶会提取任何实体并触发匹配主题。
您还可以将变量作为Bot Framework Composer的输入传递给Microsoft Copilot Studio技能主题,并使用它返回的输出。
重要事项
您必须拥有试用版或完整的Microsoft Copilot Studio许可证,才能将Microsoft Copilow Studio机器人作为技能使用。此功能不适用于Teams Microsoft Copilot Studio许可证。
要将Microsoft Copilot Studio副驾驶设置为技能,请执行以下操作:
- 将Bot Framework机器人添加到Microsoft Copilot Studio副驾驶的列表中。
- 下载Microsoft Copilot Studio副驾驶的技能清单。
- 使用Bot Framework Composer中下载的技能清单在机器人之间创建连接。
- 使用Bot Framework模拟器确认机器人作为一种技能工作。
Prerequisites
- Understand how Bot Framework skills work.
- Understand how to use Bot Framework Composer.
- Understand how to use skills in Bot Framework Composer.
- Get your Bot Framework bot's app ID.
Add your Bot Framework bot to the allowlist for your Microsoft Copilot Studio copilot
Add the Bot Framework bot's app ID to the allowlist for the Microsoft Copilot Studio copilot that you want to use as a skill. The bots must be in the same tenant.
-
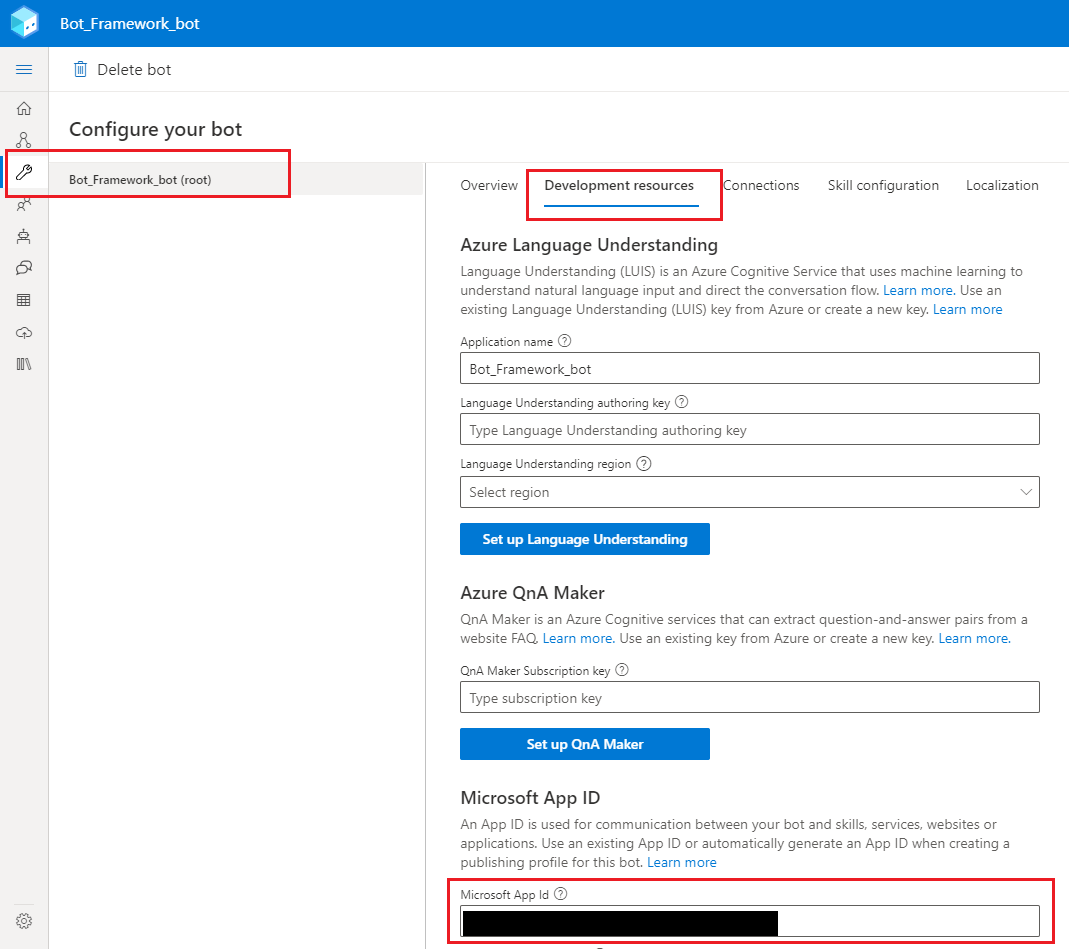
In Bot Framework Composer, open the bot that will use the skill. Select Configure, and then select Development resources. Copy the ID in Microsoft App ID.
-
In Microsoft Copilot Studio, open the copilot you want to use as a skill.
-
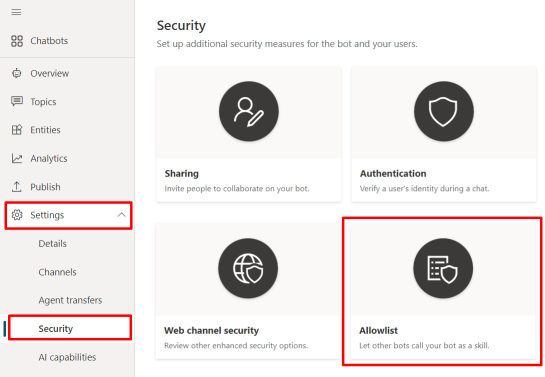
In the navigation menu, go to Settings and select Security. Then select Allowlist.
-
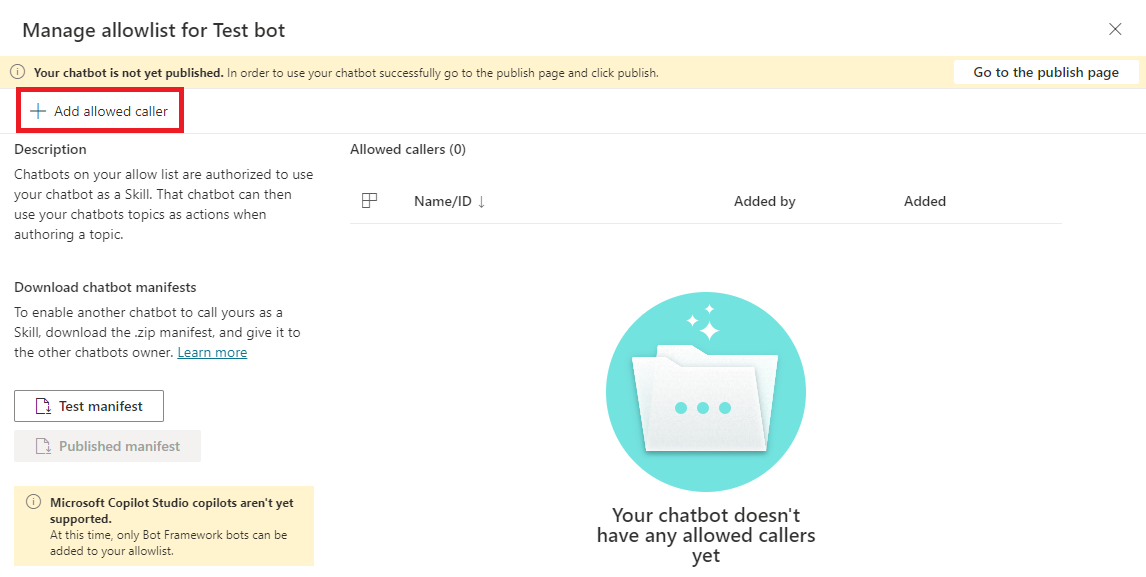
Select Add allowed caller.
-
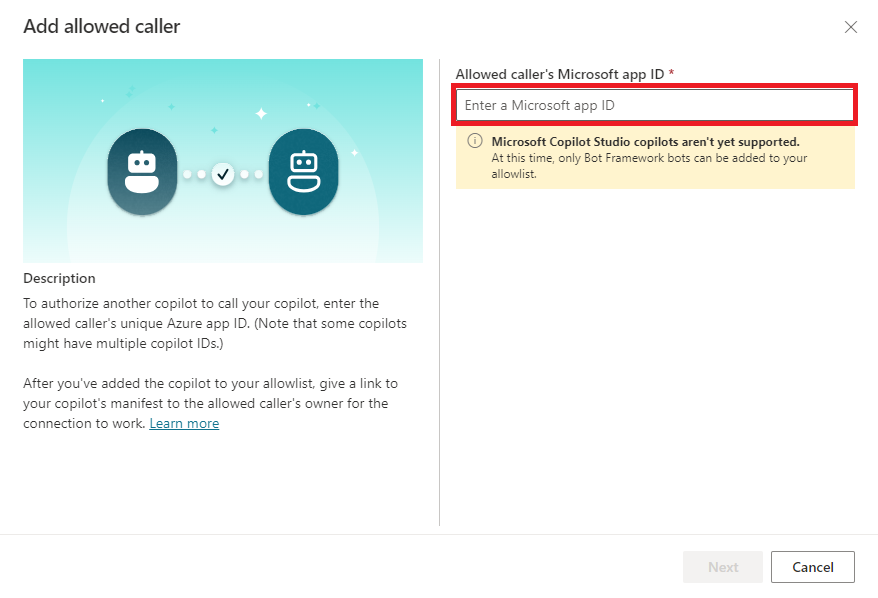
Paste your Bot Framework bot's app ID and select Next.
Caution
A Microsoft Copilot Studio copilot can't act as a skill for other Microsoft Copilot Studio copilots. If you try to add an app ID that belongs to a Power Virtual Agent bot to the allowlist, you'll get an error. You can only add an app ID for a Bot Framework bot.
Microsoft Copilot Studio validates the Bot Framework bot's app ID and confirms that it belongs to a bot in the same tenant.
-
(Optional) Add a Display name for the bot you've added to the allowlist.
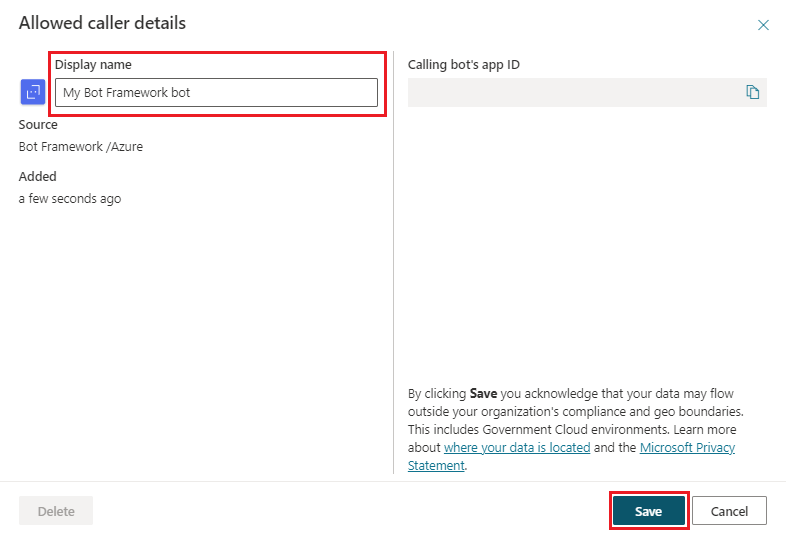
-
Select Save.
The Bot Framework bot is shown by its display name if you entered one, or by its app ID if you didn't enter a display name. To delete or edit it at any time, select the icon to the right of the bot's display name or app ID.
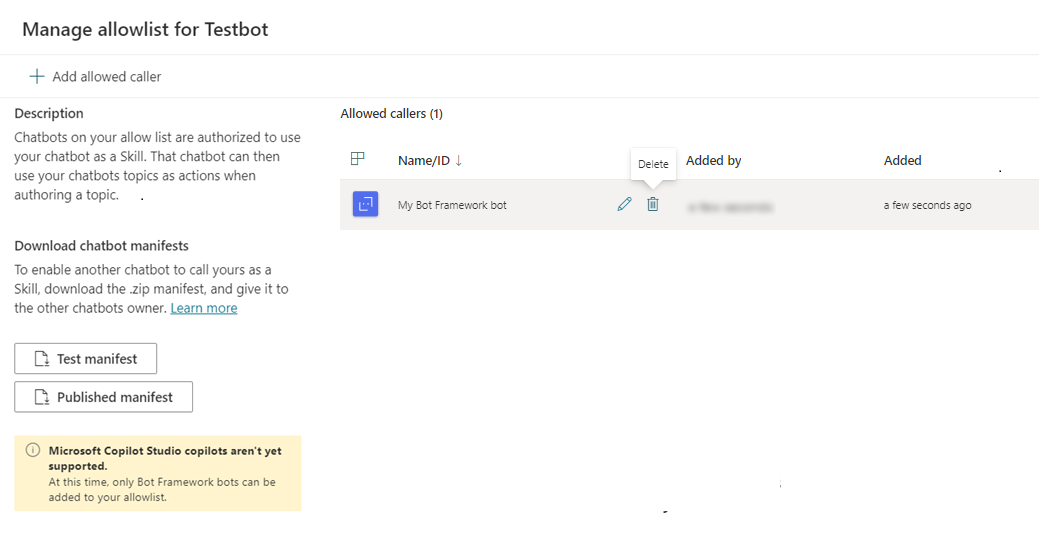
Note
Bot Framework bots added to the allowlist aren't exported as part of the bot content.
Download the copilot skill manifest for your Microsoft Copilot Studio copilot
Bot Framework bots can use a Microsoft Copilot Studio skill manifest to configure a connection to the copilot that produced the manifest.
All Microsoft Copilot Studio copilots have skill manifests. These are JSON files that include a skill's name, interface, and trigger phrases.
A Bot Framework bot can use a skill manifest to know when to trigger the Microsoft Copilot Studio bot (for example, in response to something a user says to it).
Microsoft Copilot Studio skill manifests follow version 2.2 of the Bot Framework skill manifest schema and consist of intents.lu and manifest.json files.
A Bot Framework bot may decide a Microsoft Copilot Studio copilot should handle the user's request, based on the manifest data. It passes to the copilot everything the user said. Then, the Microsoft Copilot Studio copilot matches what the user said to a Microsoft Copilot Studio topic, extracts any entities that are needed for slot-filling, and triggers the Microsoft Copilot Studio topic.
Microsoft Copilot Studio skill manifests are automatically generated and updated. A Microsoft Copilot Studio copilot has two skill manifests:
-
Test manifest: Allows the Bot Framework bot to connect to the test version of your Microsoft Copilot Studio copilot. Use the test manifest to validate changes to your skill before you publish it.
- The test manifest is immediately available for every newly created Microsoft Copilot Studio bot.
- It's automatically updated to reflect changes every time you save your copilot.
-
Published manifest: Allows the Bot Framework bot to connect to the published version of your Microsoft Copilot Studio copilot.
- The published manifest is only available for Microsoft Copilot Studio copilots that have been published at least once.
- It's automatically updated to reflect changes every time you publish your copilot.
Note
The Published manifest isn't available for Microsoft Copilot Studio copilots that have never been published.
To generate your bot's Published manifest, publish your Microsoft Copilot Studio copilot.
Both skill manifests are shown on the Manage allowlist panel.
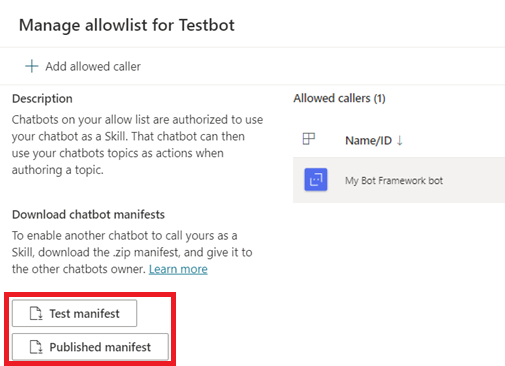
The skill manifests are also shown on the copilot's Details page. In the navigation menu, select Settings, and then select Details. The Details page shows other metadata, including Environment ID, Tenant ID, and Bot app ID.
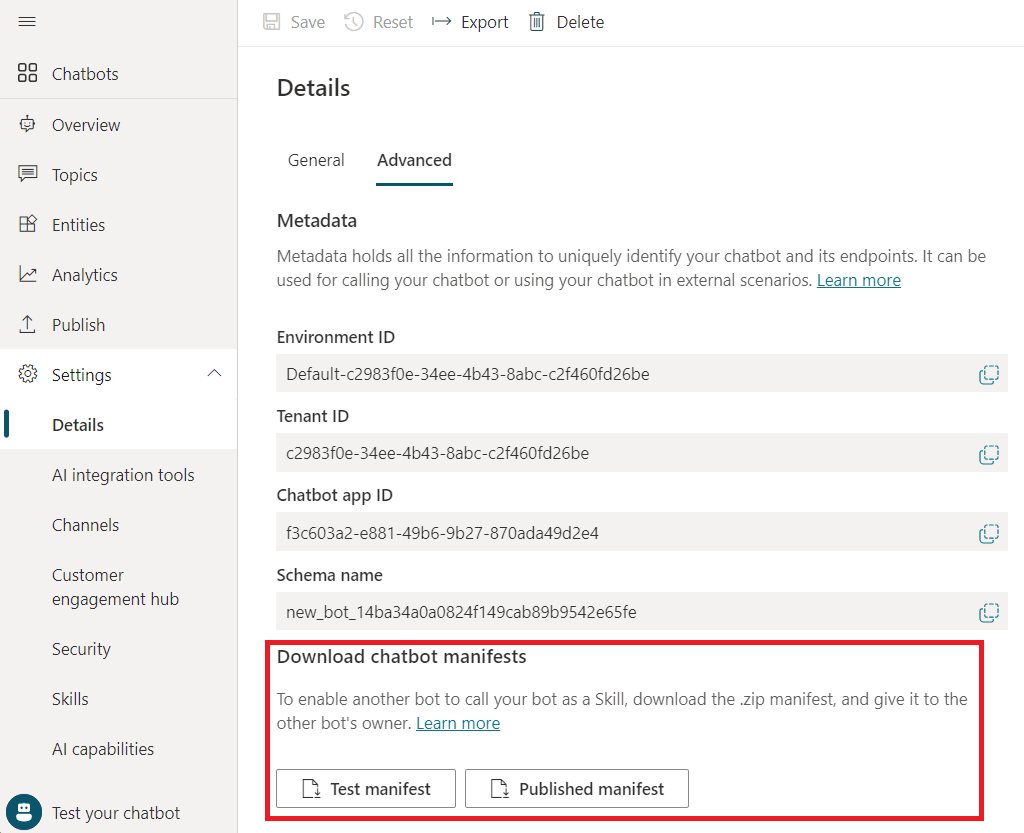
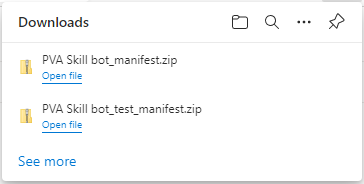
To download a manifest, select it. It downloads as a .zip file labeled <bot name>_manifest for the Published manifest, or <bot name>_test__manifest for the Test manifest.
Note
The skill manifest doesn't include system topics and Composer dialogs that are added to a Microsoft Copilot Studio copilot. Only topics that were created by copilot authors and Composer intent triggers that authors add to the bot are included.
Connect to a Microsoft Copilot Studio skill in Composer
Use Microsoft Copilot Studio skill manifests to create a skill connection in your Bot Framework bot in Composer.
-
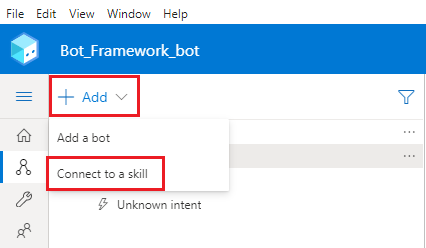
In a Bot Framework Composer project, select Add, and then select Connect to a skill.
-
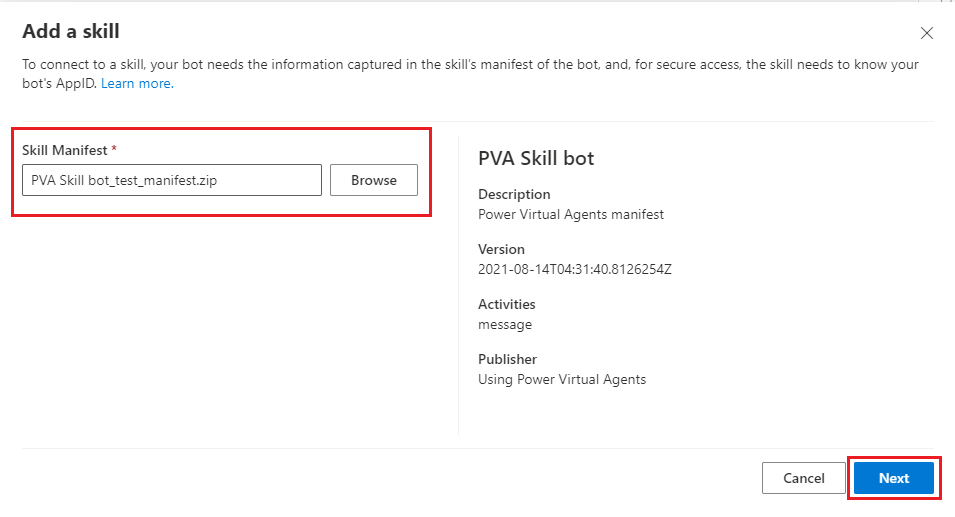
Browse to and select a Microsoft Copilot Studio manifest .zip archive, and then select Next.
-
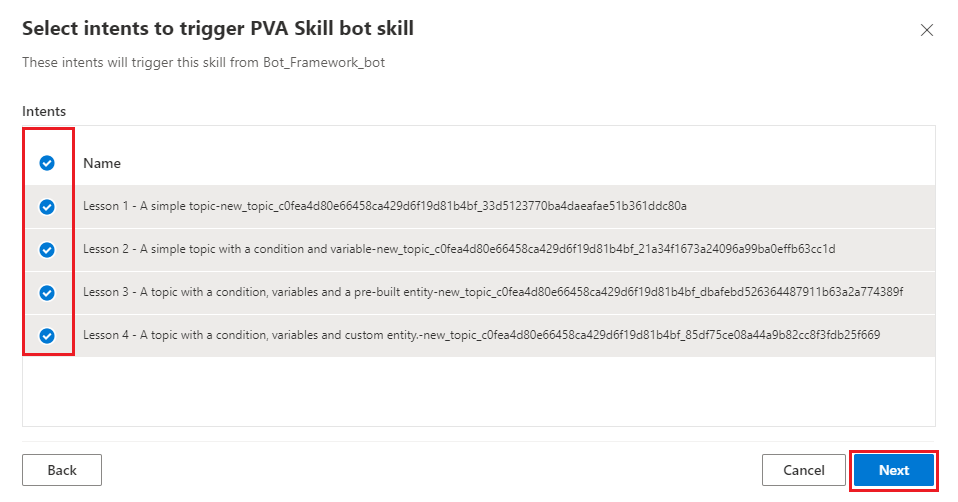
Select the topics, or intents, in your Microsoft Copilot Studio copilot that you want to add to your Bot Framework bot, and then select Next.
-
Review and edit the trigger phrases for your Microsoft Copilot Studio copilot, and then select Next.
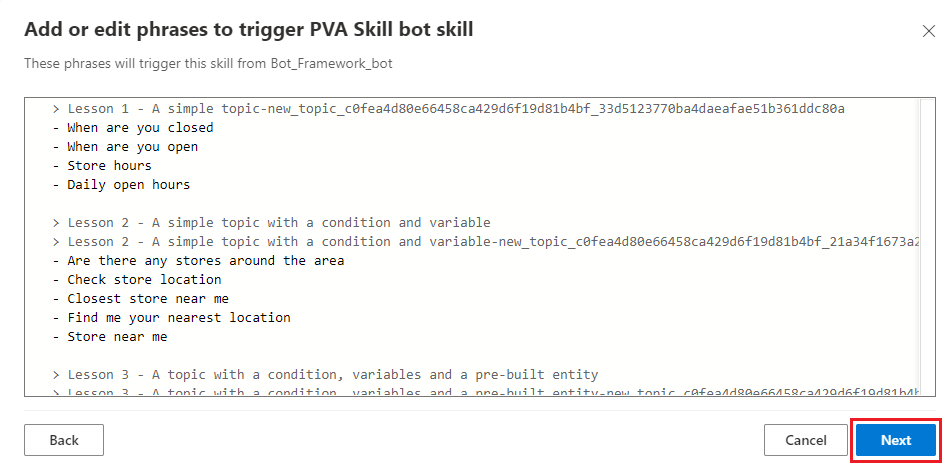
-
Make sure Use Orchestrator for multi-bot projects is selected, and then select Continue.
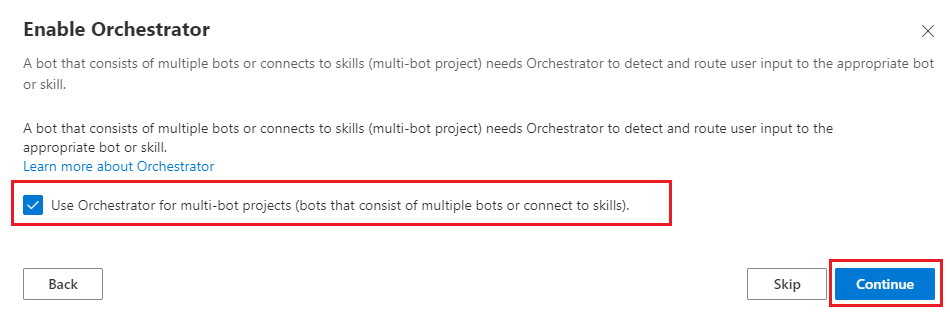
-
Verify that the Microsoft Copilot Studio skill is added to your Bot Framework bot correctly, and that a new trigger with your Microsoft Copilot Studio copilot's name appears in the project in Composer.
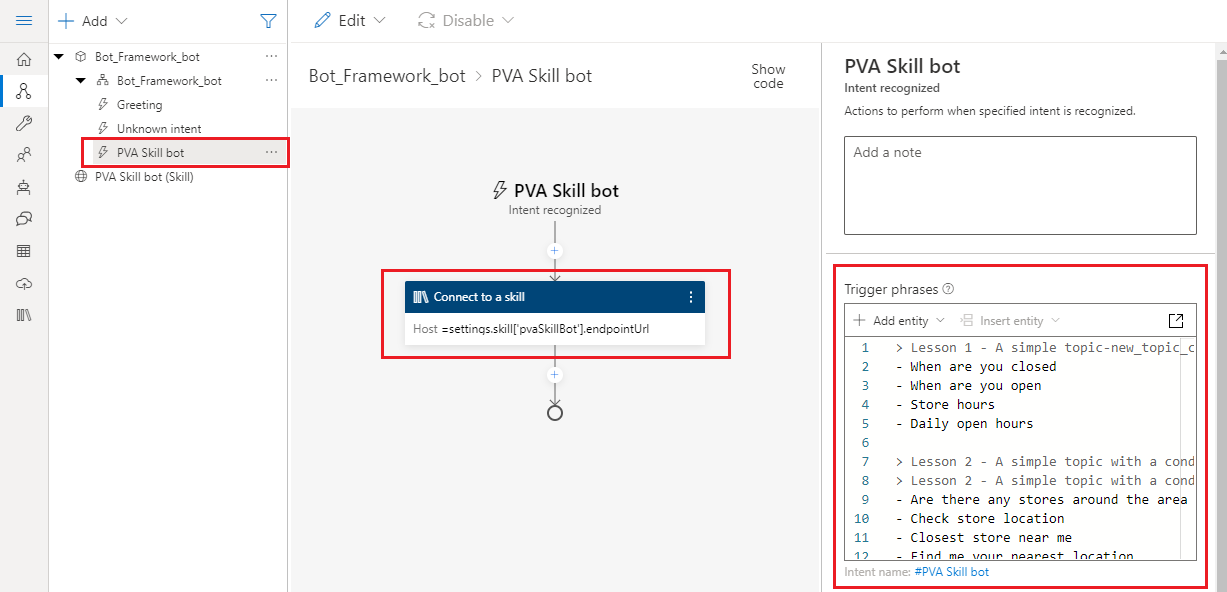
Locate the topic in the skill manifest
Use an event to trigger a Microsoft Copilot Studio topic in the skill. To call a specific topic from Composer, refer to the topic by the name of the associated event in the skill manifest.
-
Select the Connect to a skill action.
-
Under Skill Dialog Name, select Show skill manifest.

-
Find activities in the manifest. This property contains nested properties that represent the topics available in your Microsoft Copilot Studio copilot.
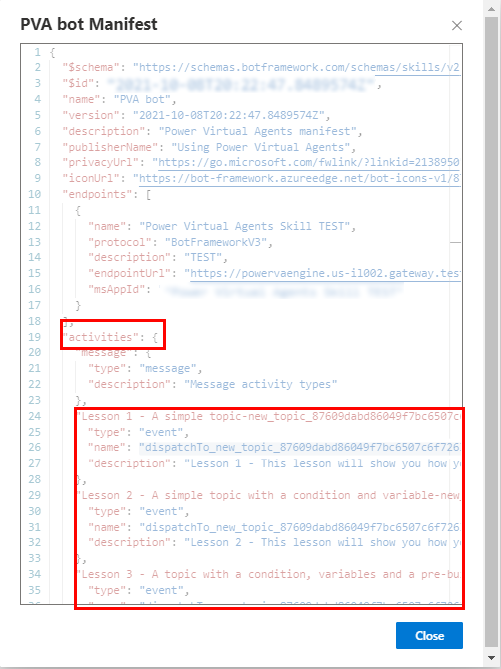
-
Find the topic you want to call and look for its name property. When the Microsoft Copilot Studio skill receives an event with this name, it triggers the topic.
In the following example, the event activity name is
dispatchTo_new_topic_87609dabd86049f7bc6507c6f7263aba_33d.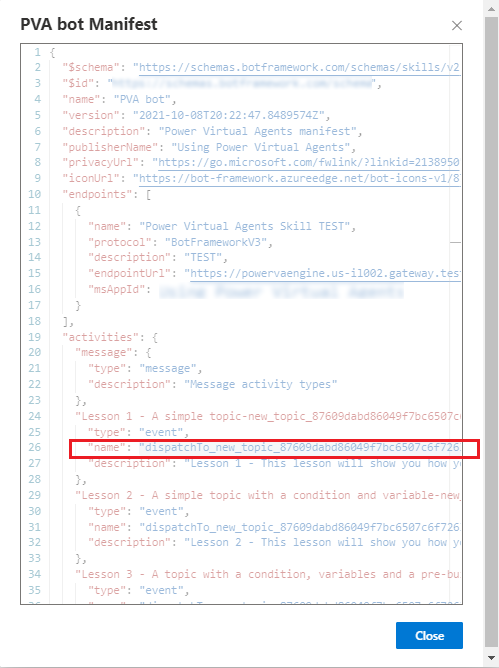
Call a Microsoft Copilot Studio skill topic
Instead of relying on what a user says to trigger a Microsoft Copilot Studio skill topic, you can call it directly. You can only directly call Microsoft Copilot Studio topics that are listed in the skill manifest.
-
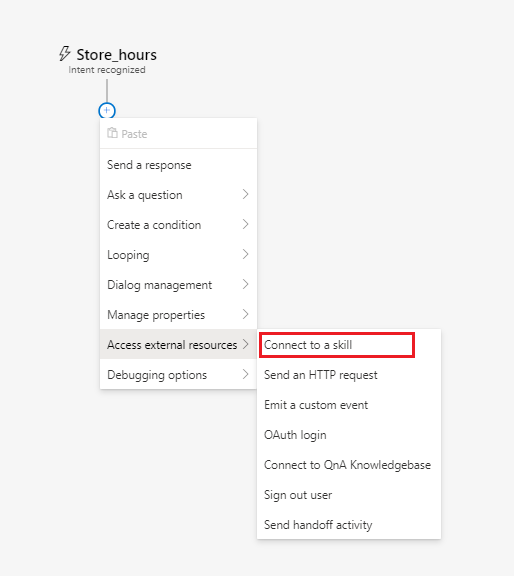
In the Composer authoring canvas, select Add, then select Access external resources, and then select Connect to a skill.
-
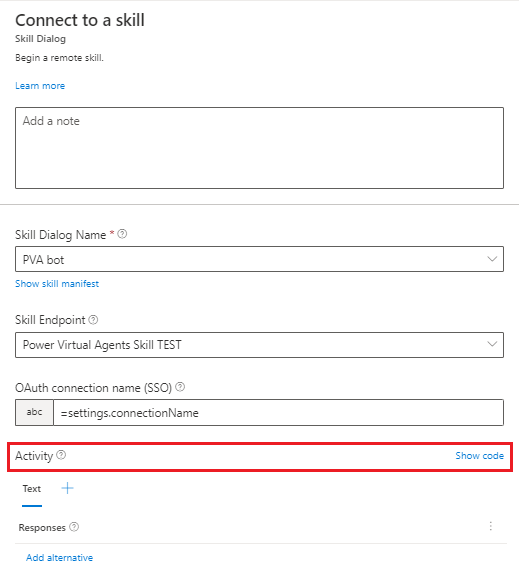
In the Skill Dialog Name list, select your Microsoft Copilot Studio copilot.

-
Find the event activity's name for the Microsoft Copilot Studio bot topic that you want to call. Copy the value, omitting the quotation marks, and save it to use in the next steps.
-
Select Close.
-
In the Activity section, select Show code.
-
Type or paste the following code. Replace
TOPIC_ACTIVITY_NAMEwith your topic's event activity name. Make sure there are no quotation marks in the name property.Bot response[Activity type = event name = TOPIC_ACTIVITY_NAME ]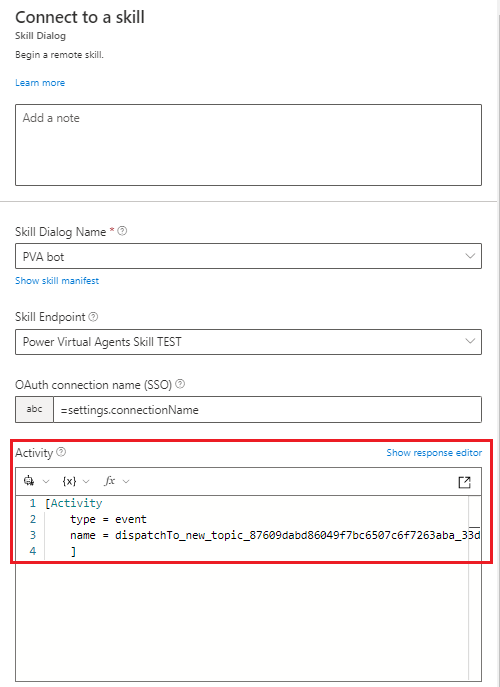
Pass an input variable to a Microsoft Copilot Studio skill topic
Bot Framework Composer can pass a variable to a Microsoft Copilot Studio skill topic as an input. To learn how to create Microsoft Copilot Studio topics that accept input variables, see Passing variables between topics.
If a Microsoft Copilot Studio topic that can receive an input variable is listed in your skill manifest, you can pass a Composer variable to it.
-
In the Composer authoring canvas, select Add, then select Access external resources, and then select Connect to a skill.

-
In the Skill Dialog Name list, select your Microsoft Copilot Studio copilot.

-
Find the event activity's name for the Microsoft Copilot Studio copilot topic that you want to call. Copy the value, omitting the quotation marks, and save it to use in the next steps.
-
Find the topic's value property. The value property contains a $ref property. Copy that value and save it to use in the next step.
Warning
If a Microsoft Copilot Studio topic doesn't have inputs, it won't have a value property.
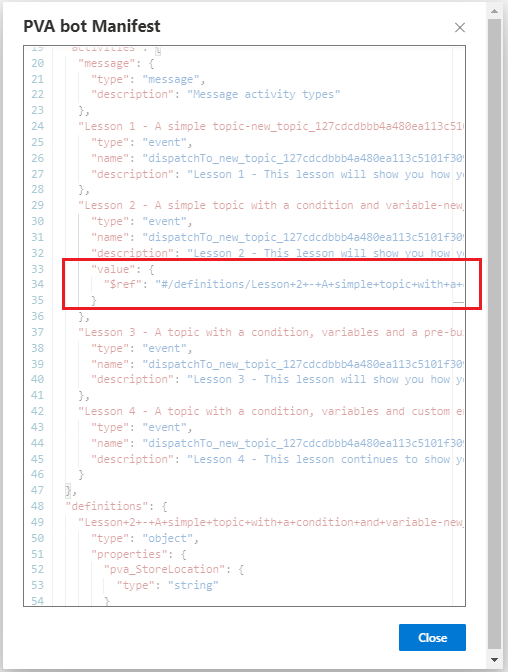
-
Find the definitions property, then look for a nested property that matches the $ref value you found in the previous step. Note the names and types of the Microsoft Copilot Studio topic's inputs. You'll use them in the next steps.
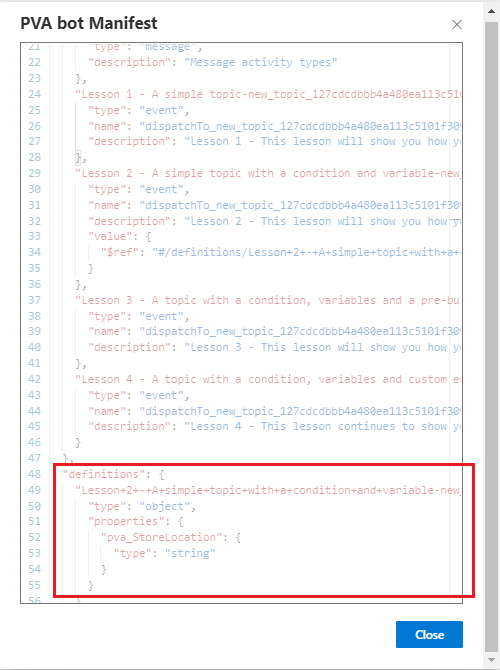
-
Select Close.
-
Under the Activity section, select Show code.

-
Type or paste the following code. Replace these values:
- Replace
TOPIC_ACTIVITY_NAMEwith your topic's event activity name. - Replace
PVA_INPUT_VARIABLEwith an input variable from your topic. - Replace
COMPOSER_INPUT_VARIABLEwith a Composer variable that will provide a value.
Bot response[Activity Type = event Name = TOPIC_ACTIVITY_NAME Value = ${addProperty(json("{}"), 'PVA_INPUT_VARIABLE', COMPOSER_INPUT_VARIABLE)} ]In the following the example, the Composer variable
dialog.storeLocationprovides a value to the input variablepva_StoreLocationin the Microsoft Copilot Studio copilot topicdispatchTo_new_topic_127cdcdbbb4a480ea113c5101f309089_21a34f16.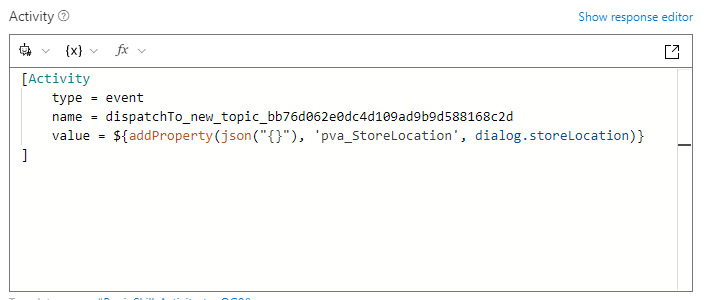
- Replace
Receive an output variable from a Microsoft Copilot Studio skill topic
It's possible to receive outputs from a Microsoft Copilot Studio skill topic in Composer. To learn how to create Microsoft Copilot Studio topics that return outputs, see Passing variables between topics.
-
In the Composer authoring canvas, select Add, then select Access external resources, and then select Connect to a skill.

-
In the Skill Dialog Name list, select your Microsoft Copilot Studio copilot.

-
Find the event activity's name for your Microsoft Copilot Studio bot topic you want to call. Copy the value, omitting the quotation marks, and save it to use in the next steps.
-
Find the topic's resultValue property. The resultValue property contains a $ref property. Copy that value and save it to use in the next step.
Warning
If a Microsoft Copilot Studio topic doesn't have outputs, it won't have a resultValue property.
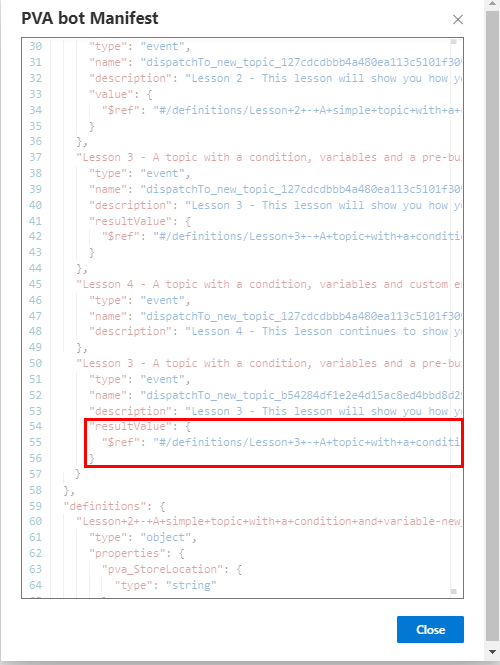
-
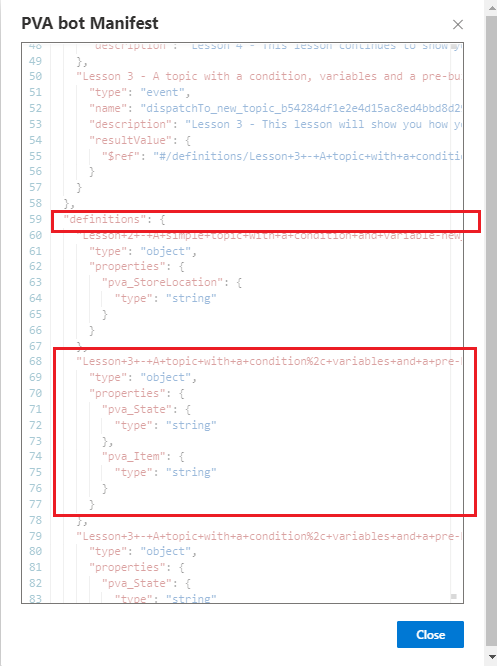
Find the definitions property, then look for a nested property that matches the $ref value you found in the previous step. Note the names and types of the Microsoft Copilot Studio topic's output variables. You'll use them in the next steps.
In the following example, the Microsoft Copilot Studio topic returns two outputs of type String, pva_State and pva_Item.
-
Select Close.
-
In the Activity section, select Show code.

-
Type or paste the following code. Replace
TOPIC_ACTIVITY_NAMEwith your topic's event activity name. Make sure there are no quotation marks in the name property.Bot response[Activity type = event name = TOPIC_ACTIVITY_NAME ]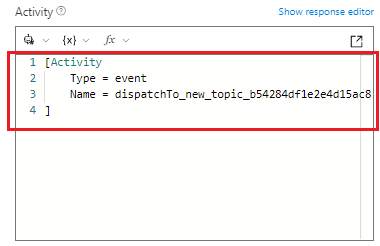
-
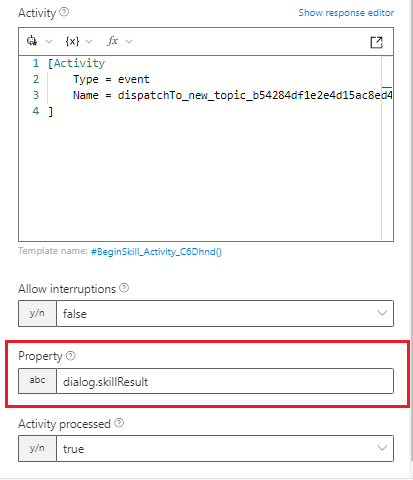
Under the code area, set Property to a Composer variable to receive and store the output values from the Microsoft Copilot Studio skill topic.
-
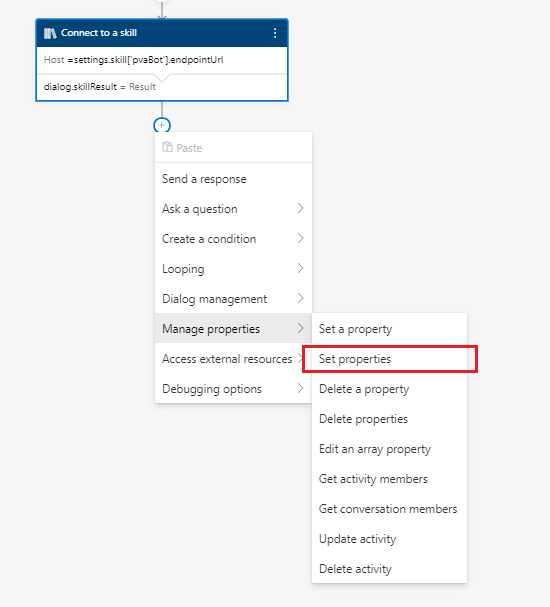
In the Composer authoring canvas, select Add, then select Manage properties, and then select Set properties.
-
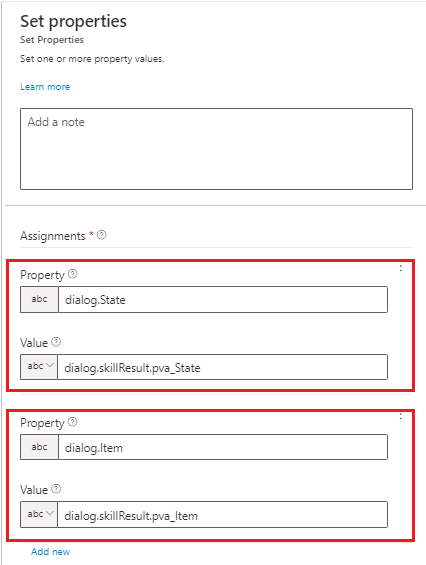
Set Property to the Composer value that should store the extracted value. Then set Value to the Composer variable you stored the topic's outputs in.
In the following example, the output values from dialog.skillResult.pvaState and dialog.skillResult.pvaItem are extracted into new Composer variables dialog.State and dialog.Item.
Test your Microsoft Copilot Studio copilot as a skill with a Bot Framework bot
Use the Bot Framework Emulator to test that your Bot Framework bot is properly calling a Microsoft Copilot Studio copilot as a skill.
Important
Your Bot Framework bot must be added to the Microsoft Copilot Studio copilot's allowlist for the skill connection to work.
Learn More
- 登录 发表评论
- 27 次浏览
最新内容
- 5 days 23 hours ago
- 6 days ago
- 6 days ago
- 6 days ago
- 6 days ago
- 6 days ago
- 6 days ago
- 6 days ago
- 6 days ago
- 6 days ago