
category
人工智能代理通过与外部系统交互、执行复杂的工作流程以及在操作中保持上下文感知来扩展大型语言模型(LLM)。Amazon Bedrock Agent通过将基础模型(FM)与数据源、应用程序和用户输入相结合,通过API集成和知识库扩充来完成面向目标的任务,从而实现这一功能。然而,在过去,将这些代理连接到不同的企业系统会造成开发瓶颈,每次集成都需要定制代码和持续维护——这是一个标准化挑战,减缓了整个组织数字生态系统中情境人工智能辅助的交付。这是一个可以通过使用模型上下文协议(MCP)来解决的问题,MCP为LLM连接到数据源和工具提供了一种标准化的方法。
今天,MCP为代理提供了对可访问工具的扩展列表的标准访问,您可以使用这些工具来完成各种任务。随着时间的推移,MCP可以通过市场促进代理和工具的更好可发现性,使代理能够共享上下文并拥有共同的工作区,以实现更好的交互,并在整个行业范围内扩展代理互操作性。
在这篇文章中,我们将向您展示如何构建一个Amazon Bedrock代理,该代理使用MCP访问数据源以快速构建生成性AI应用程序。使用亚马逊基岩代理,您的代理可以使用基于MCP的工具进行动态组装,如本例所示:
我们展示了一个通过MCP连接到AWS Cost Explorer、Amazon CloudWatch和Perplexity AI来构建代理以了解您的亚马逊网络服务(AWS)支出的示例。您可以使用本文中引用的代码将您的代理连接到其他MCP服务器,以应对您的业务挑战。我们设想一个世界,代理人可以访问不断增长的MCP服务器列表,他们可以使用这些服务器来完成各种各样的任务。
模型上下文协议
MCP是由Anthropic开发的一种开放协议,它提供了一种标准化的方法,可以将AI模型连接到几乎任何数据源或工具。使用客户端-服务器架构,MCP使开发人员能够通过轻量级的MCP服务器公开他们的数据,同时将AI应用程序构建为连接到这些服务器的MCP客户端。通过这种架构,MCP使用户能够构建更强大、上下文感知的AI代理,这些代理可以无缝访问他们所需的信息和工具。无论您是连接到外部系统还是内部数据存储或工具,现在都可以使用MCP以相同的方式与所有这些系统进行交互。MCP的客户端-服务器架构使您的代理能够在MCP服务器更新时访问新功能,而不需要对应用程序代码进行任何更改。
MCP架构
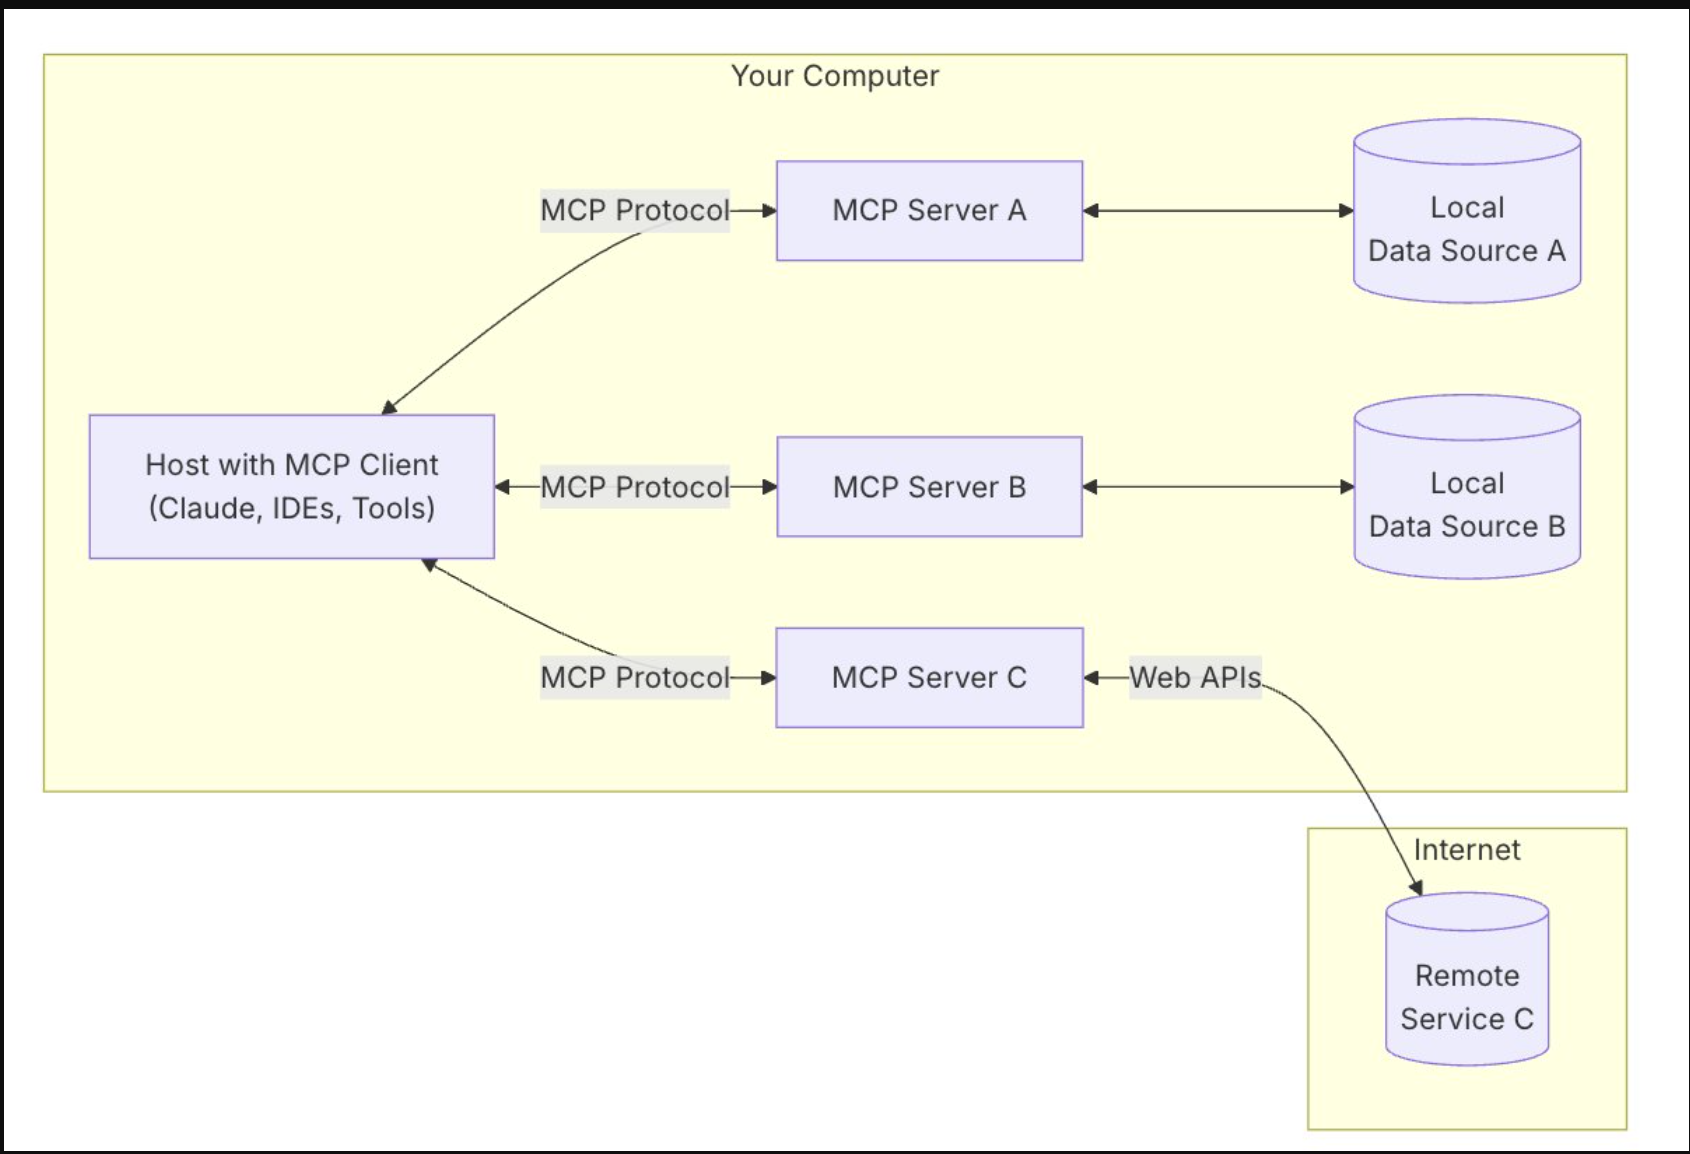
MCP使用包含以下组件的客户端-服务器架构,如下图所示:
- 主机:MCP主机是一种需要通过MCP协议访问数据的程序或AI工具,如Claude Desktop、集成开发环境(IDE)或任何其他AI应用程序。
- 客户端:与服务器保持一对一连接的协议客户端。
- 服务器:通过标准化MCP公开功能的轻量级程序。
- 本地数据源:您的数据库、本地数据源和MCP服务器可以安全访问的服务。
- 远程服务:通过MCP服务器可以连接到的API在互联网上提供的外部系统。
Let’s walk through how to set up Amazon Bedrock agents that take advantage of MCP servers.
将MCP与亚马逊Bedrock agents一起使用
在这篇文章中,我们提供了一个分步指南,说明如何将您最喜欢的MCP服务器与Amazon Bedrock代理连接起来,作为代理可以用来完成用户提供的任务的行动组。我们还介绍了Amazon Bedrock内联代理SDK,它通过管理复杂的工作流编排来简化调用内联代理的过程。SDK还包含内置的MCP客户端实现,可让您直接访问MCP服务器提供的工具。如果没有这个SDK,开发人员必须为以下内容编写和维护自定义代码:
- 解析响应流
- 处理退货控制流程
- 管理代理交互之间的状态
- 协调API调用
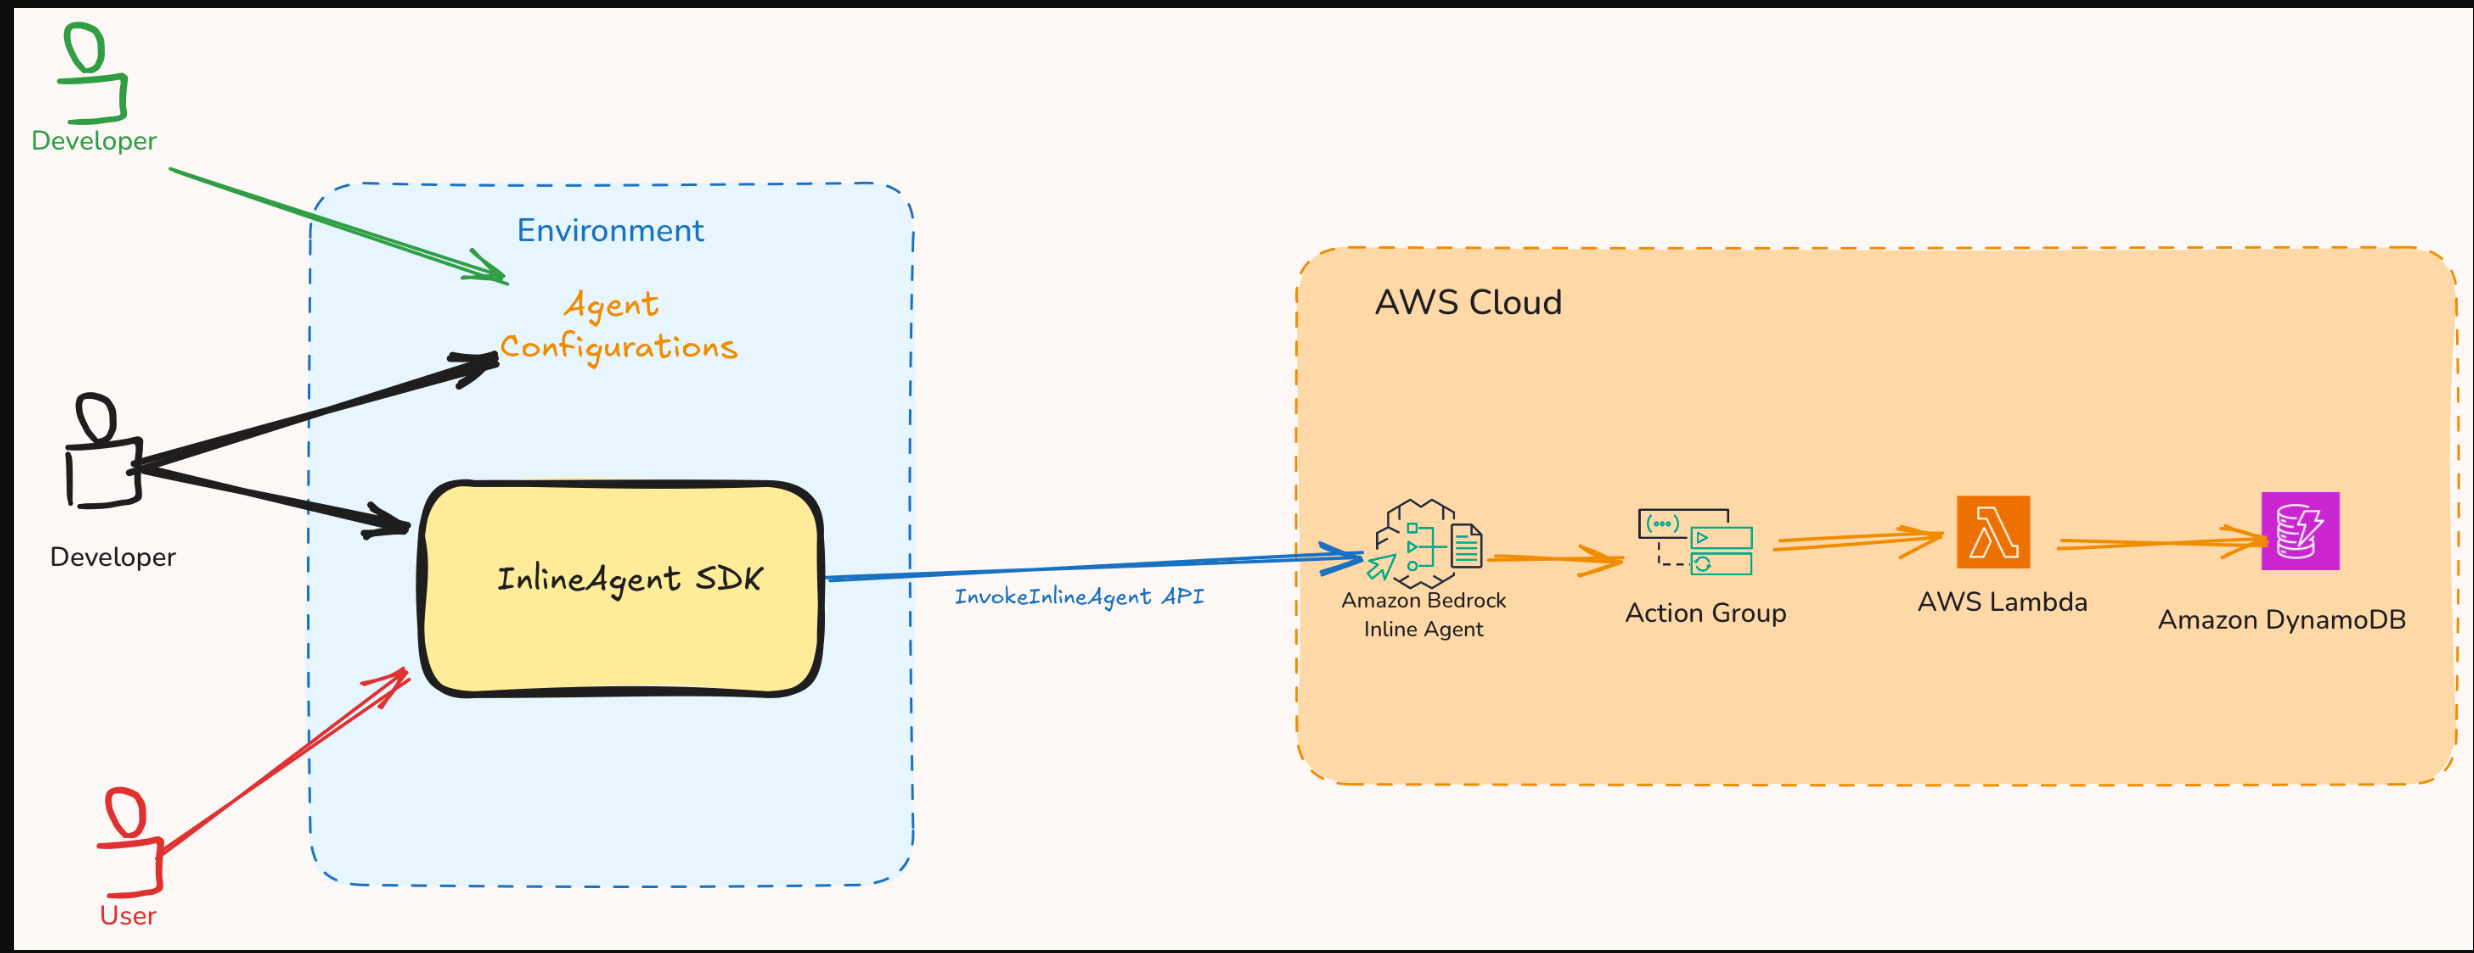
作为创建代理的一部分,开发人员创建了一个特定于每个需要代理通信的MCP服务器的MCP客户端。当被调用时,代理会确定用户的任务需要哪些工具;如果需要MCP服务器工具,它将使用相应的MCP客户端向该服务器请求工具执行。
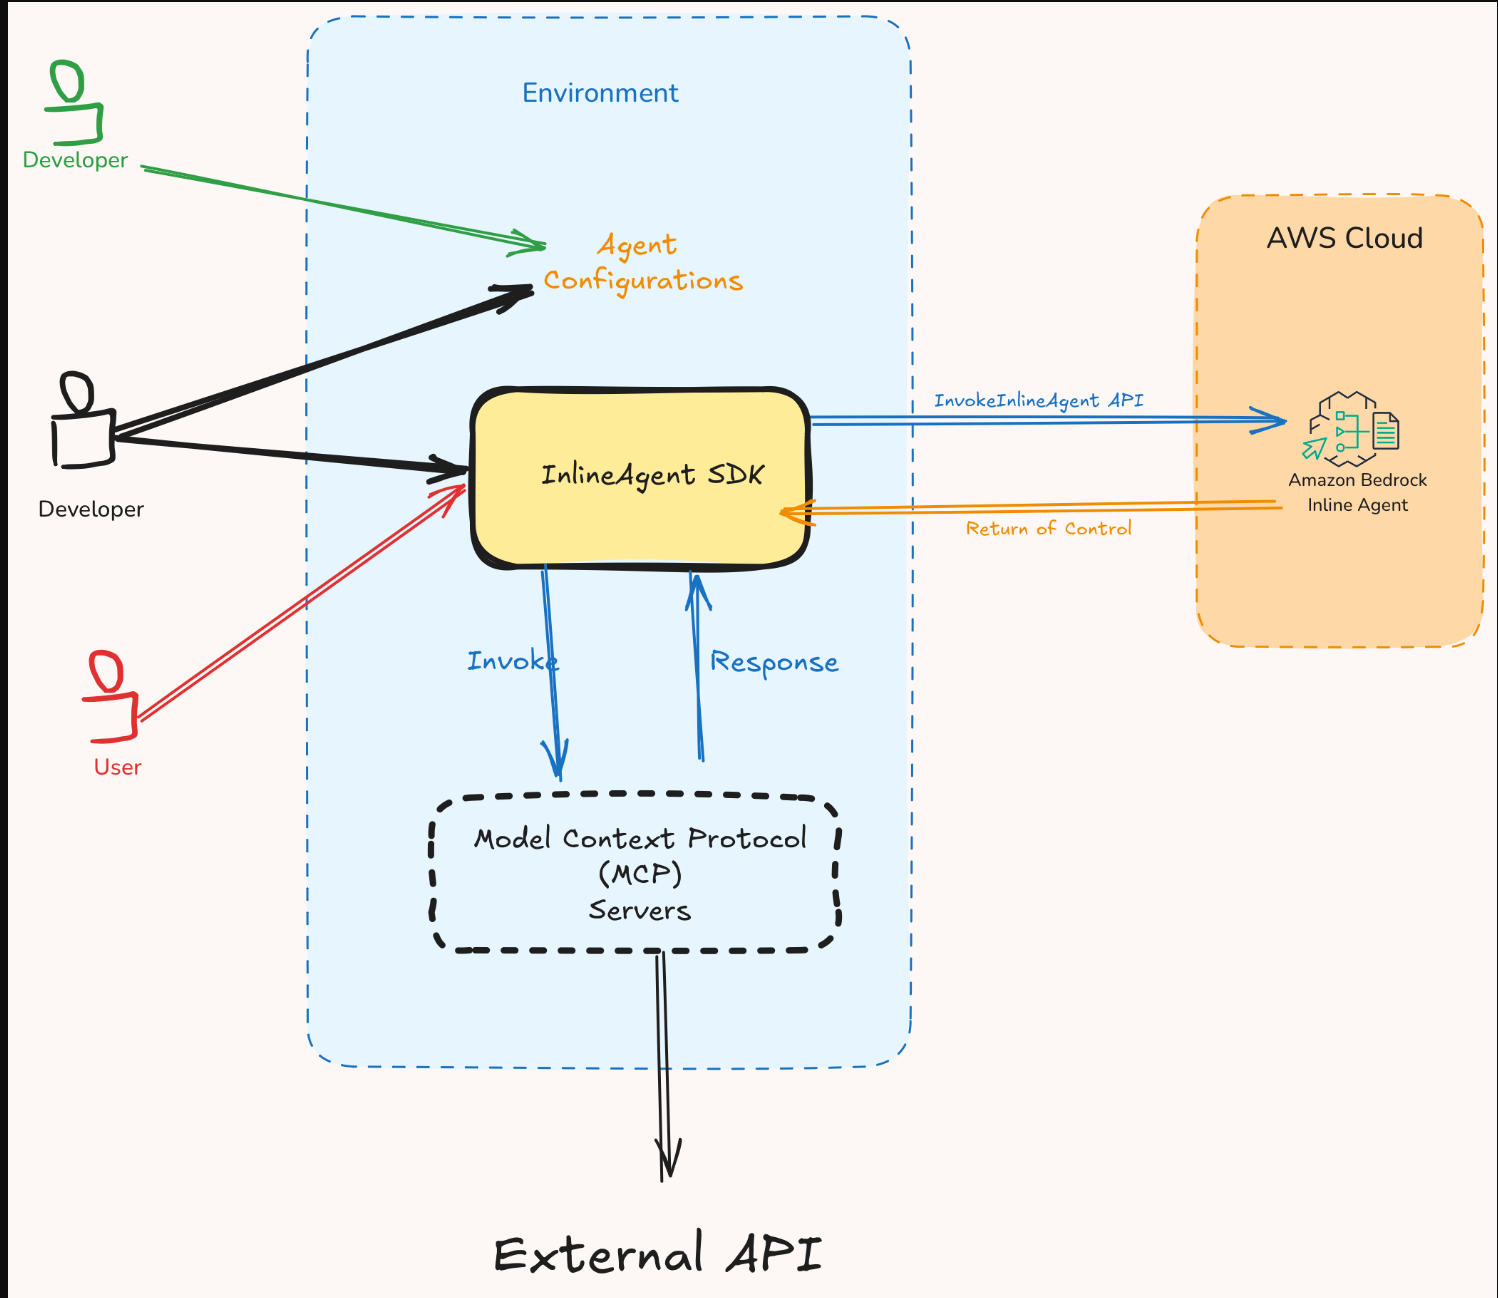
要编排此工作流程,您可以利用Amazon Bedrock Agents的退货控制功能。下图说明了使用两个工具处理请求的代理的端到端流程。在第一个流程中,执行基于Lambda的操作,在第二个流程中代理使用MCP服务器。
用例:改变您在不同AWS服务(包括Amazon Bedrock)中管理AWS支出的方式
为了展示Amazon Bedrock代理如何使用MCP服务器,让我们浏览一个示例用例。想象一下,问一些问题,比如“帮助我了解过去几周我的基岩支出”或“上个月我的EC2在不同地区和实例类型上的成本是多少?”,并在仪表板上获得人类可读的数据分析,而不是原始数字。该系统解释您的意图,并精确地提供您所需的内容——无论是详细的细分、趋势分析、可视化还是节省成本的建议。这很有用,因为你感兴趣的是洞察力而不是数据。您可以使用两个MCP服务器来实现这一点:一个是用于检索AWS支出数据的定制MCP服务器,另一个是来自Perplexity AI的开源MCP服务器,用于解释数据。您可以将这两个MCP服务器作为操作组添加到内联Amazon Bedrock代理中。这为您提供了一个AI代理,可以改变您管理AWS支出的方式。这篇文章的所有代码都可以在GitHub存储库中找到。
让我们来了解一下如何使用内联代理创建此代理。您可以使用内联代理在运行时动态定义和配置Amazon Bedrock代理。它们提供了更大的灵活性和对代理功能的控制,使用户能够根据需要指定FM、指令、动作组、护栏和知识库,而无需依赖预先配置的控制平面设置。值得注意的是,您还可以在不使用内联代理的情况下,通过将RETURN_CONTROL与InvokeAgent API一起使用来编排此行为。
亚马逊基岩制剂中的MCP成分
主持人:我是亚马逊基岩在线代理商。此代理将MCP客户端添加为操作组,当用户询问与AWS支出相关的问题时,可以通过RETURN_CONTROL调用这些操作组。
- 客户端:您创建了两个与各自服务器建立一对一连接的客户端:一个具有特定成本服务器参数的成本资源管理器客户端和一个具有Perplexity服务器参数的Perplexiity AI客户端。
- 服务器:您创建两个MCP服务器,每个服务器在您的机器上本地运行,并通过标准输入/输出与您的应用程序通信(或者,您也可以配置客户端与远程MCP服务器通信)。
- 成本浏览器和Amazon CloudWatch日志(用于Amazon基岩模型调用日志数据)以及用于检索AWS支出数据的MCP服务器。
- 困惑AI MCP服务器解释AWS支出数据。
- 数据源:MCP服务器与远程数据源对话,如Cost Explorer API、CloudWatch日志和困惑人工智能搜索API。
Prerequisites
You need the following prerequisites to get started implementing the solution in this post:
- An AWS account
- Familiarity with FMs and Amazon Bedrock
- Install AWS Command Line Interface (AWS CLI) and set up credentials
- Python 3.11 or later
- AWS Cloud Development Kit (AWS CDK) CLI
- Enable model access for Anthropic’s Claude 3.5 Sonnet v2
- You need to have your
AWS_PROFILEso you can use it as an environment variable for the server - The two MCP servers are run as Docker daemons, so you need to have Docker installed and running on your computer
The MCP servers run locally on your computer and need to access AWS services and the Perplexity API. You can read more about AWS credentials in Manage access keys for IAM users. Make sure that your credentials include AWS Identity and Access Manager (IAM) read access to Cost Explorer and CloudWatch. You can do this by using AWSBillingReadOnlyAccess and CloudWatchReadOnlyAccess managed IAM permissions. You can get the Perplexity API key from the Perplexity Sonar API page.
Steps to run
With the prerequisites in place, you’re ready to implement the solution.
- Navigate to the InlineAgent GitHub repository.
- Follow the setup steps.
-
Navigate to the cost_explorer_agent This folder contains the code for this post.
-
Create a
.envfile incost_explorer_agentdirectory using example.
Note: In production environments we strongly recommend using AWS IAM roles instead of long-term access keys. If you must use access keys, please follow these security best practices. Never share or expose your access keys publicly (including in code repositories). Implement the principle of least privilege by scoping the IAM policies to only the required permissions, and regularly rotate your access keys (recommended every 90 days). It is also important to use AWS CloudTrail to monitor access key usage and consider using temporary credentials through AWS STS when possible.
-
Build
aws-cost-explorer-mcpserver -
You are now ready to invoke the agent to obtain insights into your AWS spend, execute the agent by running
python main.py. The query being processed is:What is Amazon Bedrock? What are the AWS services where I spent most in the last 7 days? Be precise and create a bar graph. The agent establishes connections with two MCP servers and accesses their associated tools. Subsequently, the agent executes a sequential plan utilizing specific tools:- Use the Code Interpreter to generate a visual representation (bar graph) of cost distribution
- Use AWS Cost Explorer MCP server to analyze spending patterns
- Interfaces with the Perplexity MCP server to retrieve comprehensive information about Amazon Bedrock
Implementation details
Now that you understand the output produced by an agent, let’s lift the curtain and review some of the important pieces of code that produce the output.
- Creating MCP clients: config.py, defines the two MCP clients that talk to your two MCP servers.
-
Server parameters are defined for the cost explorer and Perplexity clients. The solution uses
StdioServerParameters, which configures how the client should communicate over standard input/output (stdio) streams. This contains the parameters required by the server to access the required data through APIs. -
In
main.py, the MCP server parameters are imported and used to create your two MCP clients.
-
-
Configure agent action group:
main.pycreates the action group that combines the MCP clients into a single interface that the agent can access. This enables the agent to ask your application to invoke either of these MCP servers as needed through return of control. - Inline agent creation: The inline agent can be created with the following specifications:
- Foundation model: Configure your choice of FM to power your agent. This can be any model provided on Amazon Bedrock. This example uses Anthropic’s Claude 3.5 Sonnet model.
- Agent instruction: Provide instructions to your agent that contain the guidance and steps for orchestrating responses to user queries. These instructions anchor the agent’s approach to handling various types of queries
- Agent name: Name of your agent.
- Action groups: Define the action groups that your agent can access. These can include single or multiple action groups, with each group having access to multiple MCP clients or AWS Lambda As an option, you can configure your agent to use Code Interpreter to generate, run, and test code for your application.
You can use this example to build an inline agent on Amazon Bedrock that establishes connections with different MCP servers and groups their clients into a single action group for the agent to access.
结论
Anthropic MCP协议提供了一种将FM连接到数据源的标准化方法,现在您可以将此功能与亚马逊基岩代理一起使用。在这篇文章中,您看到了一个结合Amazon Bedrock和MCP的强大功能来构建应用程序的示例,该应用程序为理解和管理您的AWS支出提供了新的视角。
组织现在可以为其团队提供对复杂财务数据的自然、对话式访问,同时利用来自困惑等来源的情境智能增强响应。随着人工智能的不断发展,将模型安全地连接到组织关键系统的能力将变得越来越有价值。无论您是希望改变客户服务、简化运营,还是获得更深入的业务见解,亚马逊基岩和MCP的集成都为您的下一次人工智能创新提供了灵活的基础。通过探索我们的代码示例,您可以更深入地了解这种MCP集成。
以下是通过将您的亚马逊基岩代理连接到MCP服务器可以构建的一些示例:
- 一个多数据源代理,可以从不同的数据源(如Amazon Bedrock知识库、Sqlite甚至本地文件系统)检索数据。
- 一个与Slack和GitHub MCP服务器集成的开发人员生产力助理代理。
- 一种机器学习实验跟踪代理,与Comet ML的Opik MCP服务器集成,用于在开发环境中直接管理、可视化和跟踪机器学习实验。
您将利用这些强大的新功能应对哪些业务挑战?
- 登录 发表评论
- 36 次浏览
最新内容
- 2 days 22 hours ago
- 1 week 3 days ago
- 2 weeks ago
- 2 months ago
- 5 months 3 weeks ago
- 5 months 3 weeks ago
- 5 months 3 weeks ago
- 5 months 3 weeks ago
- 5 months 3 weeks ago
- 5 months 3 weeks ago