
category
了解由LangChain构建的AI智能体框架LangGraph如何允许开发人员使用有状态图和内置内存管理创建复杂而灵活的智能体工作流。
LangChain中智能体背后的想法是使用LLM和一系列动作;然后,
智能体使用推理引擎来决定采取哪种行动。LangChain对于具有简单链和检索流的简单智能体很有用,但构建更复杂的智能体系统需要过于复杂的内存管理、持久性和人工循环组件,这使得链和智能体的灵活性降低。
这就是LangGraph发挥作用的地方。LangGraph是由LangChain构建的编排框架。LangGraph允许您使用图结构开发智能体LLM应用程序,该图结构可以与LangChain一起使用或不使用。
本文重点介绍使用LangGraph而不是LangChain构建智能体。它提供了一个构建LangGraph智能体的教程,从讨论LangGraph及其组件开始。通过从头开始构建LangGraph智能体并使用LangGraph智能体管理对话内存,这些概念得到了加强。最后,我们使用Zep的长期记忆来创建一个能够记住之前对话和用户事实的智能体。
LangGraph教程关键概念概述
以下是本文涵盖的主要概念。
| Concept | Description |
|---|---|
|
What is LangGraph?
|
LangGraph是一个AI代理框架,它将代理交互实现为有状态图。节点表示通过边连接的函数或计算步骤。LangGraph维护所有节点和边之间共享的代理状态。与LangChain不同,LangGraph支持实现更复杂的代理工作流。关键特性包括内置的持久性、对人为干预的支持,以及处理具有循环和分支的复杂工作流的能力。
|
|
Building a LangGraph agent
|
创建LangGraph代理是理解节点、边和状态的核心概念的最佳方法。LangGraph Python库是模块化的,通过增量添加节点和边来提供构建有状态图的功能。集成工具使代理能够执行特定任务并访问外部信息。例如 工具包装器可以返回研究论文中的内容。LangGraph提供了一个预构建的原因和行为(ReACT)代理,可以帮助您开始。 |
|
Memory management in LangGraph
|
默认情况下,LangGraph代理是无状态的,这意味着它不记得以前的对话,这限制了它进行有意义交换的能力。为了解决这个问题,LangGraph支持短期和长期记忆。LangGraph中的内存支持可以通过Zep Memory进一步扩展。
|
|
Zep long-term memory
|
Zep 是为AI代理设计的存储层,解决了默认LangGraph短期和长期内存的几个局限性。Zep自动提取事实以保护用户,并将其存储为长期记忆对象。 |
|
Guidelines for building LangGraph agents
|
LangGraph克服了LangChain的局限性,是构建代理架构的推荐框架。您可以将工具集成到您的AI代理中,以提供LLM代理不提供的功能或获取信息。内存是构建生产就绪的AI代理不可或缺的一部分,Zep等第三方SDK简化了添加长期功能的过程。
|
什么是LangGraph?
LangGraph是基于LangChain构建的AI智能体框架,允许开发人员创建更复杂、更灵活的智能体工作流。与传统的LangChain链和智能体不同,LangGraph将智能体交互实现为循环图,具有涉及分支和循环的多步处理。这消除了实现自定义逻辑来控制工作流中多个智能体之间的信息流的需要。
LangGraph的工作原理
顾名思义,LangGraph是一个由节点和边组成的图形工作流。节点在工作流中实现功能,而边控制其方向。
下图最好地解释了LangGraph是如何在较高层次上工作的。
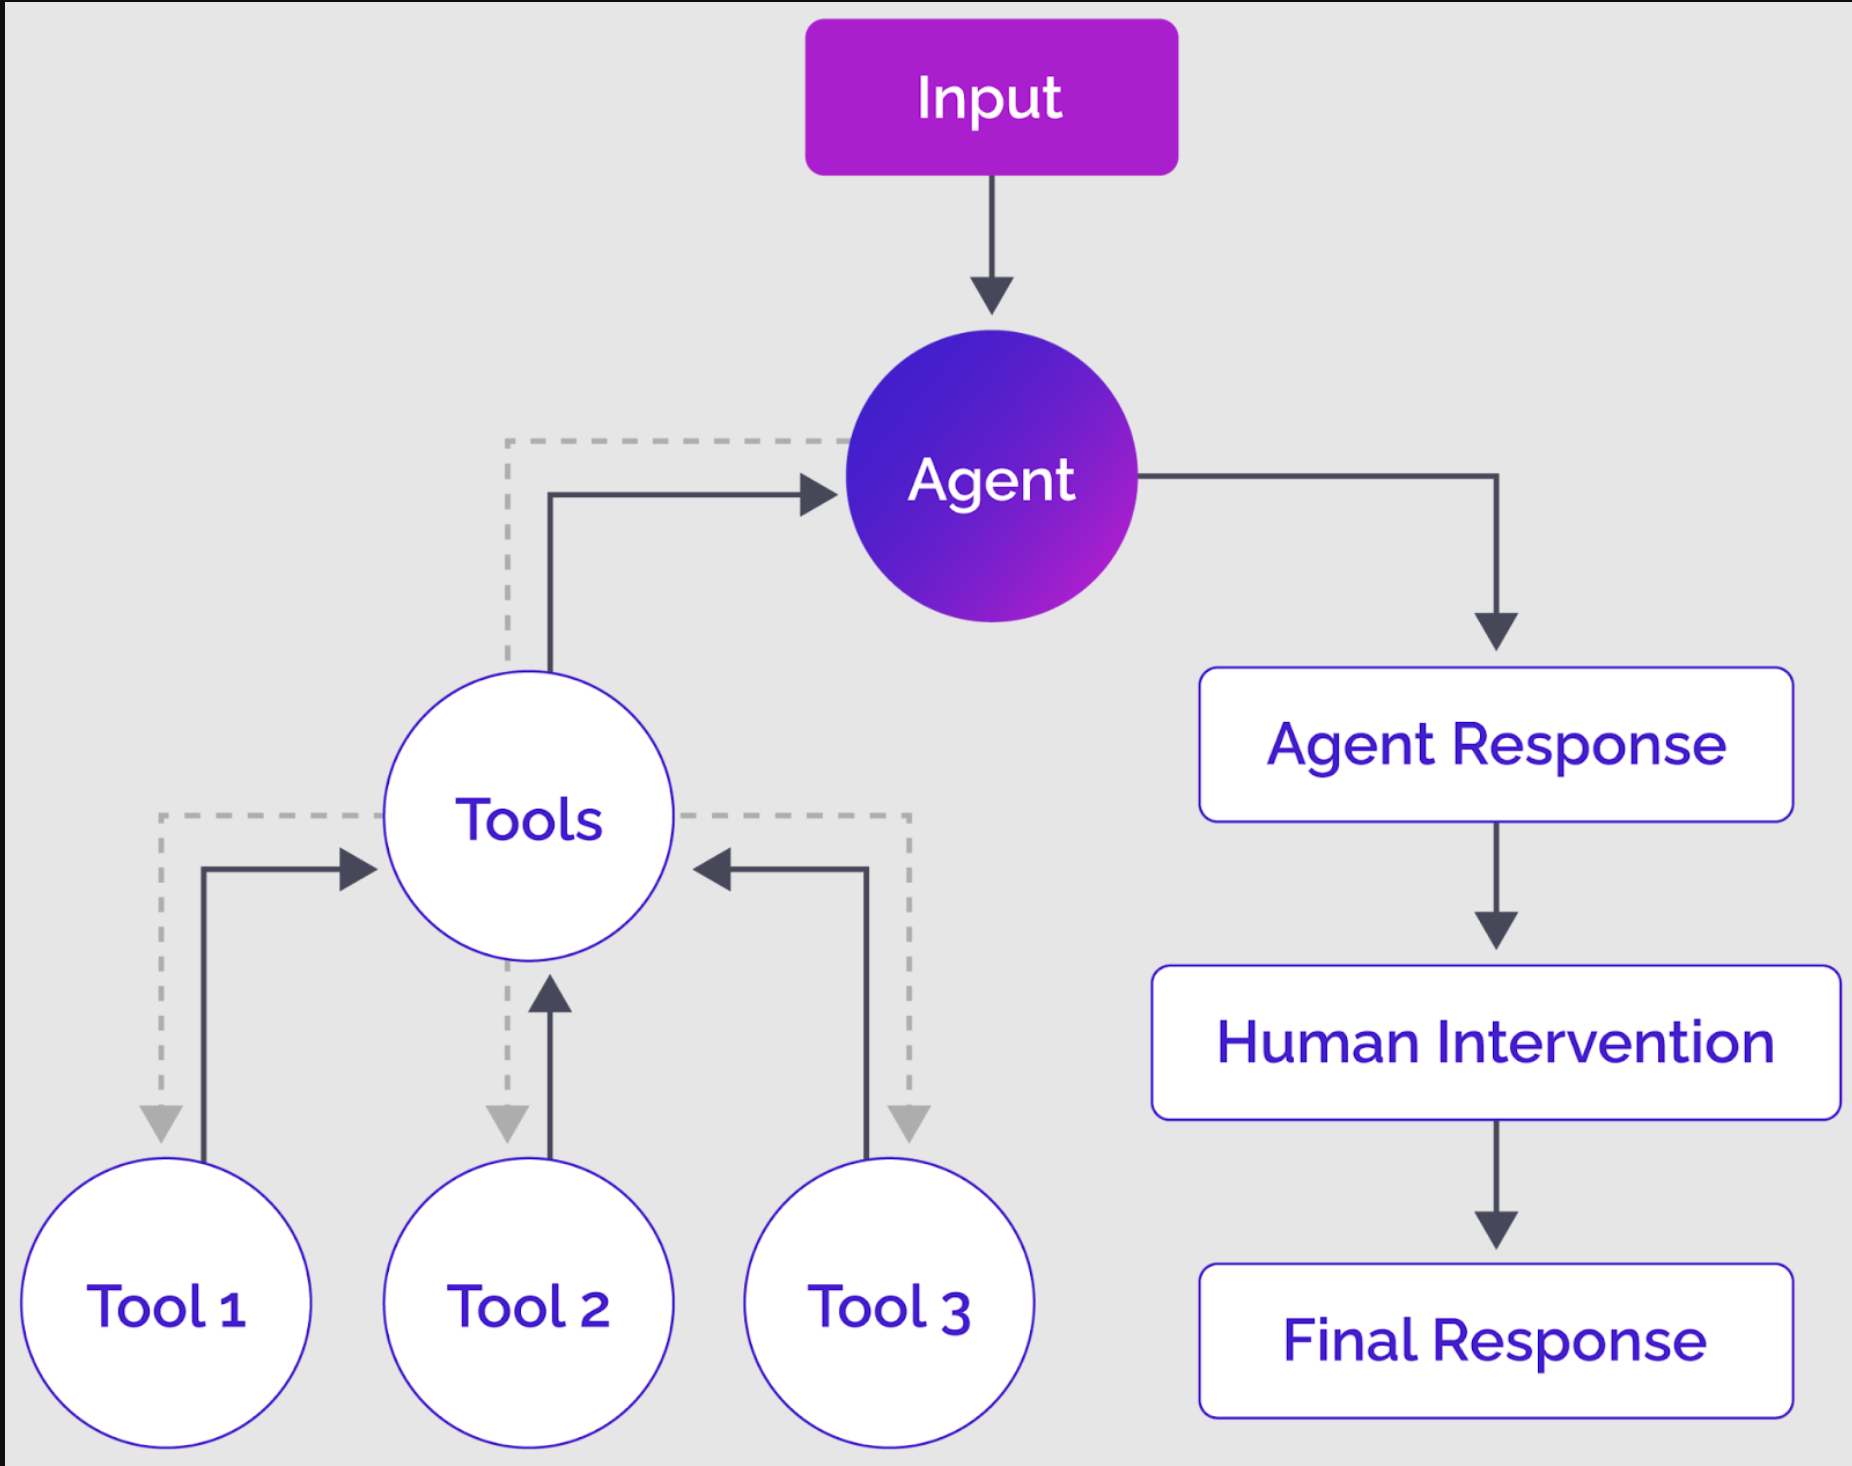
LangGraph智能体及其组件的高级概述
LangGraph智能体接收输入,可以是用户输入或来自另一个LangGraph智能体的输入。通常,LLM智能体处理输入并决定是否需要调用一个或多个工具,但它可以直接生成响应并继续进行图中的下一阶段。
如果智能体决定调用一个或多个工具,该工具将处理智能体输出并将响应返回给智能体。然后,智能体根据工具输出生成响应。一旦智能体完成其响应,您可以进一步添加一个可选的“循环中的人”步骤,在返回最终输出之前优化智能体响应。
这只是LangGraph智能体如何在高层次上工作的一个例子。您可以创建节点和边的不同组合来实现所需的功能。
持久性
LangGraph区别于传统LangChain智能体的一个关键特性是其内置的持久性机制。LangGraph引入了在工作流中的所有节点和边之间共享智能体状态的概念。这允许自动错误恢复,使工作流能够从中断的地方恢复。
除了智能体状态记忆外,LangGraph还支持使用短期和长期记忆来持久化对话历史,本文稍后将对此进行详细介绍。
循环
LangGraph引入了循环图,允许智能体以循环方式与工具通信。例如,智能体可以调用工具,从工具中检索信息,然后调用相同或另一个工具来检索后续信息。同样,工具可能会多次相互调用,以在将信息传递回智能体之前共享和细化信息。这使其与基于DAG的解决方案不同。
人在循环中的能力
LangGraph支持人工干预智能体工作流,这会在特定点中断图的执行,允许人类查看、批准或编辑智能体的建议响应。收到人工输入后,工作流恢复。
此功能可促进对智能体工作流中关键决策过程的更好控制和监督。
LangGraph智能体与LangChain智能体
在LangGraph出现之前,LangChain链和智能体是创建智能体LLM应用程序的首选技术。下表简要比较了LangGraph智能体与传统LangChain链和智能体。
| Feature | LangGraph agents | LangChain agents |
|---|---|---|
|
Structure
|
Graph-based
|
Linear or tree-like with custom implementation
|
|
Persistence
|
Built-in
|
Manual implementation required
|
|
State management
|
Automated
|
Manual implementation required
|
|
Human intervention
|
Native support
|
Manual implementation required
|
|
Cycles
|
Supported
|
No direct support
|
|
Flexibility
|
高度灵活,有环路和分支 | 与LangGraph相比有限 |
|
Complexity
|
可以处理复杂的工作流程
|
更适合更简单的任务
|
总之,LangGraph支持实现更复杂的智能体工作流,同时比传统的LangChain链和智能体具有更高的灵活性。
了解节点、边和状态
如果您是LangGraph的新手,在创建智能体之前,您必须了解一些术语:节点、边和状态。
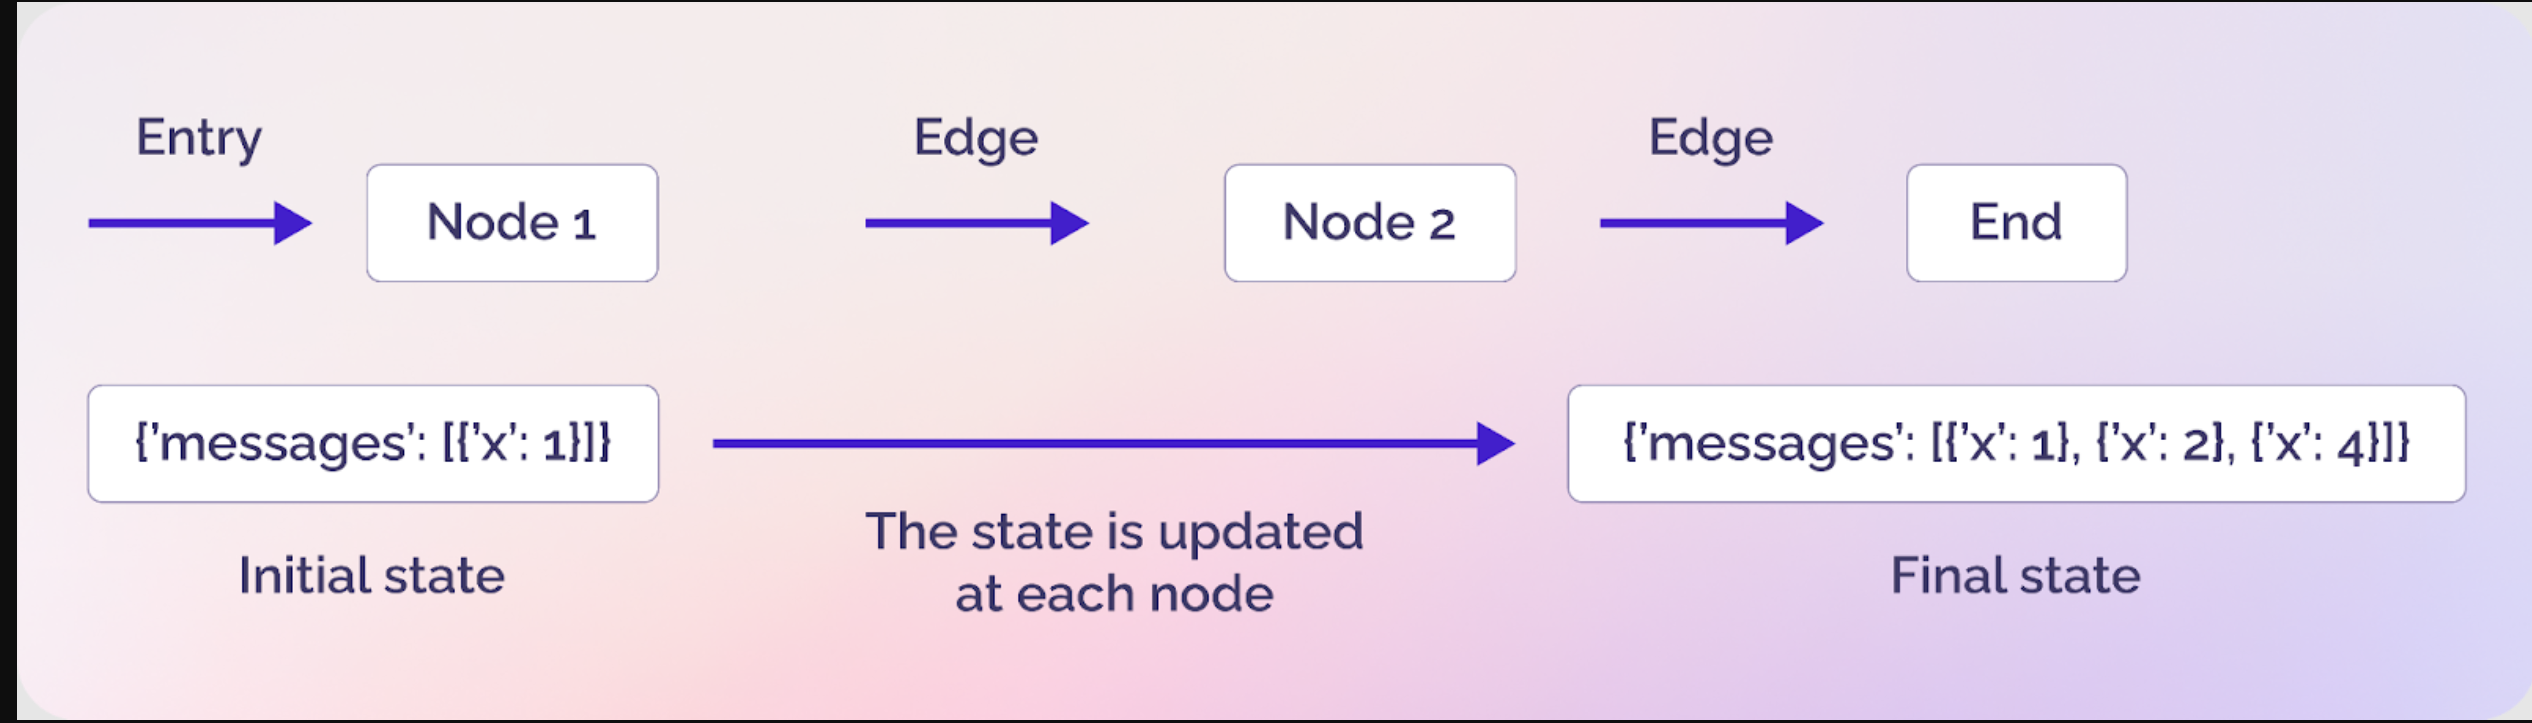
LangGraph中显示节点、边和状态的简单图(源代码)
节点
节点是智能体的构建块,代表智能体工作流中的离散计算单元。节点可以像一个小型Python函数一样简单,也可以像调用外部工具的独立智能体一样复杂。
边缘
边连接节点并定义智能体如何从一个步骤进行到下一个步骤。边可以有两种类型:直接边和条件边。直接边只是在没有任何条件的情况下连接两个节点,而条件节点类似于if-else语句,并根据条件连接两个结点。
状态
状态是LangGraph最被低估但最重要的组成部分。它包含不同实体(如节点和边)可用的所有数据和上下文。简单地说,状态在图中的所有节点和边之间共享数据和上下文。
构建LangGraph智能体
通过本节中的理论,您将看到LangGraph智能体的所有构建块。您将学习如何:
- 从头开始创建LangGraph智能体
- 将工具整合到LangGraph智能体中
- 流智能体响应
- 使用内置智能体
安装和导入所需的库
本文使用Python版本的LangGraph作为示例。要运行本节和后续章节中的脚本,您需要安装以下Python库,这些库允许您访问将合并到智能体中的各种LangGraph函数和工具。
%pip install langchain-core
%pip install langchain-openai
%pip install -U langgraph
%pip install langchain-community
%pip install --upgrade --quiet  wikipedia
%pip install arxiv
%pip install zep-cloud
让我们从上面的模块中导入相关功能。
[object Object] langchain_openai [object Object] ChatOpenAI
[object Object] langchain_core.messages [object Object] AnyMessage, SystemMessage, HumanMessage, ToolMessage, AIMessage, trim_messages
[object Object] langchain_core.tools [object Object] tool, ToolException, InjectedToolArg
[object Object] langchain_core.runnables [object Object] RunnableConfig
[object Object] langchain_community.utilities [object Object] ArxivAPIWrapper
[object Object] langchain_community.tools [object Object] ArxivQueryRun, HumanInputRun
[object Object] langgraph.graph [object Object] StateGraph,START,END, add_messages, MessagesState
[object Object] langgraph.prebuilt [object Object] create_react_agent, ToolNode
[object Object] langgraph.checkpoint.memory [object Object] MemorySaver
[object Object] langgraph.store.base [object Object] BaseStore
[object Object] langgraph.store.memory [object Object] InMemoryStore
[object Object] typing [object Object] Annotated, [object Object]
[object Object] typing_extensions [object Object] TypedDict
[object Object] pydantic [object Object] BaseModel, Field
[object Object] wikipedia
[object Object] uuid
[object Object] operator
[object Object] IPython.display [object Object] Image, display
[object Object] os
[object Object] google.colab [object Object] userdata
从头开始创建LangGraph智能体
让我们从状态定义开始,它指定了什么类型的信息将在图中的不同节点和边之间流动。
[object Object] [object Object]([object Object]):
 messages: Annotated[[object Object][AnyMessage], operator.add]
这定义了一个简单的状态,用于存储任何类型的LangChain消息列表,如ToolMessage、AIMessage、HumanMessage等。operator.add运算符将向列表中添加新消息,而不是覆盖现有消息。
接下来,我们将定义一个简单的Python函数,在LangGraph智能体中添加一个节点。
[object Object] [object Object]([object Object]):
   messages = state[[object Object]]
   message = model.invoke(messages)
   [object Object] {[object Object]: [message]}
run_llm()函数接受我们之前定义的State类的对象。当我们将run_llm()函数添加到LangGraph节点时,LangGraph会自动将智能体的状态传递给run_l1m()函数。
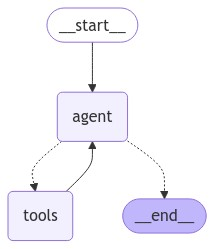
现在让我们创建图形。
graph_builder=StateGraph(State)
graph_builder.add_node([object Object], run_llm)
graph_builder.add_edge(START,[object Object])
graph_builder.add_edge([object Object],END)
graph=graph_builder.[object Object]()
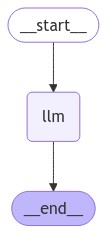
要创建图,我们将创建一个StateGraph对象,并在StateGraph构造函数中定义状态类型。随后,我们将添加一个名为llm的节点,并将run_llm()函数添加到该节点。
我们添加了两条边来定义智能体执行的开始和结束。我们的智能体只有一个节点,因此我们从llm节点开始,并在收到llm节点的响应后结束智能体执行。
最后,我们必须使用compile()方法编译图。
我们可以使用以下脚本将图形可视化:
display(Image(graph.get_graph().draw_mermaid_png()))
让我们测试一下我们刚刚创建的智能体。为此,请在创建的图对象上调用invoke()方法。
messages = [HumanMessage(content=[object Object])]
result = graph.invoke({[object Object]: messages})
[object Object](result[[object Object]][-[object Object]].content)
 在大多数情况下,您需要LangGraph智能体使用工具进行适当的响应。以下部分解释了如何将工具合并到LangGraph智能体中。
将工具整合到LangGraph智能体中
AI工具是增强AI智能体默认功能的组件,使其能够执行特定任务或访问外部信息。例如,您可以使用工具访问网络、连接到外部数据库、预订航班等。
您可以将自定义和内置的LangChain工具合并到您的LangGraph智能体中;这些方法仍然非常相似。在本节中,我们将看到这两种工具类型。
将工具整合到智能体中是一个高度灵活的过程。您可以直接向智能体的节点添加工具,或向调用一个或多个工具的节点添加函数。建议采用后一种方法,因为它允许更多的定制。
让我们先看看如何在LangGraph中使用内置的LangChain工具。我们将使用LangChain ArXiv工具包装器创建一个根据用户查询返回研究论文的工具。
[object Object] [object Object]([object Object]):
   data = arxiv_tool.invoke(query)
   [object Object] data
[object Object] [object Object]([object Object]):
 topic: [object Object] = Field(description=[object Object])
[object Object]
[object Object] [object Object]([object Object]) -> [object Object]:
 [object Object]
 [object Object] get_arxiv_data(topic)
在上面的脚本中,我们定义了函数get_arxiv_data(),它接受用户查询并调用LangChain arxiv工具来返回与用户查询相关的研究论文信息。
接下来,我们继承BaseModel类来定义我们的工具将接受的数据类型作为参数,这确保了工具的输入始终具有有效的输入数据类型。
最后,我们使用@tool装饰器并创建一个调用get_arxiv_data函数的arxiv_search工具。在这种情况下,工具描述至关重要,因为LLM智能体会根据其描述选择工具。
同样,我们创建了一个自定义工具,如下脚本所示:
[object Object] [object Object]([object Object]):
   data = wikipedia.summary(topic)
   [object Object] data
[object Object] [object Object]([object Object]):
 topic: [object Object] = Field(description=[object Object])
[object Object]
[object Object] [object Object]([object Object]) -> [object Object]:
 [object Object]
 [object Object] get_wiki_data(topic)
上面的工具使用Python维基百科库根据用户查询返回维基百科文章摘要。
创建工具后,下一步是将它们绑定到您将在智能体中使用的LLM。
tools = [arxiv_search, wikipedia_search]
tools_names = {t.name: t [object Object] t [object Object] tools}
model = model.bind_tools(tools)
在下一步中,我们定义了一个函数,每当智能体决定调用一个或多个工具时,该函数就会执行。
[object Object] [object Object]([object Object]):
   tool_calls = state[[object Object]][-[object Object]].tool_calls
   results = []
   [object Object] t [object Object] tool_calls:
     [object Object] [object Object] t[[object Object]] [object Object] tools_names:
       result = [object Object]
     [object Object]:
       result = tools_names[t[[object Object]]].invoke(t[[object Object]])
       results.append(
         ToolMessage(
           tool_call_id=t[[object Object]],
           name=t[[object Object]],
           content=[object Object](result)
         )
       )
   [object Object] {[object Object]: results}
上面的execute_tools函数将被添加到LangGraph智能体的节点中,自动接收智能体的当前状态。只有当智能体决定使用一个或多个工具时,我们才会调用execute_tools()函数。
在execute_tools函数中,我们将迭代地调用工具,并将LLM最后一个响应中的参数传递给它们。最后,我们将把工具响应附加到results[]列表中,并使用状态的消息列表将该列表添加到模型状态中。
创建图之前的最后一步是定义一个函数,检查智能体的最新状态是否包含工具调用。
[object Object] [object Object]([object Object]):
   result = state[[object Object]][-[object Object]]
   [object Object] [object Object](result.tool_calls) > [object Object]
我们将使用此函数创建一个条件边,它决定是转到execute_tools()函数还是END节点,并返回智能体的最终响应。
现在,让我们创建一个使用我们创建的工具的LangGraph智能体。下面的脚本像以前一样定义了智能体的状态和run_llm()函数。
[object Object] [object Object]([object Object]):
 messages: Annotated[[object Object][AnyMessage], operator.add]
[object Object] [object Object]([object Object]):
   messages = state[[object Object]]
   message = model.invoke(messages)
   [object Object] {[object Object]: [message]}
下面的脚本定义并显示了完整的智能体图。
graph_builder=StateGraph(State)
graph_builder.add_node([object Object], run_llm)
graph_builder.add_node([object Object], execute_tools)
graph_builder.add_conditional_edges(
[object Object],
tool_exists,
{[object Object]: [object Object], [object Object]: END}
)
graph_builder.add_edge([object Object], [object Object])
graph_builder.set_entry_point([object Object])
graph=graph_builder.[object Object]()
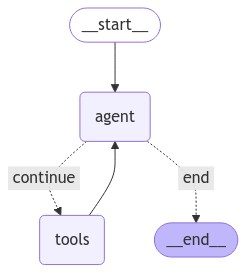
display(Image(graph.get_graph().draw_mermaid_png()))以下是图表的外观:
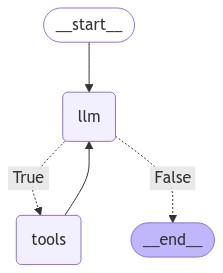
图中有两个节点:运行run_llm()函数的llm和运行execute_tools()函数。条件节点根据llm节点的输出将llm节点与工具或END节点连接起来。我们还将一条边从工具添加回llm节点,因为我们希望llm节点在有或没有工具的帮助下生成最终响应。
现在让我们测试一下我们创建的智能体。我们将首先要求智能体退回一篇研究论文。
messages = [HumanMessage(content=[object Object])]
result = graph.invoke({[object Object]: messages})
result
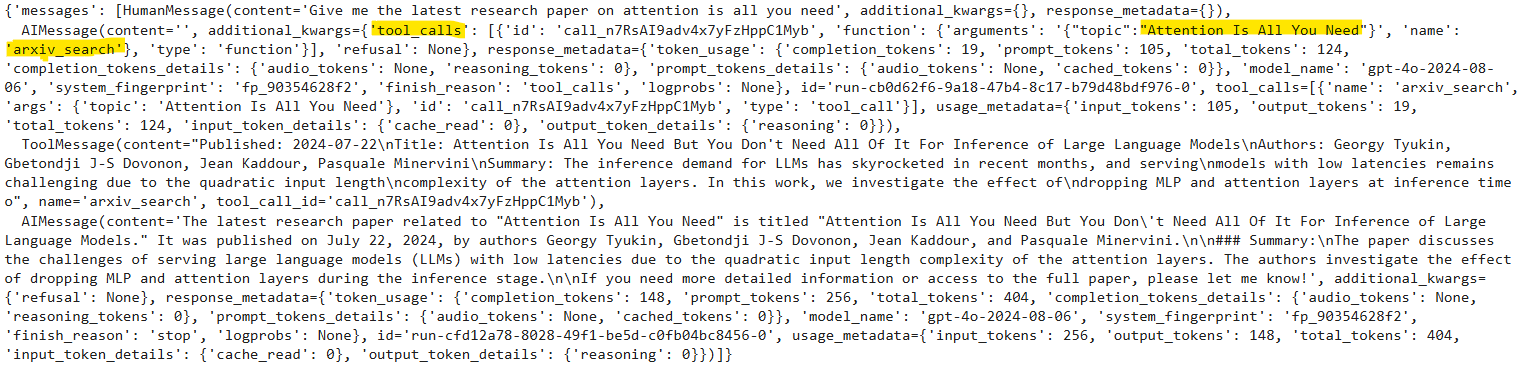
上面的输出显示,模型已调用arxiv_tool来生成响应。该模型足够智能,可以推断任何关于研究论文的查询都必须路由到arxiv_search工具。
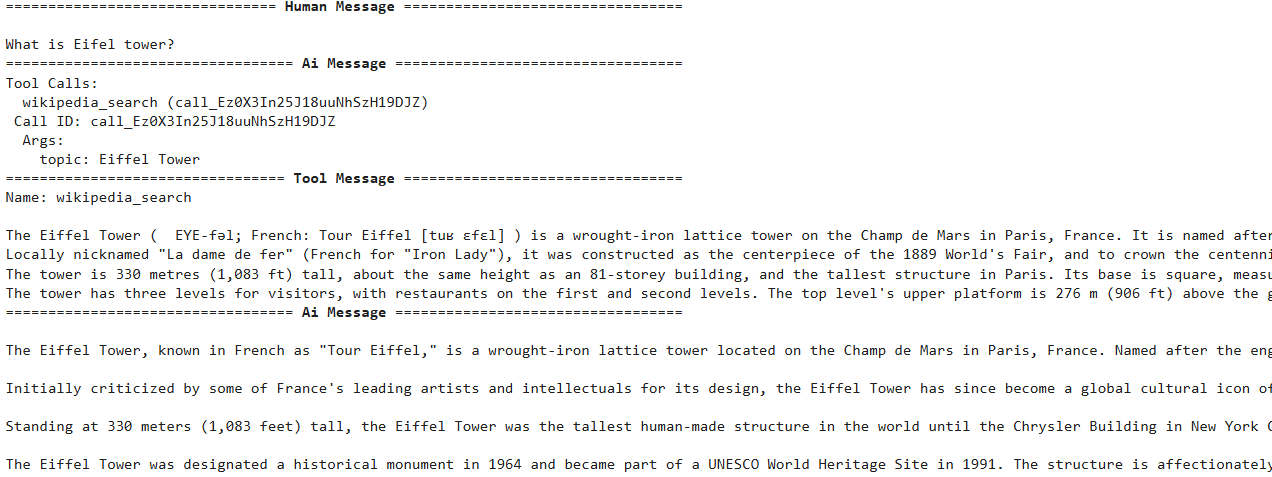
让我们在维基百科上搜索一些东西。
messages = [HumanMessage(content=[object Object])]
result = graph.invoke({[object Object]: messages})
result
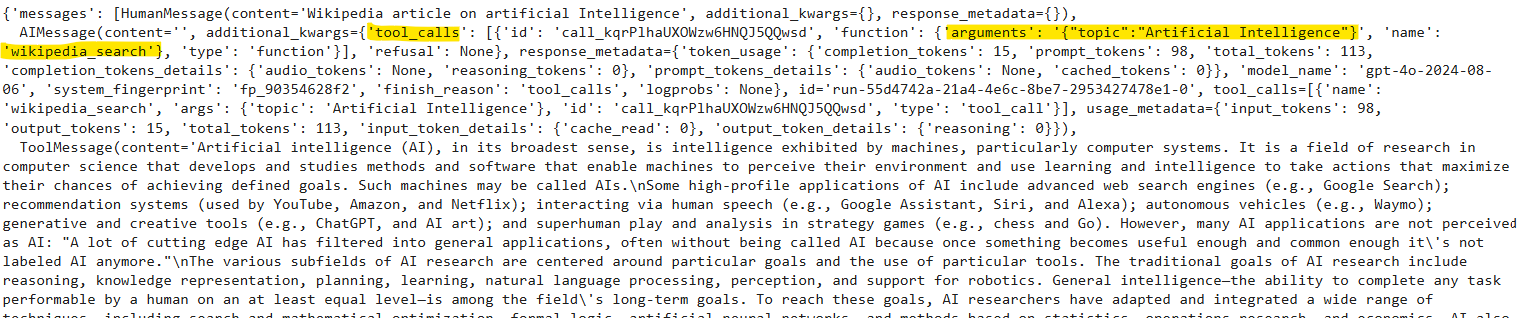
您可以看到,该模型使用wikipedia_search工具生成了最终响应。
流式智能体响应
您还可以流式传输来自LangGraph智能体中所有节点和边的单个响应。流媒体消息允许用户实时接收响应。为此,您可以调用stream()函数而不是invoke()方法。
让我们定义一个函数,该函数接收流智能体响应并将其显示在控制台上。
[object Object] [object Object]([object Object]):
   [object Object] s [object Object] stream:
       message = s[[object Object]][-[object Object]]
       [object Object] [object Object](message, [object Object]):
           [object Object](message)
       [object Object]:
           message.pretty_print()
接下来,调用graph().stream()并将输入消息传递给它。还将属性stream_mode设置为值,该值显示流媒体智能体响应的值。
messages = [HumanMessage(content=[object Object])]
print_stream(graph.stream({[object Object]: messages}, stream_mode= [object Object]))
您将在控制台上看到每个图形节点的实时响应。例如,在上面的输出中,您可以看到人工消息后面是AI响应,其中包含对wikipedia_search工具的工具调用。该工具返回对用户查询的响应;这再次传递给生成最终响应的AI节点。
使用内置智能体
在前面的部分中,我们创建了一个智能体,用于检查它是否需要工具的帮助来生成最终响应。如果是这样,它将调用工具,获取工具响应,并返回最终响应;如果没有,它只会返回默认的LLM响应。我们可以使用LangGraph内置的ReAct智能体来实现相同的功能。
您可以使用langgraph.prebuilded模块中的react_search_agent()来创建react智能体。要定义ReAct智能体的功能,请将system_prompt传递给state_modifier属性。
以下脚本创建了一个ReAct智能体,该智能体使用我们在前面部分中创建的工具:
model = ChatOpenAI(model=[object Object])
prompt = [object Object]
react_search_agent = create_react_agent(model, tools, state_modifier= prompt)
display(Image(react_search_agent.get_graph().draw_mermaid_png()))
You can see that the ReAct agent above is very similar to what we created earlier from scratch.
Let's test the agent by asking a simple question that doesn't require any tool's help.
Copy

You can see that the ReAct agent generated a response without any tool's assistance.
Let's send another request.
Copy
这一次,智能体在生成最终响应之前调用了wikipedia_search工具。
LangGraph中的内存管理
默认情况下,与LangGraph智能体的交互是无状态的,这意味着智能体不记得之前的对话,也无法对后续查询生成响应。在本节中,您将了解为什么需要具有内存的智能体,以及如何创建记住以前对话的LangGraph智能体。
为什么你需要有记忆的特工?
答案很简单:人类有记忆,可以回答后续问题。你希望你的智能体记住之前讨论过的内容,这样他们就可以进行有意义的对话。
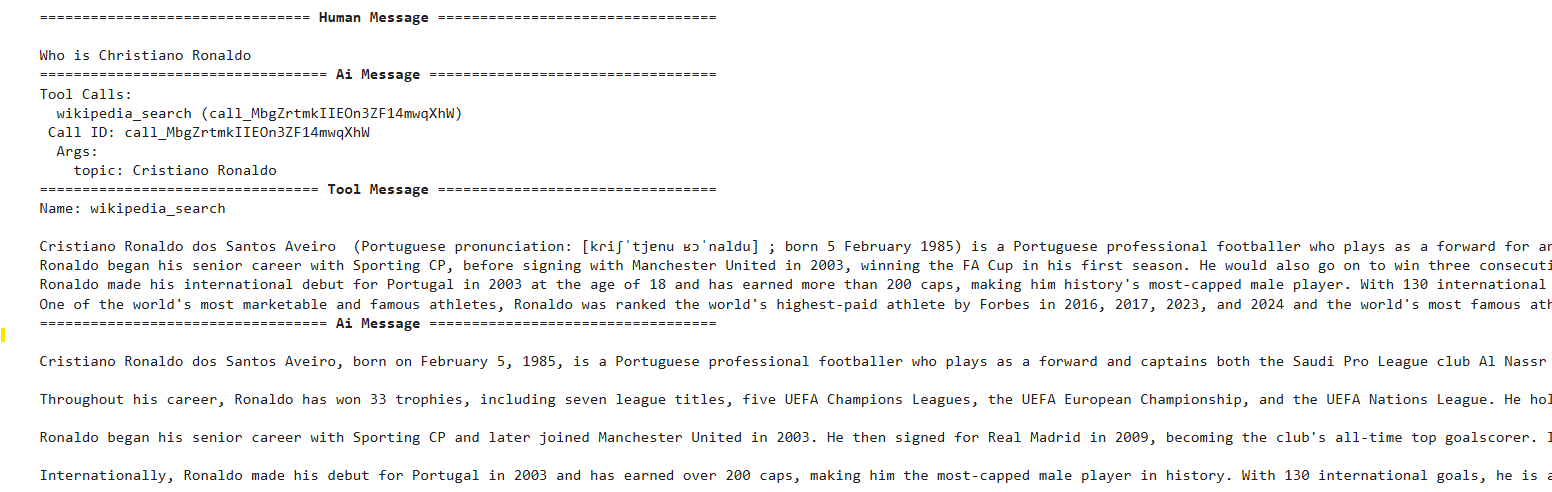
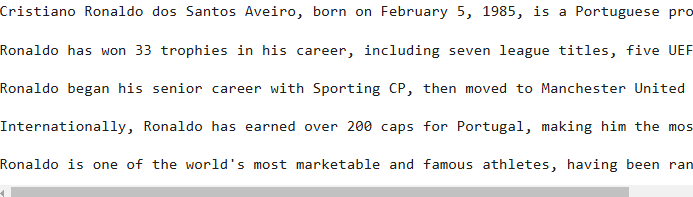
让我们来看一个用户与没有会话记忆的智能体交互的示例。我们问经纪人:“克里斯蒂亚诺·罗纳尔多是谁?”
Copy

Here, the agent probably called the wikipedia_search tool to generate the response. Let's ask a follow-up question about Christiano Ronaldo.
Copy

你可以看到,模型不记得我们之前问过它什么。尽管我们可以在当前消息之前附加之前的对话,为LLM提供上下文,但LLM的上下文窗口是有限的,最终会被填满,导致智能体响应变慢,在某些情况下还会截断对话上下文。
具有非常大的上下文窗口的模型可以存储整个聊天历史,从而导致模型可能忽略旧对话的回忆问题。此外,如果对话的早期部分存在相互冲突的细节,那么一个大的上下文窗口可能会引入相互矛盾的信息,从而可能混淆模型。最后,使用较大的提示会显著增加处理成本。
AI智能体记住先前对话的能力在几乎所有类型的智能体中都至关重要,从医疗智能体,智能体必须记住患者的先前信息,到电子商务智能体,智能体记住用户偏好以提供定制响应非常重要。
下图显示了LLM驱动的智能体的组件;在上述示例中,使用了工具来检索其他信息。在下面的例子中,将解释记忆的作用。
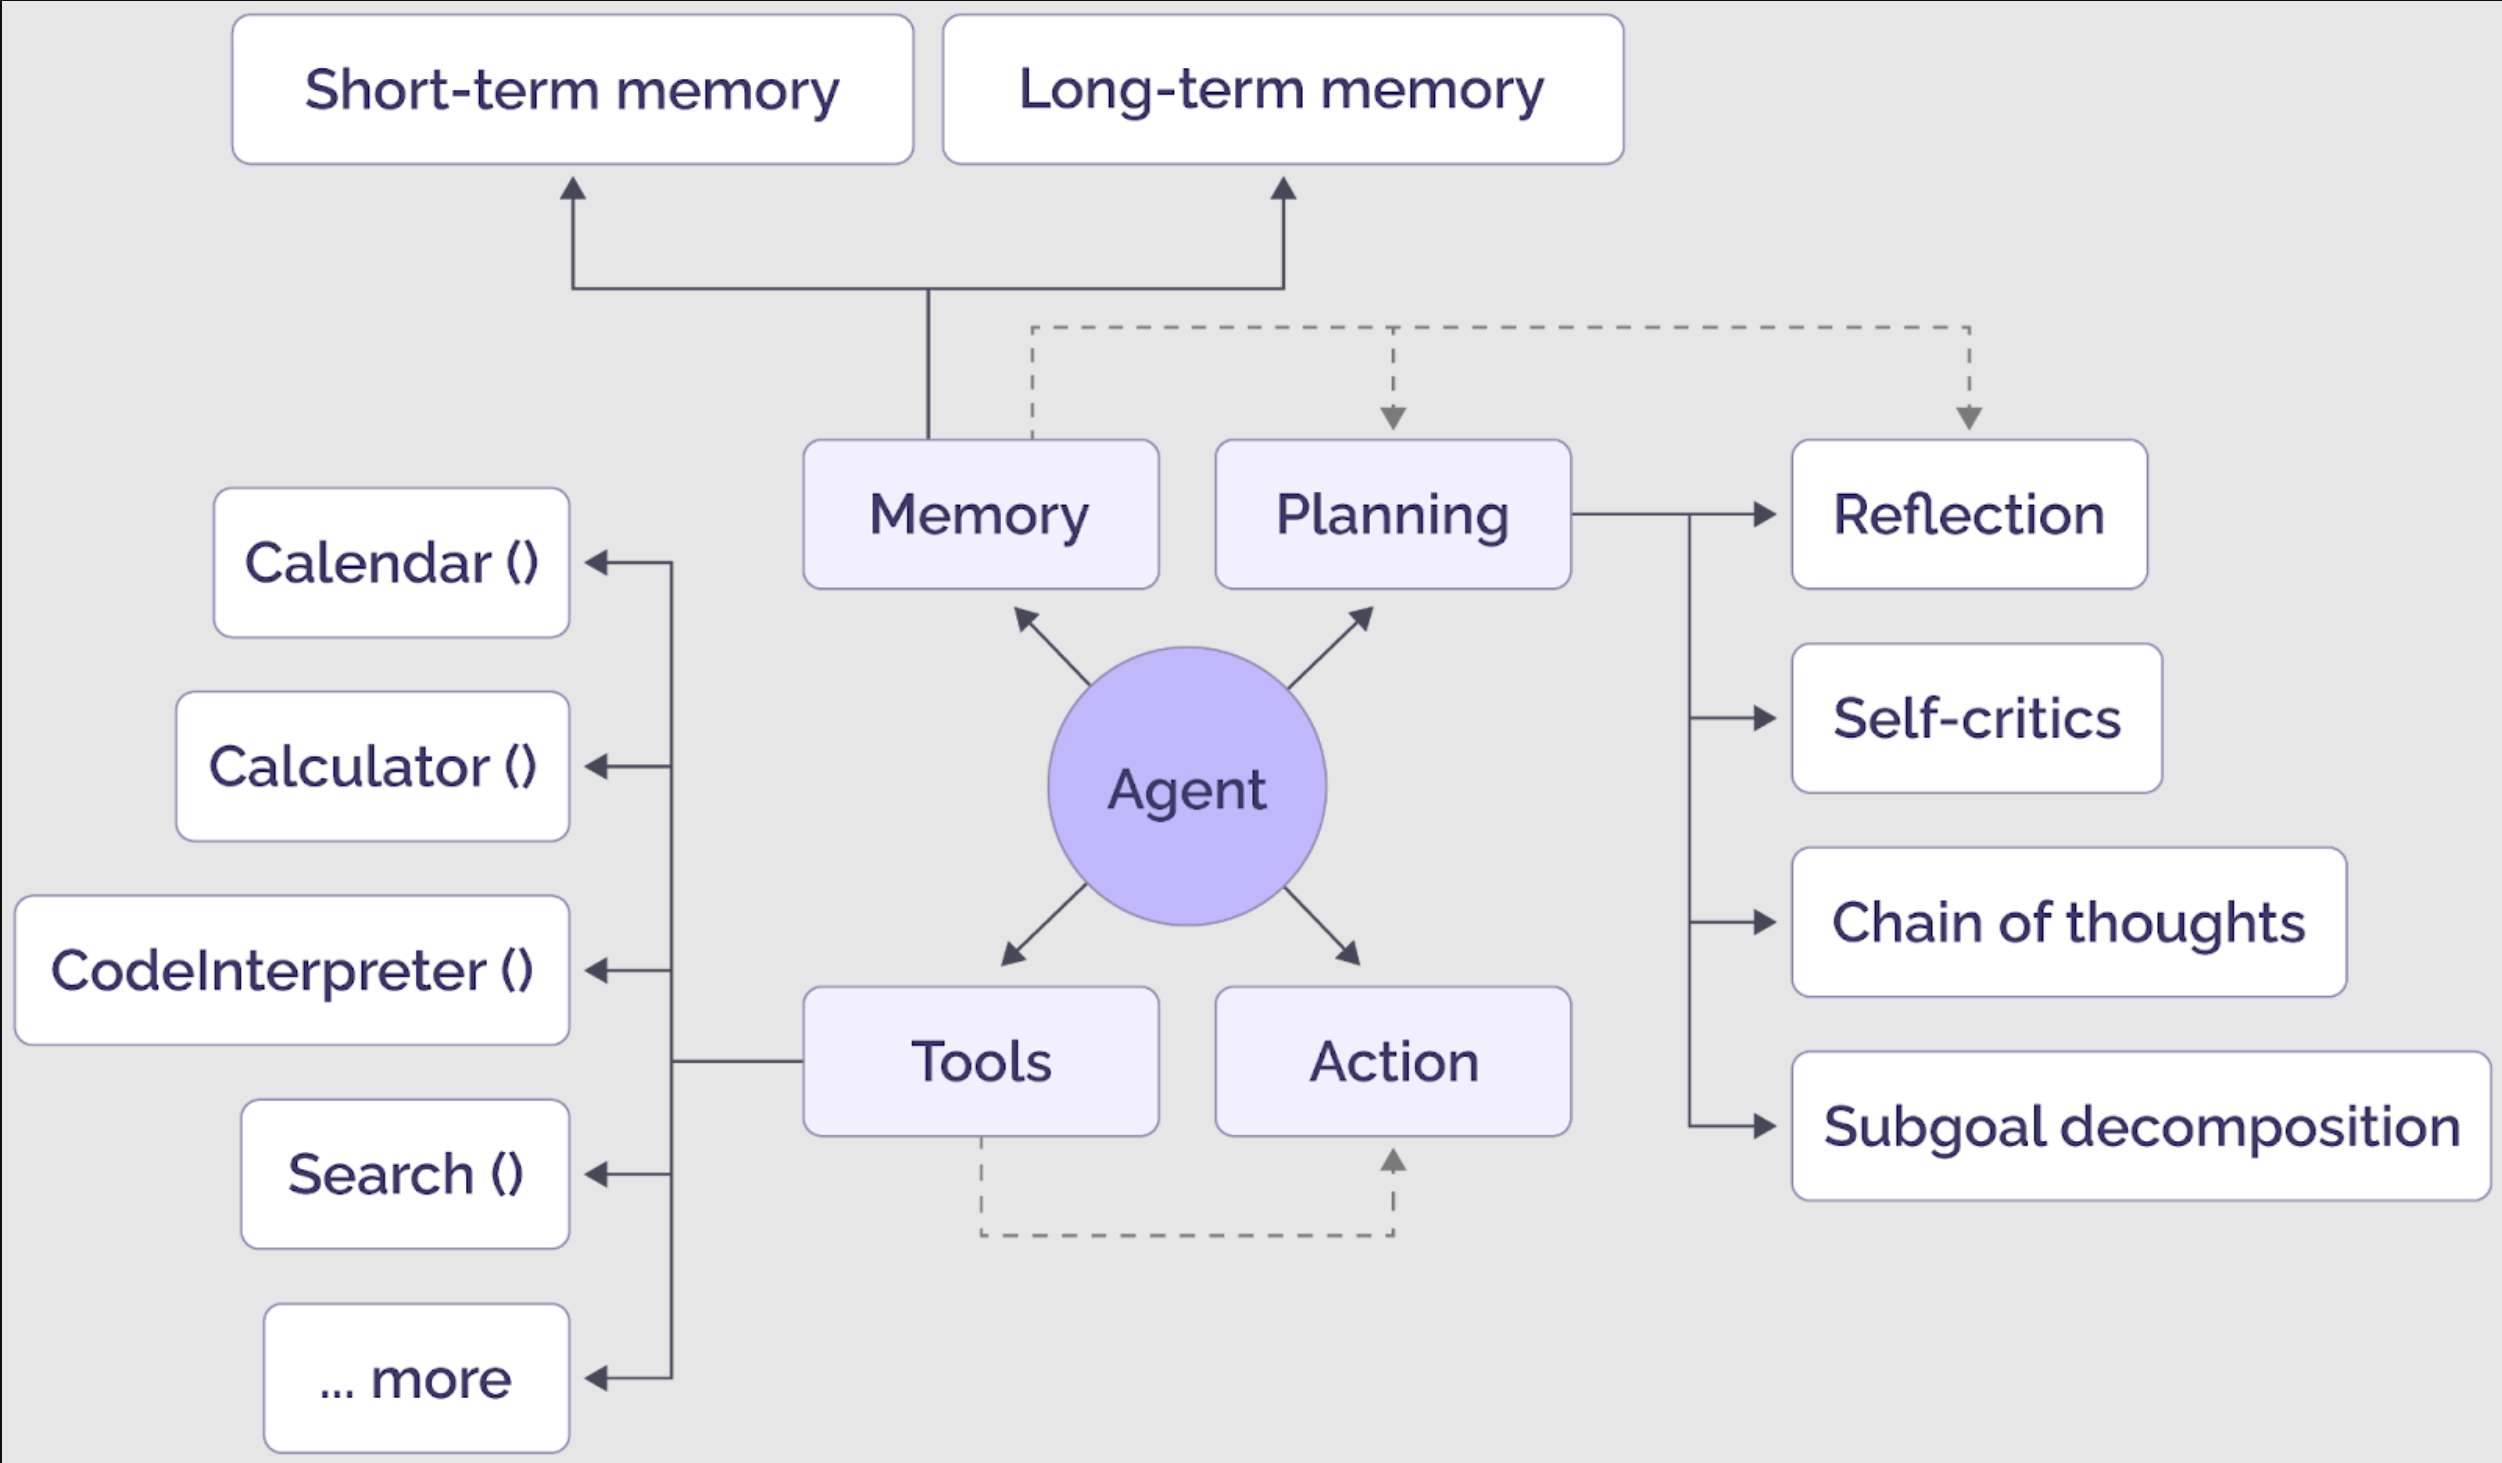
General components of an AI agent (source)
使用内存创建LangGraph智能体
LangGraph智能体可以创建短期或长期记忆。
具有短期记忆的智能体
在与LangGraph智能体的交互中添加持久性的最简单方法是通过检查指针。为此,在编译LangGraph智能体时,必须将内存对象(内存中或第三方)传递给检查指针属性。例如:
graph.compile(检查指针=内存)
对于ReAct智能体,您可以将内存对象传递给create_ReAct_agent()函数的检查指针属性。
接下来,在调用图时,您必须传递包含thread_id键值的可配置字典。内存与此thread_id相关联。
这里有一个例子。
Copy
![]()
Copy
You can see that the agent remembers that we are asking a question about Christiano Ronaldo. However, one drawback of short-term memory is that it is not shared between multiple sessions or threads. For example, if you change the thread_id and ask the same question, the agent will not understand the follow-up query.
Copy
![]()
短期记忆的另一个缺点是,整个聊天历史可能不适合模型上下文窗口。较长的聊天历史可能很复杂,并且经常在智能体反应中引入幻觉。
具有长期记忆的智能体
最近,LangGraph引入了长期内存,您可以在多个线程之间共享。您还可以从用户对话中提取事实,并将其添加到长期记忆中,从而形成更短、更强大的聊天环境。
您可以使用LangGraph的InMemoryStore类来管理和存储长期记忆。此类在命名空间中存储内存,每个命名空间可能包含多个内存。每个内存都有一个内存ID,而上下文和内容是键值对。
以下脚本显示了使用put()方法在InMemoryStore对象中存储长期内存的示例。
Copy
You can see memories in a namespace using the following script:
Copy
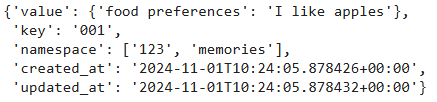
Now we will create another memory for the same user:
Copy
![]()
You can see two memories in the memory store now. Let's see how you can create a LangGraph agent that uses LangGraph's long-term memory.
We will create a tool that accepts the memory ID, content, and context and inserts them in a memory store. The tool also accepts the configuration dictionary containing the user ID and the memory store object.
Copy
If the memory ID is not passed, it creates a new memory ID; otherwise, it updates the content of the passed memory ID.
We will define the update_memory function to add to our LangGraph agent node. It will receive the graph's state, the configuration dictionary, and the InMemoryStore object. The function extracts the memory content and context from the graph's state and the user ID from the configuration dictionary.
Copy
The function passes these values to the upsert_memory tool. The update_memory function adds the tool's response to the state. Next, we define the run_llm() function, which extracts memories from the InMemoryStore object using the user ID and invokes the LLM model using the memories and the user's new query.
Copy
The last step is to define the tool_exists function, which decides whether we need to store user facts in memory.
Copy
Finally, we will create our LangGraph agent that uses long-term memory to respond to user queries:
Copy
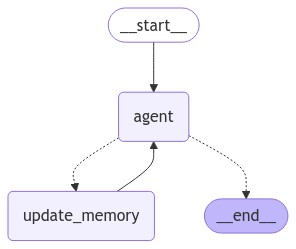
The agent is similar to the ReAct agent we created earlier but maintains a long-term user memory. Let's test the agent.
Copy
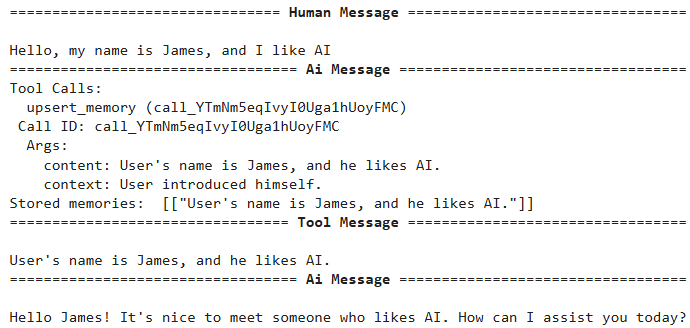
You can see that the agent called the upsert_memory tool and inserted some user information into long-term memory.
Copy

这表明智能体记住了用户信息。由于这次没有什么可添加到内存中的,智能体没有调用任何工具,而是直接响应用户。
LangGraph默认内存选项的问题
虽然LangGraph提供了几个默认选项来存储内存,但它有一些缺点:
短期记忆不会在多个会话和线程之间共享。
内存上下文可以超过LLM模型上下文;在这种情况下,您必须修剪或总结记忆以适应模型上下文。
极长的记忆背景可能会在LLM模型中引发幻觉。
LangGraph的默认长期记忆解决了与短期记忆相关的大多数问题。然而,即使使用LangGraph的默认长期记忆,从对话历史中生成和更新事实并使现有事实无效以获得最新的用户信息也是具有挑战性的。
这就是Zep的长期记忆发挥作用的地方。
Zep试剂长期记忆
Zep是一个为AI智能体设计的存储层,它解决了上述默认LangGraph短期和长期存储的几个局限性,同时提供了额外的功能。
Zep的存储层会根据用户交互和业务数据不断更新知识图,从而随着事实的变化而更新。在与用户对话期间,会收集新信息,并将取代的事实标记为无效。开发人员可以通过单个API调用从知识图中检索最新的事实,通过将LLM建立在相关历史数据中来提高响应质量。这消除了存储整个用户对话并通过提示工程技术提取事实的需要。
您可以通过以下pip命令安装Zep云库:
Copy
To use Zep cloud, import the Zep class from the zep_cloud.client module and instantiate it by passing the Zep API key. You can create or retrieve an existing API key from the Projects section of your Zep cloud.
Copy
To add memories for a user's session, you need first to add the user and then the session. Users have a one-to-many relationship with sessions. The Zep client's user.add() method adds a user to the Zep cloud, and the memory.add_session() method adds a new session. The script below defines a dummy user and the session to add to the Zep cloud.
Copy
Let's define a dummy chat history between the user and an agent.
Copy
To populate a Zep session, you must pass a list of zep_cloud.Message type objects. The following script accepts a list of chat history messages and converts them to a list of zep_cloud.Message type objects. You must pass values for the role_type, role, and content attributes for each Message object. Finally, you can add messages to a session using the memory.add() method.
Copy
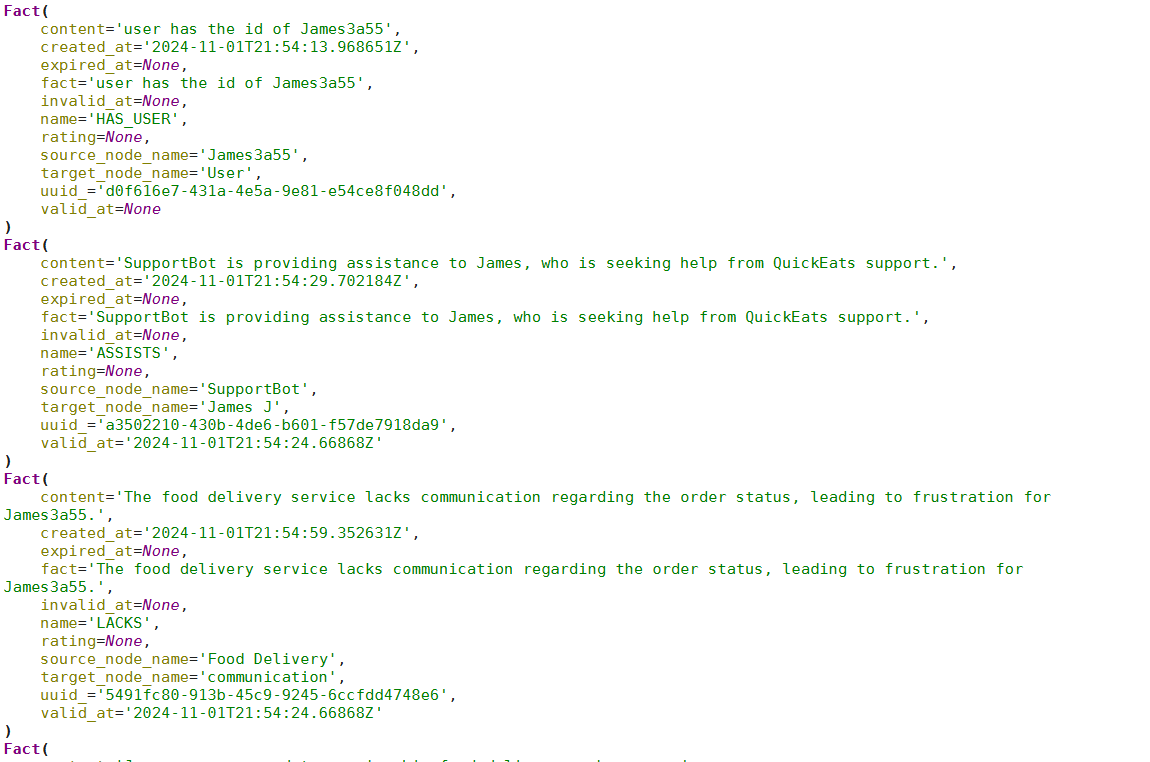
Once you have messages in session, you can retrieve all facts about a user from all the sessions using the user.get_facts() method, as shown below.
Copy
If you are only interested in retrieving facts from a relevant session, you can call the memory.get() method, providing it the session ID. Subsequently, you can retrieve session facts using the relevant_facts attribute.
Copy
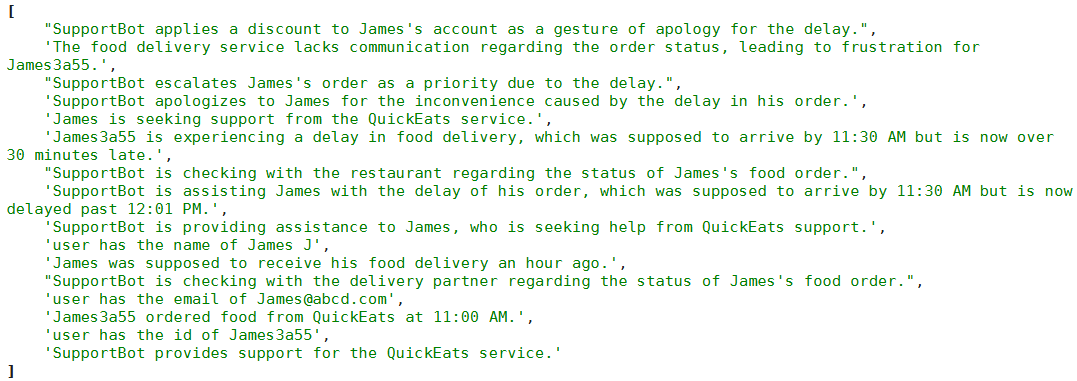
The output above shows all relevant facts for a specific user session.
把它放在一起:一个带有Zep的LangGraph智能体
现在你知道Zep的长期记忆是如何工作的,让我们来看看如何使用LangGraph智能体开发一个智能体,该智能体利用Zep的长时记忆来存储用户事实。智能体响应将基于Zep记忆中的用户事实。
我们将定义一个图状态,用于存储来自不同节点、用户名和会话ID的消息。接下来,我们将创建search_facts工具,该工具使用Zep客户端的memory.search_sessions()方法查找与查询相关的用户事实。
Copy
search_facts工具已添加到LLM中。我们还创建了ToolNode类的一个对象,该对象用作调用工具的方法。
随后,我们定义了chatbot()方法,该方法充当图的起始节点。此方法获取当前会话的相关用户事实,并在系统提示中将其传递给LLM。请注意,系统提示告诉LLM充当财务顾问,并使用用户事实来提供自定义响应。
Copy
使用memory.add()方法将LLM响应添加到当前会话的Zep内存中。Zep将自动从这些消息中获取事实。请注意,与LangChain长期内存不同,在使用Zep内存时,您不必进行任何即时工程来提取和保存事实——一切都是在幕后为您完成的。
最后,我们将消息状态中的消息修剪到最后三个,因为我们不需要完整的消息历史记录。我们使用Zep用户事实来维护对话中的上下文。
我们将定义一个名为should_concontinue的方法,并将其添加到条件边,以决定LLM是应该调用search_facts工具还是直接向用户发送响应。
最后,我们定义LangGraph并打印图形。
Copy
上图类似于ReAct代理,其中工具节点现在调用search_facts工具。接下来,我们将定义extract_message()函数,该函数从graph.invoke()方法返回的响应中提取消息。
Copy
最后,我们定义graph_invoke()函数,该函数接受用户查询、用户名和会话名称(以下脚本中的thread_id),并返回LangGraph代理的响应。
Copy
To test the agent, we will create a new session for a dummy user and add the user and the session to the Zep cloud memory.
Copy
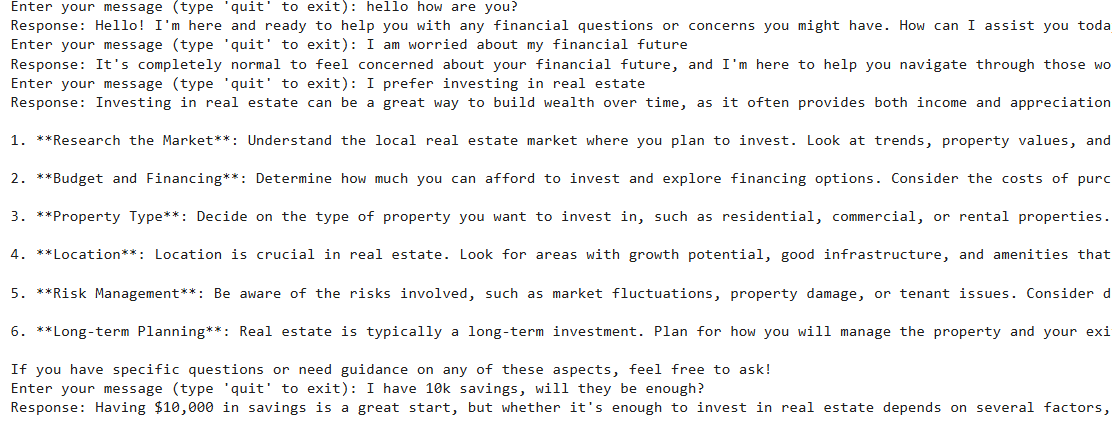
接下来,我们将执行一个接受用户输入的while循环;使用用户名、会话ID和用户输入调用graph_invoke()方法;并在控制台上打印代理的响应。
Copy
让我们通过提供一些信息来测试代理。
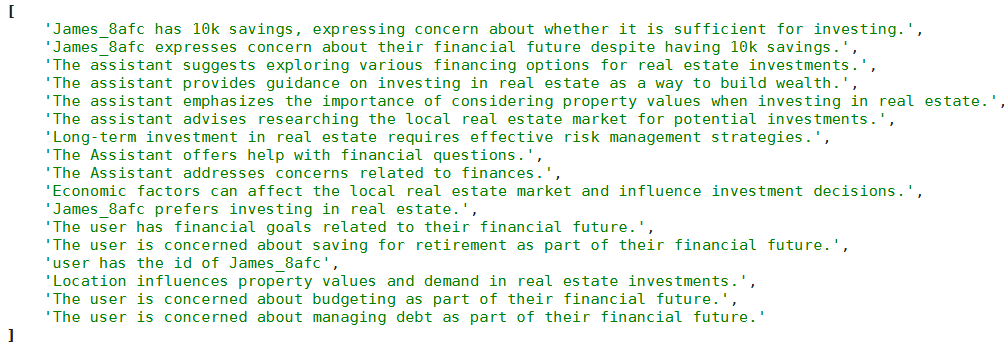
您可以检查会话以查看代理存储的有关用户的事实。
Copy
Let's ask a question to verify that the agent can access the user facts.

您可以看到智能体拥有有关用户的所有信息。Zep存储器存储有关用户的重要事实,您可以使用这些事实来避免幻觉并改善个性化的客户体验。
构建LangGraph智能体的指南
以下是您在与LangChain智能体商合作时应该遵循的一些指导方针:
请记住,LangGraph是由LangChain的创建者构建的,但也可以在没有LangChain的情况下使用。它是构建AI智能体的一个更强大的框架,因为LangGraph允许您定义涉及循环的流,这对大多数智能体架构来说都是必不可少的。
工具是LangGraph智能体不可或缺的一部分,但不应过度使用。仅实现工具来获取LLM智能体默认情况下不具备的信息。
工具描述应尽可能详细。这将帮助智能体为任务选择正确的工具。
一个智能体的好坏取决于它的上下文。根据您的要求,将过去对话中的所有相关信息存储在短期或长期记忆中。
第三方SDK(如Zep)可以通过自动管理内存和存储对话事实,让您的生活更轻松,从而获得个性化的用户体验。
最后的想法
LangGraph智能体提供了一种灵活的方法来开发复杂的LLM应用程序。本文通过详细的示例解释了LangGraph智能体以及如何实现它们。添加外部工具使智能体能够检索外部信息,在对话中持久化内存使LangGraph智能体能够提供情境化的响应。
Zep的长期记忆存储对话上下文和用户事实。Zep在提取相关用户事实方面快速高效,从而产生更好、更个性化的用户响应。结合Zep的长期记忆帮助智能体记住用户事实,使其能够提供个性化的响应。
- 登录 发表评论
- 127 次浏览
最新内容
- 1 week 1 day ago
- 2 weeks 2 days ago
- 2 weeks 6 days ago
- 2 months 1 week ago
- 6 months ago
- 6 months ago
- 6 months ago
- 6 months ago
- 6 months ago
- 6 months ago