
category
在分布式系统和微服务架构的背景下,协调不同组件之间的通信带来了重大挑战。然而,随着Amazon Bedrock Agents的推出,市场格局正在不断演变,提供了一种简化的代理创建方法和无缝集成的控制能力。在这篇文章中,我们探讨了亚马逊基岩代理如何彻底改变代理创建,并展示了控制能力的回归在协调多个系统之间的复杂交互方面的功效。
Amazon Bedrock Agents简化了分布式系统中代理的创建、部署和管理。通过使用AWS Lambda和AWS Step Functions的强大功能,Amazon Bedrock agent抽象了代理实施的复杂性,这意味着开发人员可以专注于构建健壮且可扩展的应用程序,而无需担心基础设施管理。
您可以在Amazon Bedrock中的各种场景中使用代理,在这些场景中,您需要处理将控制权归还给用户或系统的问题。用例包括会话助手、任务自动化、决策支持系统、交互式教程和演练以及虚拟助手。在这些用例中,代理的关键方面是它们处理将控制权返回给用户或系统的能力。这允许更自然和响应更灵敏的交互,用户感觉可以控制流程,同时仍然受益于代理的指导和自动化功能。
解决方案概述
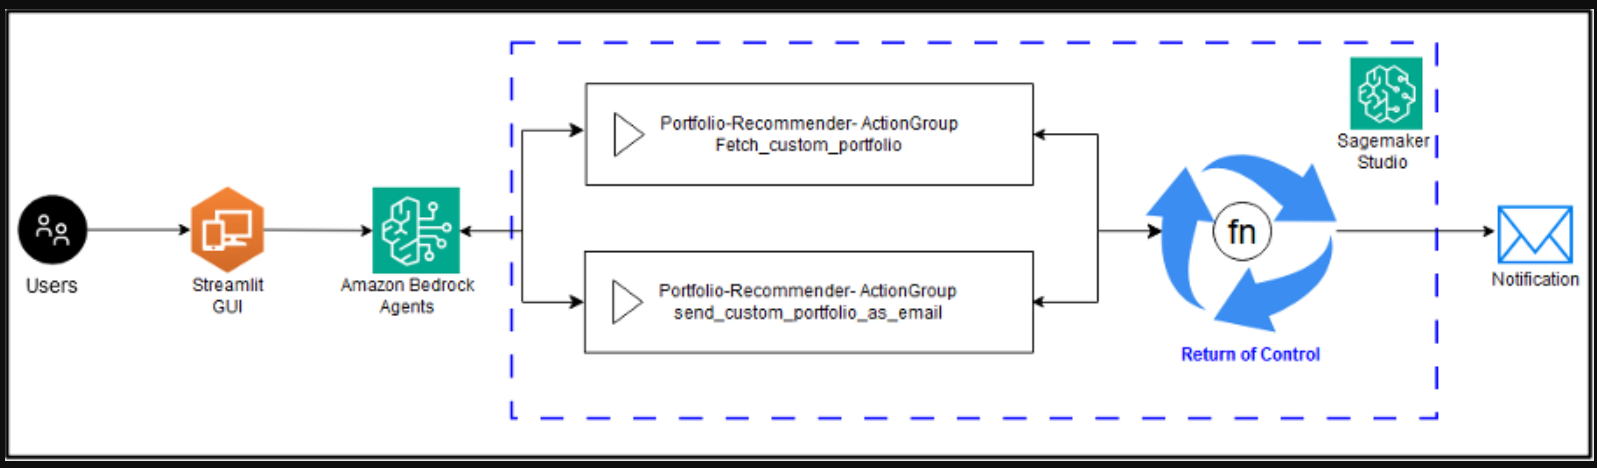
在这篇文章中,我们演示了使用亚马逊基岩代理的自动化个性化投资组合解决方案。该解决方案调用第三方API来获取用户当前的投资组合。然后,使用Amazon Bedrock上可用的基础模型(FM)对这些进行分析,以根据最终用户提供的输入生成建议,展示与Amazon Bedrock Agent集成的控制能力的恢复。
该解决方案结合了同步数据检索和生成式人工智能,提供量身定制的投资建议,以符合用户的特定财务目标和风险承受能力。通过结合机器学习(ML)和仿真技术,该系统可以生成个性化的投资组合并评估其潜在性能,确保推荐的解决方案针对个人需求进行优化。
使用Amazon Bedrock代理,将控制权返回给调用代理的应用程序的能力可以在应用程序级别处理外部函数和业务逻辑,而不是使用Lambda函数。这样,应用程序可以管理外部交互并在代理继续编排的同时返回响应。下图对此进行了说明。
The option to return control is particularly useful in two main scenarios:
- Calling an API from an existing application rather than building a new Lambda function with the required authentication and networking configurations
- Handling tasks that might run longer than 15 minutes and can’t be accommodated through a Lambda function, instead requiring containers, virtual servers, or workflow orchestration tools such as AWS Step Functions
The following sample code uses Amazon Bedrock Agents with handling return of control in the code. With the Amazon Bedrock Agents feature, you can manage Amazon Bedrock Agents return of control in your backend services and simplify application integrations. To demonstrate this, we have the following four code snippets: external-bedrock-agent-api.py, streamlit-app-portfolio-recommender.py, Portfolio-Recommender-CFN-Template.yaml, and requirements.txt, along with detailed steps to replicate the scenario.
The external-bedrock-agent-api code implements a portfolio recommendation system using Amazon Bedrock Agents and Flask. Here’s a high-level overview of the functions used:
- fetch_user_data: Processes user profile information such as risk tolerance or investment goals
- generate_portfolios: Creates sample investment portfolios with different risk levels
- fetch_custom_portfolio: Combines user data and portfolio generation
- send_custom_portfolio_as_email: Sends portfolio recommendations by email using an Amazon Simple Email Service (Amazon SES) verified email identity
- /sns-handler endpoint: This API endpoint receives POST requests with user investment preferences, processes the message containing user preference details, invokes the Amazon Bedrock agent to generate recommendations, and handles email communication of the recommendations
The streamlit-app-portfolio-recommender code is a Streamlit web application for investment portfolio recommendations. The code sets up the webpage with a title and configuration. The app collects several pieces of information through form elements:
- Email address – Text input
- Financial goal – Dropdown with options for retirement, wealth accumulation, and passive income
- Risk tolerance – Dropdown with options for low, medium, and high
- Investment horizon – Dropdown with options for short-term and long-term
- Environmental, social, and governance (ESG) preference – Checkbox for environmental, social, and governance preferences
- Email preference – Checkbox for receiving recommendations by email
The system operates through a Portfolio Generation Function that actively sending POST requests to a local API endpoint. This function transforms user preferences into JSON data and delivers either an API response or error message back to the user.
The process to display results begins when user click the Submit button, which triggers the custom_portfolio function with their specific inputs. The system then displays the portfolio recommendation in a text area for successful executions, while immediately alerting users with an error message if any issues occur during the process.
Solution walkthrough
Follow the steps to set up the environment and test the application in the US East (N. Virginia) us-east-1 Region.
To enable Anthropic’s Claude model on Amazon Bedrock in your AWS account:
- On the Amazon Bedrock console, in the left navigation pane under Amazon Bedrock configurations, select Model access
- Select Claude 3 Sonnet, as shown in the following screenshot

- To create the Amazon Bedrock agents, related action groups, Amazon SageMaker AI domain, sample user profile, and JupyterLab space, follow these steps:
-
- Invoke the AWS CloudFormation template at Portfolio-Recommender-CloudFormation-Template.yml
- Give a name to the stack
- Provide an email address for the
EmailIdentityParameter

- Select the checkbox to acknowledge that the template contains AWS Identity and Access Management (IAM) resources, as shown in the following screenshot

- Monitor AWS CloudFormation until it completes the resource creation process. You can verify the successful deployment by checking the Stack details output tab, which will display the
AgentIdandAgentAliasIdvalues, as shown in the screenshot below.

You will receive an email address verification request email from AWS for in the US East (N. Virginia) Region. Select the link in the email to verify.
After creating your CloudFormation resources, follow these steps to access Amazon SageMaker Studio:
- On the Amazon SageMaker AI console, under Admin configurations in the left navigation pane, select Domains
- Select the bedrock-return-of-control-demo domain created by the CloudFormation template, as shown in the following screenshot

- Select the User profiles tab
- To open the SageMaker Studio environment, under User profiles, next to the sagemakeruser profile on the right, select Launch. From the dropdown menu, choose Studio, as shown in the following screenshot

You should now observe the SageMaker Studio home page. This environment is where you will execute Python scripts to set up your application.
To access the JupyterLab environment for this lab, follow these steps:
- On the SageMaker Studio console, in the left navigation pane under Applications, select JupyterLab
- You’ll find bedrock-agent-space that has been preprovisioned for this lab. Its Status should be Stopped. On the right side under Action, choose Run
- Within 30–40 seconds, the JupyterLab application status will change from Starting to Running

- When it’s running, under Action, choose Open, as shown in the following screenshot

Three required files are copied under the /home/sagemaker-user/scripts directory: two Python files (external-bedrock-agent-api and streamlit-app-portfolio-recommender) and one requirements.txt file, as shown in the following screenshot. The JupyterLab application environment is under the default directory.

- In the File menu, select New. In the dropdown menu, select Terminal to open a new terminal window, as shown in the following screenshot.

-
Go to the scripts directory where you have the required files in the terminal and enter:
-
Enter the following command on the terminal:
-
Open a new terminal and go to the
/home/sagemaker-user/scriptsdirectory and enter: - From the command execution in the terminal, note the port number (8501) and studio URL from the browser. The URL will be in the format of:
https://{domainid}.studio.{region}-1.sagemaker.aws/jupyterlab/default/lab/tree/scripts - To access the Streamlit app, modify the Studio URL, replacing everything after the default/ lab/tree/scripts with proxy/[PORT NUMBER]/. The modified Streamlit UI URL will look like this:
https://{domainid}.studio.{region}.sagemaker.aws/jupyterlab/default/proxy/8501/ - Select all appropriate inputs for generating your custom portfolio recommendation. Choose whether you prefer to receive email notifications or inline recommendations through the application interface by checking the corresponding box. Then choose Submit. Provide the same email address that was verified earlier in this walkthrough.
The sample output and email response are shown in the following demo screenshot.

Cleanup
When you’re done, delete resources you no longer need to avoid ongoing costs. Follow these steps:
- Go to the SageMaker AI JupyterLab environment and stop the Amazon SageMaker Studio application or running instance
- Delete the resources created by deleting the CloudFormation stack.
The following screenshot demonstrates how to view and stop running instances in the SageMaker AI JupyterLab environment. For more information, refer to Delete a stack from the CloudFormation console.

亚马逊Bedrock 智能体收回控制权的考虑因素
在实施控制权回归时,请考虑以下因素:
- 控制返回性能考虑因素——在实现控制返回时,开发人员应专注于优化操作执行时间和响应处理。每个动作都应该在合理的时间范围内完成,以保持对话的流畅性。考虑为频繁访问的数据实现缓存机制,并促进控制周期返回之间的高效状态管理。应用程序的设计应能有效地处理并发用户会话,同时保持响应性。
- 控制权的回归限制——必须使用明确的输入和输出模式来定义操作。每个动作都应该是原子性的,并专注于特定的任务,以保持简单性和可靠性。考虑请求和响应的有效载荷大小,因为可能存在大小限制。动作按顺序执行,系统需要在整个交互周期中保持对话上下文。
- 安全建议——安全实施要求所有操作都有适当的身份验证和授权机制,在定义权限时遵循最小特权原则。处理前必须验证输入参数,并进行全面的错误处理。应实施速率限制和请求验证以防止滥用,敏感数据处理必须符合安全要求,并包括用于审计跟踪的适当日志记录机制。此外,实施输入过滤以防止提示注入攻击,配置响应过滤器以保护敏感信息,并为输入和输出设置内容扫描。部署基于正则表达式的响应过滤,以帮助防止个人身份信息(PII)暴露,并建立内容审核过滤器来阻止不适当的内容。
- 监控和可观察性——对所有操作执行和响应进行全面的日志记录。监控关键指标,如操作执行时间、成功率和错误率。为异常模式或故障设置警报。使用Amazon CloudWatch监控系统运行状况和性能。考虑实现跟踪,以跟踪系统不同组件的请求流。定期审查指标和日志有助于识别潜在问题和优化机会。
结论
在这篇文章中,我们演示了Amazon Bedrock agent如何使用控制返回功能简化代理创建,并简化微服务之间复杂交互的编排。通过抽象基础设施管理并提供与应用程序的无缝集成,Amazon Bedrock Agents使开发人员能够轻松构建有弹性和可扩展的应用程序。随着组织采用微服务架构和分布式系统,亚马逊基岩代理等工具在加速创新和推动数字化转型方面发挥着关键作用。
Resources
For the most current and specific information, refer to:
- 登录 发表评论
- 12 次浏览
最新内容
- 6 days 23 hours ago
- 1 week 3 days ago
- 1 month 4 weeks ago
- 5 months 3 weeks ago
- 5 months 3 weeks ago
- 5 months 3 weeks ago
- 5 months 3 weeks ago
- 5 months 3 weeks ago
- 5 months 3 weeks ago
- 5 months 3 weeks ago